Friday, June 28, 2013

M261 dedicated .22 LR upper build Prototype part 2


 Now that we have the barrel turned to the correct specs we need to focus on the "barrel extension" part of the build and mill it so it will work in combination with the M261 bolt conversion. We will need to make four cuts (5 if you are using a blank barrel) the first cut will be at the top dead center, this is made to clear the charging handle as the extension goes further into the receiver. The second cut is made on the bottom to clear the magazine you just need to cut away enough to offer proper clearance. The next two cuts are made using a woodruff cutter. Luckily I had the two sizes I needed already on hand so for once I didn't need to buy tooling for a project! The right side of the extension gets a 1/8" slot milled for the extractor and the same for the left side for the wire that helps retain the case (this cut may need hand finished with a round file so the wire does its job). The left side is then cut again for the bolt guide rod. You must measure this cut correctly or the bolt will not seat in and cant possibly causing undue stress and twisting on the whole unit.  I will get more detailed pictures up of each cut. This was the prototype so its not really pretty.


Top has been milled off, slot for extractor is milled (note new garage walls being put up)


View of extractor slot, over sized a little but it will work.


Left guide rod slot being milled


Wednesday, June 26, 2013

M261 dedicated .22 LR upper build Prototype 1


The M261 .22 LR conversion is great for what it was designed for....general familiarization of the weapon platform with accuracy taking a backseat to trigger time and dynamics. With this in mind more and more "designated uppers" as they are called in .22 LR have been manufactured. Some of these are costly and take proprietary parts which may be hard to obtain from time to time. My idea here is to make my own dedicated upper in .22 LR using the M261conversion bolt as a host bolt and a "demilled" A1 upper receiver.  I acquired a pair of these A1 upper receivers cheap and needed to put them to use . I wont say my idea here is original, however I have not seen an example in person and I'm pretty sure this has been done using the M261 bolt before.  I'm starting with a Marlin 60 take off barrel I happen to have a few of in the old parts box. The idea is to use M16A1 upper parts to build a trainer rifle that is more accurate than just the barrel conversion used in the M261.

Since barrel length is not so much of an issue with .22 LR we will go with a 16.25" barrel. I've kind of always liked the looks of the dissipator AR-15 sight radius and shorter barrel length but have never felt the need to have one in .223/5.56 I thought the design could be applied to my project here.

Below is mostly pictures of my yet to be tested prototype. I need to spend another hour or two on it and it will be up and running. I put this all together in about a day...most of that time spent hunting for tools and putting the shop back together as we just had a new garage floor poured.


Shortened barrel with muzzle end turned to fit M16A1 triangle end cap and Front sight.
Bushing needs fitted, final length determined and threaded. 

 Above and below we see the start of what is to be the modifications needed to morph the old Model 60 barrel into what we need it to be for our project.


Barrel being turned to fit M16A1 front sight and end cap

 We started with 1 1/4" mild steel round stock for the barrel bushing (pictured below) Since the shank on the barrel was close to 5/8's I chose to drill the center of the bushing to 5/8's and then fit the dedicated barrel closely to that.


Roughed out barrel bushing ready for final fitting.


Final turning of the bushing collar.

Above we see the bushing being shortened up a little, Here is where my prototype took a wrong turn but more on that further down.


Test fit


Ready for a barrel


Barrel bushing fit is very important as it must be tight since this is where the accuracy comes from. Note on above picture the upper receiver is missing the area under the ejection port, this was bashed in to "demil" the receiver, why? I'm not sure. I have it on good authority you can not bend and weld 7075 alum so I removed this lower section, it should not greatly hinder anything with this particular build.


Barrel press fitted into the bushing, for future designs this should be pinned into place.


Note barrel bushing stick out into upper rec.

The place where this prototype took a wrong turn was in the distance the bushing goes into the upper receiver. I measured wrong somewhere and made the bushing nearly 1/4" too short, what happens is the bolt goes too far forward and binds on the magazines. This will be a easy fix 


Upper mocked up to take a look at the progress. The "Ohio" hand-guards were the only spare ones I had around, they were left over from team shoots.


Threaded for 1/2x28 

Now politicians can worry.......its the dreaded bird cage. 

The flash hider and threaded barrel are really not needed for this particular build but I chose to thread it and put one on as it makes the build look more complete and is a nice finishing touch. The fact that this is a trainer upper also pushed me to put one on as when I'm working with trainee's this will be closer to what they may find "off the shelf" also it protects the muzzle which tends to find its way into the floor from time to time if shooting prone.

Mocked up again with the flash hider installed. Rubber bands make a dandy quick delta ring.


So from here we will need to mill the barrel bushing to accept the M261 bolt, drill and pin the front sight base in. The fix for my mistake can be done one of two ways, either make a whole new bushing which wont be hard or further modify the barrel to extend a little farther into the receiver. either way I will have to pin the front sight base a little farther forward than initially intended as the distance between the delta ring and the end cap would be too short. I plan on making a few more of these uppers once I get all the kinks worked out. Recycling has never been so cool......


Tuesday, June 18, 2013

SKS gas valves

Parts get corroded and wear out, especially if those parts are on firearms fired with corrosive ammunition from countries where cleaning may not have been top priority. I have a Yugoslavian SKS that has severe gas leakage and causes the rifle to short stroke the bolt carrier sometimes. Now I have heard that Yugoslavian ammo tends to be a bit hotter than the Russian Tula and Wolf imported ammo but I have not shot any in my rifle so I do not know if that is necessarily true or not. I have only shot Wolf/Tula through my gun which short cycles from time to time.

If you have a SKS that is short cycling one easy way to see if you need a new gas valve is to slip a O-Ring over the gas valve and re-install it into the rifle and shoot a few rounds and see if it cycles more reliably, the O-ring will not last long as it will "blow out" or be forced out of the excess space between the gas valve and the gas tube. I used this quick test on a few SKS's before deciding to machine my own gas valves out of 5/8's Stainless.  I may choose to do other gas valves out of carbon steel in the future as the stainless is a little harder to machine as it is "gummy", that is a technical term....NOTE: I had planned to do a part 2 to my gas valve experiments however I figured it was better to just let the SKS's I had go down the road, even with the gas valves I machined and increased reliability, I realized I wasn't happy with the accuracy of the rifles and sent them on their way. Life is too short for headaches such as this.

What the O-Ring looks like after a few rounds.

Blown out O-Ring for testing purposes.

Tuesday, May 21, 2013

Some more observations on the 7.62x38R 1895 Nagant

I've had this gun for almost 2 years or so now. I've slugged the barrel after reading a few more articles saying the original bullet diameter was .295". That still makes me scratch my head a little, the example I have slugged to .302 lands and .312 grooves. So from that I'm good in both the cast and jacketed bullet area. Technically my cast bullets should be done up around .313 but with such a low power / low velocity caliber I'm not going to even worry about it, besides I haven't had significant leading yet. But a .295 bullet in a .302 bore? which is probably supposed to be closer to .300 I would like to get some more background on the thinking or reasoning there.

Another issue I've come to realize I do not think I mentioned in the original blog post was the cylinder advancing star is slightly off center. This I've found causes larger diameter rims to slightly jam up, so in addition to making the rims thinner you also may have to reduce their diameter. but this will vary from gun to gun, on my particular gun its enough to cause 3 of the chambers to be slightly off. If I had a rotary table for my mill I would see about fixing the cylinder but for now modifying the cases some more won't be too much of a hassle and will leave the gun stock still. It may be a project for down the road for this neat little gun, if you have not see my earlier post on reloading for this round click here .


Friday, March 22, 2013

Making a new front sight for a handi rifle in 30-30: or : 3 lbs of scraps for 1 lb of product


     Many experienced hunters and shooters can tell you there is not much to be desired over a quality single shot rifle. Accuracy, simplicity, reliability and versatility give this class of rifles a marked advantage over their more complex brethren. The NEF/H&R handi rifle has been an American favorite for these attributes for a while, yes they take some work to get them to really perform but there is little left to be desired for somebody on a budget. The best part of this line is the barrels swap out in a matter of seconds. These barrels are difficult to come by on the used market by themselves because they are favored by those frugal and utilitarian folks who have the host guns these go to and wish to get the most bang for their buck. Generally if you want additional barrels you must send your rifle into the company along with a check and they will fit what you want to your rifle. These set ups are wonderful if you can hunt deer in your area with a center-fire rifle and you are simply after putting meat on the table and not owning the newest and most advertised rifle/caliber/gear type stuff.  The single shot attribute is great for beginners and handloaders in a lot of ways. For a while I have been looking for a 30-30 rifle either a Marlin or Winchester lever action or a handi rifle. A few months ago my patience paid off and I purchased a 30-30 barrel for a NEF/H&R handi rifle for $90. The barrel came with a scope mount (no rear sight) and a front blade sight. Right away I ordered a Williams guide sight for the rear, after the first range trip with some handloads I noticed right away the rifle shot 3' high at 50 yards...VERY short front sight. This 30-30 needed some work before it would give me what I wanted out of it.

 I was told by a few people that the SB1 frame (mostly used for the shotgun frames) could be used in lieu of the SB2 (rifle frame, 30/06 .308 etc..) when using barrels for either the .357 magnum or the .30-30. From what I can discern these two chamberings along with perhaps a few others (.22 hornet?)  were offered on the SB1 frames before they were SB1 frames but I'm not going to make a sworn statement to that. The NEF/H&R single shot rifle and shotgun line has gone through lots of models but they have all pretty much been the same gun. Its just luck of the draw when buying spare barrels if they will fit your given receiver, you have to know how to check to make sure it is safe before firing. I will not get into how this is done just yet here, I need to get on about the front sight I made to get this rifle back on its feet.

The stock sight blade was much too short with the new rear sight it was obvious a taller front sight was needed in order to raise the point of impact. I tossed the idea around in my head for sometime and figured that with the 30-30 a wide range of bullet weights are used so having a front sight adjustable for elevation would work very well paired with my fully adjustable rear. I thought to myself "what is adjustable and easy to make".....AR-15 front sights of course!!!!!!! In this case I was going to be using A1 front sights since I like those much more than the A2 and I have a bunch of them in my parts box. For starters the A1 sight is threaded 8-36, which is a non standard tap...not hard to if you know where to look, don't go to lowes or menards thinking you'll find one....you wont, you'll just find 8-32 and get frustrated. The 8-36 tap needs a #29 drill bit as well, again not something super easy to come up with.  I started with a block of 6061 aluminum MUCH too big for what I needed, I should have known better but since I was prototyping kinda I let it slide. After I measured the barrel I found a tapered reamer that would work for final fitting of the block to the barrel. This was CLOSE , about a 80% contact fit, a few light taps of the hammer gets it very close to 100% front to back. 

This side view shows the sight slipped on the barrel, its about twice as long as it needs to be but that give me some room for error.

You can see here just how oversized I made the blank, its better to start out with too much material when prototyping than too little sometimes but this may be excessive.
I decided to make the base with sight protectors as the thin posts on the A1 sight can bend easily if abused, not to mention its a bit of a snag point, protectors help avoid those issues. Not to mention the final product kind of looks like the front sight to a No4 Mk1 Enfield. I had to shorten up the threaded portion on the sight post considerably as well as the plunger needed to index the sight. The spring was shortened in half as well. The spacing of the plunger hole and the front sight post holes is somewhere around .206" from their respective centers, The recess for the sight is dead on 3/8". This recess needs to be a square bottom hole, I used a bottom cutting 3/8's end mill to do this. You could use a standard drill bit I guess but I'm not sure how that would turn out.

Here you can see the holes for the plunger and the sight at the bottom of the sight channel created by the sight protectors. Note, if you look close you can see the step from 3/8" to 1/2" when I was trying to decide what I liked better.

Yeeeah.....a lot of wasted material....next time more time spent planning might prevent this.
The sight channel (the part you look down through) I made just under 3/4", I started out at 3/8" (which is roughly what the channel is on the AR-15) and quickly decided it needed to be wider. I went to 1/2" and it still needed to be wider. Since the sight block is out of aluminum the protectors needed to remain somewhat thick. I think where I ended up will prove to be a good balance of protection and field of view when looking through the rear peep sight. For the floor of the sight channel I also counter milled the front of it to reduce glare. This is caused from the fact I would be looking down onto a square surface when sighting down the rifle, its not a major thing but it helps when refining the sight quality.

Sight as seen looking down the barrel.
New front sight, Not a world class job but its a good first attempt. I could lighten it up a bit more but not by much . This slip over barrel design does tend to be a little blocky but it does have its advantages.


Tuesday, March 12, 2013

The surplus of the parts you have the guns to: or : My experience playing estate liquidator


Surplus parts, you hear about surplus guns...but not so much about their parts..parts are surplused just like the guns! Recently I liquidated the inventory of a parts dealers estate.  The task involved several weeks it seemed of cleaning, inventory and identifying parts but proved VERY educational. None of the parts shown here are for sale any longer but are examples of what I got to sort through.

Note I dealt with parts in this case, firearms are a whole other creature in legalities, Deal in those as you see fit.

My tips-
Take your time in sorting, be thorough
Take good pictures (if selling online)
Write good descriptions (if selling online)

This is the 3rd such estate I've dealt with, and every time I learn more and more about items and their value. I hope in the future to be able to build something perhaps with the knowledge I've gained through selling these estates. A online parts store or perhaps something else.


I had to improve my photography skills a lot in order to get the quality of picture I wanted to be able to show in my listings. Pictures truly WORTH 1,000 words. Though that did not stop some from asking stupid questions.

Odd ball parts like this barrel straightness gauge surprised me a little as it was little more than a pipe it seemed but it was worth $30 to somebody as they pounced on it quickly when I listed it.


Having never dealt in grease gun parts before this was more of an education than I thought it would be!


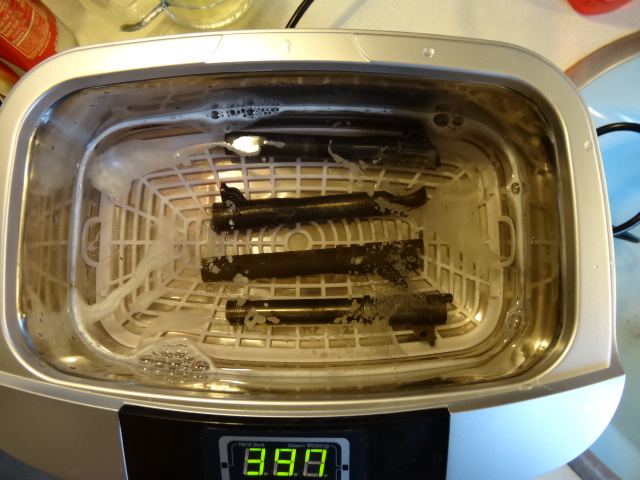
This ultrasonic cleaner took some of the elbow grease out of the cleaning process, here a small lot of 1911 barrels are being cleaned.

Same with 1911 plastic grips

They looked clean before but the dark water I poured out of the cleaner after running 2 batches through said otherwise. Now they are ready for "market".


Saturday, March 9, 2013

Modifying a M14/M1A magazine for use in a AR-10


I give some people ideas I really shouldn't, a friend was looking for spare mags for his AR-10 and I thought "hey I can make some out of Import M14 mags for you" never having tried it before....My last trip to Knob creek had yielded  a small lot of M14 korean import magazines new in the wrap I thought perfect for the job. The first thing I realized is the mags are VERY close....but the AR-10 mag costs $45+ or so new and my Korean imports were under $10. 

AR-10 magazine on the left, Korean import M14 magazine on the right.


First thing was to take both mags apart and see if there were any limiting factors involved in the modification.
The spine of the two mags showed the biggest difference. The tab on the import magazine serves as the catch for the M14 magazine release, there is no such tab on the AR-10 magazine meaning you could not use the AR-10 readily in a M14. Also note the tab on the follower of the AR-10 magazine, this travels in the channel formed in the spine of the magazine, this serves as your bolt hold open after the last round has been fired.  The M14 magazine follower does not have this feature nor could it be easily modified to work in this way. After the modification the follower itself stops the bolt, much like that on some AK-47 mags, when you pull the magazine out the bolt goes home. I realized these magazines would serve well at the range but I would not want to rely on them for serious social encounters without making a modified follower. I had a idea for a spring loaded tab but it would have been more work than what was needed for this modification.

The difference in the spine and followers can be seen here. The tab on the AR-10 follower left is your bolt hold open, our mags would not have this yet the bolt will stop on the follower itself much like some AK-47 magazines.

Here I am pointing out a ridge formed in the magazine feed lips, it was enough to cause  a little hangup if you try to load these into the magazine too fast.


 I don't have any pictures of the modification for the magazine latch hole, pretty much if you have an original magazine you need to follow that same angle and size, GO SLOW, if you know when not to use a dremel this is one of those times, you may rough out the hole with a dremel but after you get to about 75% you use a square file to true it up. If you do a bunch of these its worth it to make a cutter for that particular size hole.


Here I'm using a woodruff key cutter to make the relief needed in the magazine body for the bolt hold open.

Its pretty easy to modify these cheaper magazines to work in a AR-10, Just go slow and check your work often. Be sure not to crank these magazines into a vice really tight as you will squish them EASILY.

Thursday, January 17, 2013

Welcome to 2013!

This blog is not here for politics but things are happening already this year that can have a far reaching effect on citizens of these United States far into the future. First of all if you are a first time gun owner and you ran out and purchased a AR-15 or AK-47 and you're not sure what to do next, GO READ SAFETY INFORMATION! we don't need any more accidents with that class of firearms right now so I beg you be smart go review range safety and firearm safety prior to un-boxing your new toy or taking it to the range for the first time. Don't bother buying mags if you aren't going to buy the ammo to fill them NOW. Mags are consumable, good luck finding any right now if you purchased a AK or AR. I find it increasingly disturbing people are buying a AR-15/Ak-47 or like firearm then buy 3 x 20 round boxes of ammo and say they are set.......if that is your line of thinking you could have saved yourself a TON of hassle and purchased a Mosin Nagant and over 2000+ rounds of ammo for the same money and you would have a more robust firearm that is more reliable and enough ammo to practice for a good long while, DON'T FORGET THE STRIPPER CLIPS!

That was for the beginners, now for the rest of us who have been in this game for awhile, listen closely buy spare parts if you haven't already, review my post on spare parts and ask questions about your particular firearm and what parts/ tools you may need to keep it running. If the Gov't drives the manufacturers out of business or bans import of say AK kits, parts will start to evaporate. 

My advice if you are panicking right now and have never purchased a firearm before in your life. #1 STOP panicking, there is nothing to fear as of right now, there is no danger of anything being stripped from your hands when you don't have it. #2 access your NEEDS, don't spend $2000 on a rifle alone if you've never owned one before, what are you purchasing it for? security? investment? maybe a little of both? God put a good head on your shoulders now use it, do you need a super tactical rifle to defend your apartment or would a Side by side coach gun work better? what versatility do you perceive in your needs? Think this out, firearms are tools, if you do not understand how to use the tools then don't bother having them. Please I beg of you learn safety, and use it always! 

Wednesday, August 1, 2012

Swampy, muddy, messy combat shotgun match

A few weeks ago I ventured into Northern Ohio to shoot a pretty famous (locally speaking) combat shotgun match that I had heard about from a security guard at work who also taught defensive shotgun in his free time. The match is simply the "Francis Marion (Swamp fox) memorial" but I would add "Combat shotgun swamp match" the that title...but that may be too long seeing as the T shirts we got were already limited on space because of the art work they chose.

The match had 3 stages, a swamp stage, dry land and woods stage, which had a creek element in it as well. The swamp stage is what I want to talk about here since the woods and dry land were not difficult. I don't usually give match reports like this, in fact this is the first one I've ever done but this shotgun match is so unique it deserves honorable mention here.

Going into this match you have to know your shotgun well where the controls are and how to work the safety under stress.

Some rules I made up for myself on the fly in the swamp stage.
#1. Keep the gun out of the mud and generally clean
#2. Keep the hand loading the gun clean, your trigger finger hand can go in the mud that is fine. It only pulls the trigger
#3. When you stop to engage a target...reload on the spot before moving on.

Below is a video of a guy in our relay that shot the swamp stage.
Swamp run

The shotgun match required nearly 75 rounds of buckshot or shot (depending on if you could afford or reloaded buckshot) and 15 rounds of slugs in all 3 stages. I used the buckshot I spoke about earlier on in a post and had no issues at all I'm proud to say with my developed load. Except 1 miss on a 3"x3" square target at about 10 yards...might have been a hole in the pattern or been me not taking my time.

Either way, the match was physically challenging, Something I look for in a match where I want to learn more about how I act under physical stress and can manipulate my weapon. My gun was not flawless, the 870 I used had a jam or two that were easy to clear on the fly and a hung hull or two as well. But I still posted good times because I practiced practiced practiced clearing jams and failures, almost more than I did practicing loading the gun. In the end though I got hurt in the dry land stage with after shooting 6 rounds of factory slugs something caused a hung hull that I could not quickly get out, I missed with my 1st slug and since the clock stopped and that was the last shot needed for score I took the 5 second penalty for a miss instead of take 5 seconds OR more to try and clear the stubborn hull.

Saw a lot of close range misses with the shotguns as well, especially those with rifle and ghost ring type sights. Seems at 7 yards you shoot WAY low with them when holding center on a small steel plate. One shooter took 4 shots to knock down a very close steel plate right off the buzzer.

Hope you guys got out some this summer and shot some challenging matches. I hope to find more matches like these in the future, its hard though...shooting sports I've found are starting to cater to lazy and fat people....and yes sometimes old people that can't move so well. Those of you who have noticed we don't stand any more at Camp Perry for the Sitting and Prone rapid fire know of this change and why they did it....I think its BS and does not allow people to learn to establish GREAT NPA AUTOMATICALLY. Get out shoot some matches and learn your equipment!

Thursday, June 21, 2012

1000 Yard front sight base and rifle Update

I shot the Bob Wright memorial 1000 yard match with my new 6.5/06 rifle last weekend, 3-20 shot matches and I put about 84 rounds downrange using unlimited sighters in the 1st and 3rd matches, had some issues getting on target to start with. The front sight base worked very well. didn't budge, did not get loose, nothing! stayed right where it needed to be.

Being that this is the 1st time I've had to fuss with getting MY OWN rifle on at 1000 yards with iron sights I had made a thermometer target and shot it at 100 yards to zero. The only issue I think I ran into however is my home range shoots a bit downhill and Camp Perry is near level I think. Everybody said I needed to zero 27 MOA high to be on at 1000. Later on the ballistics program I ran some numbers on after finally getting the chrono to catch the bullet and not the bits of grass or my muzzle blast said 32 MOA was what I needed.....The ballistics program was correct and when I came off the line having just finished with a pair of X's I had exactly 32 minutes on my rifle (128 Clicks). But when I shot on my home range to confirm this I was still only 27 MOA high?  and the two shots I fired at the thermometer target were touching and 7 inches out to the right (that was my wind correction from the last match and I hadn't returned it back to mechanical until I shot on the thermometer target) So I'm still doing a little head scratching there.   Soooooo I'm not really sure where my 5 MOA went to at this point in time, May re-fire the target again and see if I was just holding different that day. I hung the target with a plumb bob so that wasn't the issue....only other thing I could think of is the cold bore shots vs very hot bore shots....but 5 MOA???  the aiming black is 4.4" at 100 and 44" at 1000...hmmmm

Anyways my scores were pretty good I shot a 188-3X, 182-2X and a 176-1X I had some position problems and stock/cheek weld problems which resulted in a nasty abrasion on my cheek.

Monday, June 11, 2012

Shop project: Front sight riser/base for new 1000 yard rifle


With the help of my gunsmith mentor I've been putting a 6.5/06 rifle together for 1000 yard matches. This rifle is going to be using iron sights and shot all prone. The issue here is that the rear sight mount on this rifle puts the rear sight nearly 1 5/8" above the center line of the bore. The barrel which started out life as a 1.25"x28" blank is now a tapered barrel going down to .850" at the muzzle. The Redfield sights that I am using should parallel with the barrel so I can zero and practice at 200 yards and move out to 1000 yards easily, right now the rifle would shoot about 20' high at 200 yards if the front sight was mounted so low. So I need a front sight base that raises the front globe up about 1/2" roughly or so. Did I mention the first match I plan to shoot the rifle in is in a week? I've only had the action for a month so its been a bit of a race to get everything together. Sadly my mentor is very busy this month so I'm on my own to make a front sight base for this rifle. I'm choosing to make a single piece clamp style out of 6061 Aluminum. Its simple lightweight and pretty straight forward to make.

Note: I used a webcam for the pictures, did not have a camera to use while I was making chips sorry.


The design is a one piece clamp style.
Attempt #1 ended in a off center hole, Yes I could have machined material off the large side but  I chose to just try again, I can always rework the 1st piece.


Muzzle view of the new riser/mount, for a first completed attempt I'm pleased, I could probably remove 1/2-2/3rds of the material and still have a strong base. If I would do that I would get rid of the bottom portion the screws go through and make recessed slots in the body of the riser. Then reduce thickness in the sides and drill some 3/8"  or 1/2" holes in the sides and obliques.


From the front it looks pretty crude...I think it was just the angle, the side view looks a lot better in
my opinion and shows just how bulky it is. Like I said 1st attempt, very utilitarian, may make some modifications with it....then again if it works I may just leave it.


Sunday, May 27, 2012

.375 H&H Swage die update

Core uniform swage die is finished, I choose to have it make .312" cores so I could use it for other calibers like 35 and such. The cores actually come out .314" however but they will work either way....I'm not actually sure why they come out slightly over sized from what I reamed the die body to but it wont hurt anything since these will be seated into the jackets then squished again.


Once I get going I don't wanna mess with pictures, Here is the finished product with a sample swagged core. Note excess being squished from the side of the die. Also got 2 of the 3 pieces done for the core seat die done today....Should have a finished die set in the next week or so. The reamer for the point form die must be heat treated and ground so that will take some time.

Monday, May 14, 2012

Slings for the working gun

Rifle and shotgun slings are accessory items that should be seriously considered on working long arms, that is long arms that are going to go into the field with you, hunting or checking on the buildings and livestock when you know there have been coyotes in that back pasture or ground hogs in between the buildings and we all know what it feels like when we come across a job for a rifle that is back at the house...... "the things you see when you haven't got your gun...". The same argument could be made to a greater extent to carry a sidearm. Its completely hands free until you need it and when you need it YOU REALLY NEED IT. And as the man said..."a sidearm is there so you can fight your way to a rifle (or shotgun)".

Slings come in many flavors from top grade leather with sheep skin pads to synthetic jobs with more adjustments and sliders you can shake a stick at. My argument pretty much here is you're much more likely to carry the gun with you slung over your shoulder than if you had to constantly occupy the use of one hand to carry it. Tactical conditions not withstanding slinging a rifle over your shoulder is perfectly fine. The only thing I would keep in mind is muzzle up or muzzle down. It does vary how you deploy the firearm when it is needed. I prefer muzzle down myself as it is easier to deploy, I grab the forearm of the rifle and bring it up instead of un-slinging and grabbing with the weak hand and climbing up the firearm as it were. Being taller, rifles like a Mosin Nagant with the barrel up would put the barrel at about the perfect height to run into the top of door frames and brush if I'm walking through either or.

Home defense guns 99% of the time should not have a sling on them at all, especially in smaller homes. The sling is made for 3 reasons, to carry the gun, to support a shooting position and to retain the gun when freeing up both hands is a must but slinging the gun on your back is not a option. If you are clearing your dwelling with a sidearm yes then use a sling but make sure you train with it, aware of how it snags and decide if its worth the risk of tangling up your long arm.  The basic M1 Garand and M14 cotton and nylon sling are great starters for teaching positions and use of a basic sling, really wanna get the basics down before we try to teach anything else more complex.

Pictured are two popular rifles with two different sling set ups. The top M4 type rifle
has a side mounted sling the rear point is supplied by a side stock magazine pouch.
You need to really understand with guns why we are using what we are using and putting on the gun as an accessory , it may not work the same for you the way we are making it work for ourselves.  You need to start with a standard firearm and use it train with it, and then add to it as necessary. It is ok to get a AR with a rail and try combinations of accessories while you find what you like, what you don't like and what works/does not work. But do not go buying something with lots of stuff hanging off of it you think you need especially if you don't know why its there or how best to utilize it.

One thing you should take into serious consideration in a defense firearm is quick detach (QD) sling attachments. There are a lot of good ones out there for your use (if you have a use). I don't understand needing two QD points unless you need to remove the sling completely or put it on quickly...which may be a good option for long arms that may go on post apocalyptic patrol with you after you sweep your apartment and bug out?  But in all seriousness a sling with 2 QD points will allow your shotgun or rifle you use in the 2 gun matches to be quickly modified for use as needed. I stay away from single point slings as I view them more as a modified lanyard of sorts more so than a sling. If you are hands free of your long arm and crouched the muzzle may go into the dirt with a single point sling. Try one out and see how you like it, I will stay with a modified 2 point.

Not all mounts are steel or plastic...at least hard plastic. The M4 you can see has
a paracord point which is silent and movable. It will not melt where it is mounted and does not get in the way
The M44 has leather fasteners which should occasionally be oiled to keep from cracking if its a truck gun.

Sling position on the gun will have a lot to do with how it functions as a useful accessory. Positioning the sling correctly to maximize use and comfort when the option is in your best interest. Try not to mix the side mounted front sling stud and a bottom rear sling stud.....esp if you are using the sling to transfer to a secondary weapon.....you will nail yourself in the groin with the pistol grip of your AR or other such flavored rifle or shotgun...and I'll laugh...at you...for a while.  For firearms that are going to be used for 2 gun matches or otherwise are "worn" and "retained" when transitioning from long arm to pistol or revolver I highly recommend side mounting the sling. Again train with it, learn it and modify it as needed....shoot matches and put it in use! You need to know how your gear is going to perform when you go to use it...either for farm use...or for matches.


Saturday, May 12, 2012

Zen and the art of Browning high power maintenance :or: Talk to your kids about font size before somebody else does....


My only 9mm (non conversion) pistol I own is a Canadian Inglis Browning high power built for the Canadian military. Recently I've had some problems with it  bulging cases and the safety gets snicked on and off at random while I am shooting and while its riding in my holster...not cool or safe. I found a weak recoil spring was why it is bulging cases, the gun was unlocking too soon and the barrel was not supporting the entire rear of the case during the firing process. A stronger recoil spring is the answer for that, specifically a 18.5lb Wolff spring. I highly recommend Wolff springs for all firearms that they can be had for. I've used them as replacements in revolvers and automatics as well as some rifle. If you can field strip the gun....you can replace the spring.

Ok, so the spring is the easy fix, the harder fix being the safety going on and off when not intending to do so. Firearm controls should be positive and smooth. The low profile safety on this gun was smooth in going on and off when I didn't need it to and it was positively a pain. Knowing I would like a slightly larger safety on the gun I looked at getting an extended safety I could fit to the gun and would have better control over. I ordered through midway a Cylinder & Slide extended BHP safety that would be required to be installed by a competent gunsmith......yeah not a drop in part. But I got lucky, installation was easy on my particular gun sear and safety engagement was good, the only problem was the ejector insert when pinned back into place caused the ejector to lift significantly to the point it was binding the new extended safety. Some fitting will be required to allow the safety to move freely. Upon closer inspection after test fitting the new safety I found the place on the shaft where the ejector was rubbing. It turned out there was a high spot on the part that would need to be removed.


Here we see the ergonomic differences offered by the C&S extended safety.

To sum everything up, certain gunsmithing projects can be fairly straight forward if you take your time and don't rush. I am not a gunsmith by profession and I am not a expert....I'm still learning and will continue to do so till the day I die...which will probably be the day I learn about how  to piss off a Cape Buffalo. With care and skill and taking the time to learn and research before starting most gunsmith tasks are fairly straight forward. Read, re-read, watch, learn, practice and improve....its how we do good work. Even though the instructions for the safety had touched on fitting it if the sear blocker did not work we ran into a issue that was not addressed in the instructions. We noted how the parts interacted and test fitted many times before removing any metal. Only taking a few strokes at a time we did the job right the first time. I could have modified the ejector plate but that was not the issue...there was nothing wrong with it and I would have been making a part fit another part that was not the correct dimensions. Go slow with a steady hand and most of the time you'll have a job you'll be proud of. Or make sure other parts cover it up....


The wear spot being marked by a yellow dot needs to be uniformed with slow even rounding strokes
with a file. The result should take off the high spot and allow proper function of the safety.

 
Leave the power tools to the idiots on TV....assorted small hand files will do a lot of jobs well.


The author finds this self made gunsmiths block very helpful when disassembling and assembling
handguns and parts groups for various firearms. Note space for small parts and punches.  

Finished part buffed with Dremel wire wheel to blend and clean up the  tool marks left by the file.
(SOME power tools are "ok")
Here we can kinda sorta see the issue, imagine the plate part being forced up counter clockwise causing
the shaft of the safety to bind.
Installed and properly fitted the new recoil spring and safety should bring  this firearm back into service without any further problems....and I pray I don't break an extractor...cause those are hard to find for these Mk 1* guns.

Tuesday, May 8, 2012

.375 H&H Swage dies update #4

Working on reamer design some more and exactly how to make the dies the best way. I think I've found that machining the dies from the inside out provides the best accuracy and lessens time spent on retooling for each step. When I say from the inside out I mean do the precision internal stuff near the center of the die first and thread last.  Hopefully I'll have a complete die set done by mid May!