I've never been a HUGE fan of the M4/AR-15 platform, I've been shooting a BCM M4 carbine barrel with iron sights for about 5 years now on and off when the need for a 5.56 rifle comes up (3 gun matches etc). I thought I was really liking the idea of the A2 rear sight set up and the compact 14.5" barrel with 1.5" flashhider soldered on but the shortcomings of the sight radius kept bothering me.
The full length A2 rifle barrel is a option however the length of the overall package gets unhandy quickly. Enter the Dissipator! without getting into too much about the lore of how the dissy got going I'm just going to outright say I could care less. The dissipator as it seems to be initially contrived was a rifle that got chopped down. The rifle length gas system was left intact and iterations and clones today that use the rifle length gas system have issues from time to time. Dwell time of the bullet in the barrel past the gas port was shortened and reliability became grossly suspect. I was wanting a set up that would give me reliable function and a rifle length gas system without the cost of what some of the clone barrels were running ($150-$500). A true dissipator will have a rifle length gas system, for the sticklers out there look away because I didn't go with a rifle length gas system. Few things are sacred to me when it comes to firearms function/design and correctness.
A few M4 barrels came my way and I thought it was time an AR-15 rifle that I would be more apt to get along with. A 16" barrel with rifle length sight radius using A1 sights (yes A1...the A2 I have found is not useful outside of high power matches) A phantom 5C2 flash hider and a place to hang a TLR-1 Streamlight flashlight was all I was looking for. Put that package atop a M4 lower and we might just get along.
A M4 barrel does not have cross pin holes to mount the front sight/gas block where it is needed so step 1 is to drill our own and spaced so we can still put handguard halves in place. That is step 1....and that is where I messed up. The M4 barrel that I got came from a very well known manufacture and as such I thought their gas block (it was just a gas block no sights) would have been drilled/mounted true to the barrel. They were assuming however whoever was getting the barrel would slap optics on it and call it good, never having to worry about the gas block being level with the world.
My mistake- I drilled the first hole and mocked it up realized that I was true with their holes but not perpendicular to the sight line. I will explain how I fixed this further down.
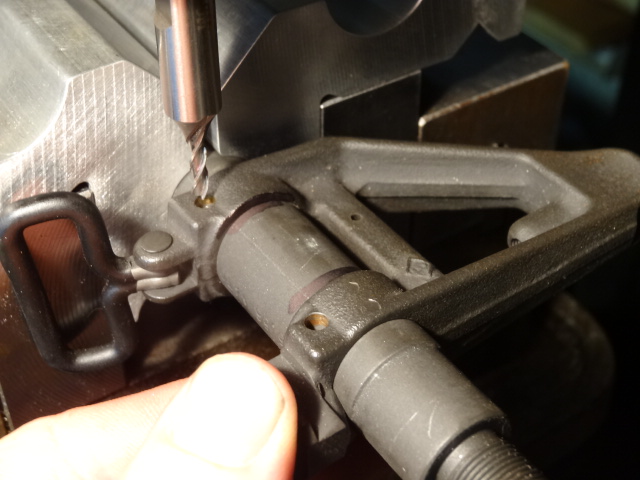
 |
| Setting up the barrel to cut cross pin holes. A #2/0 taper reamer is required for the taper pins |
To align the work I dropped the reamer in the hole then centered it to the chuck and made sure the run out was good for the length of the barrel.
 |
| Spotting the hole to be drilled with a 1/8" end mill |

Ok, so as far as I know the above is in theory a good way to do that job without a jig (jigs are about $125ish iirc) What follows is my solution to the problem I created when I drilled the first hole and confirmed on the 2nd. The problem was when mounted my sights were canted 7° to the right....because that is how far off the factory holes were. So I needed a way to insure that the holes I was drilling would give me true and level sights. The dissy has a 16" barrel, you're not going to be mounting a bayonet on this sucker. so I cut the bayonet lug off my donor front sight (inert gas block) and filed flush. Next I drilled and tapped for a #10/32 set screw and with the barrel in the upper and assembled I cranked down on the set screw with the block EXACTLY where it needed to be. With the gas block acting like my drill guide I mounted the barrel back into the mill and drilled 1/8" holes all the way through, got myself some 1/8"x3/4" roll pins, drove them in and declared victory on what could have been a blunder. The sight is level and with the set screw in place its simply not going anywhere.
Step 2 to finish the upper assembly I taped the old gas tube port #10/32 iirc (no drilling required) and mounted the handguard endcap right on the block.

 |
| No gas shall pass! (remember this is the forward sight block, gas block is to the rear yet) |
The Dissipator has been a design I've often wondered if it were right for me, and as usual a off the shelf item rarely works for my needs/wants. If you're not going to run irons then the dissipator is just a way to get a standard handguard onto a carbine length set up. Not much appeal to the red dot/optics crowd which makes up a lot of the AR-15 crowd.
Below are some pictures of the rifle after some range time, initial zero and a rattle can spray job with 2 coats of matte flat enamel applied (seems to work so good so far). Since this rifle is going to get used more I wanted to test out the spray can camo job on this before I tried it on other more costly firearms.
 |
| Completed dissy with magpul handguard and A1 sight set up. |
 |
| Dissy with handguards removed for clarity of barrel layout |
 |
| 1964 yeaaah baby yeaaaah , The upper is a new mfg DPMS the sights are originals I've had stashed away for just this project. |
 |
| No bayonet lug (set screw in place) roll pins might not be correct but I'm sure they will hold up just fine. Easier to swap out as well, can stake in place if needed (not needed). |
 |
| Gas block/sight block detail. |
As a closing thought, when spray painting a hasty camo job do not use non camo labeled paint. I thought the red that you see would be flat enough, in person it looks it but the flash really makes it stand out. it was the only color applied that was not labeled for "camouflage". The rifle has been out to the range several times and the combat zero I decided on has been working out perfectly. Only time will tell but I think I've come up with a set up I'll be pleased with.
No comments:
Post a Comment