Monday, March 16, 2015

Williams FP-RU-77 sight installation on a Ruger 77/357 : or : NECG sight need not apply....wouldn't mind trying a Skinner though.


Most Ruger rifles leave something to be desired in sights, mostly their rear sights. It's the same with other "field" type rifles such as remington 700's and such. I've never been able to shoot well with the rear notch type sight as it does not offer the accuracy I am looking for. Now I can hit stuff with the notch sight but its not what I prefer....kind of like Tom selleck's character from Quigley down under...."I said I never had much use for one. Never said I didn't know how to use it". Anyways I went on a search for a rear sight for this 77/357 as the flip up notch rear wasted sight radius and does not allow for easy adjustment. Now NECG does make a "drop in" rear sight but they wanted too much for the dang thing and it looks butt ugly, and this is coming from a guy that thinks Mosin Nagants are beautiful. That and you give up your ability to mount a scope if you ever wanted to put one on for whatever reason without loosing your zero. Skinner sights makes a lovely replacement and is easily adjustable, you retain the factory sight radius though.  My solution was to find and install a FP-RU 77 rear sight on my receiver. FP=Foolproof...except these 77/357 receivers are not drilled from the factory so we'll have to do it ourselves. No worries, we have the technology!

123 blocks, hold downs and brass shims are used. Receiver only needs to be flat since we are drilling one hole at a time.

I'll be drilling the receiver on my Bridgeport mill, the cast stainless receiver is much softer than I anticipated. This made things a lot easier as far as tapping and drilling went. My first problem was finding a way to mount the receiver level in on the mill table, two 123 blocks were used under the receiver. A pair of hold downs and brass shims to keep the receiver from getting scratched were also utilized. The 77/357 receiver has a few high spots that you need to be aware of so you are sure the frame is level. The sharpie lines you can see are my guides as I free drill the 1st hole, making sure to not get into the bottom of the reciever just below the raceway. My goal was to be just a few thousandths above it and the first hole is drilled all the way through and tapped. I reversed the drill bit in the chuck while setting up so I got a accurate measurement as to where the hole needed to be.
Side view of set up.

Lots of magic tap is used while drilling the hole....I have to say I was a little nervous in drilling as I only had one chance to get it right. A #31 drill bit was used to tap the hole for the 6-48 threads.


First hole drilled, now since I don't have a fancy jig for hole spacing  I'll remove the receiver and tap the first hole. At that point I will install the sight, make sure it is level and then go off of that for the second hole using the tap installed in the chuck to make sure the base is where I want it for the second hole.


Tiny tap handle with tiny tap! 6-48 tap shown. A taper tap was used although a bottoming or plug tap is shown.


Here is where I messed up..as in I forgot to take pictures...through the magic of the internet I will just skip the the sight base installed with the stock already inletted (easily done). The stock needed trimmed down about 1/4" to allow the sight to sit as low as possible. The stock being solid in this area took the modification easily. Once both holes were drilled and tapped I cleaned them up with a file on the inside to break the hanging chips away and stoned the outside lightly after tapping it off so as not to scratch the receiver. This ensures the base will mount flush. When tapping it is important that the tap is square with the receiver, lots of tap magic is used again and chips are cleared away very often. After we are done with tapping we clean up the receiver with brake cleaner and a air hose, making sure all the chips are gone. Then we install the sight, oil up the parts that need it and we're ready for the range!


Sight installed, everything is level and ready for the range! I can still install a scope on the 2nd rear mounting area and have my irons as a back up! looks a lot better than I thought it would. 


Thursday, March 12, 2015

MiHec 360640 with options!


I'm a member over at castboolits.gunloads.com and to say we love our cast boolits is an understatement. Every once in a while we'll get together and commission custom molds. Below is one that is currently being produced (no additional order are being taken, buys close when the mold starts production). I'm looking forward to it for my 38/357 carbine/revolver combination. I've often heard how good the 125gr bullet is in the .357 Mag and this little pill should offer some good range sessions by the looks of it!  There were two options given to us, we could either go with a gas check or without. I went without  a check as bullets sized and lubed correctly (I love my carnuba red) should not lead. MiHec is the manufacturer of the molds, I have one other custom mold from him for my .500 S&W and its simply a work of art. 

I'm also waiting on 2 other custom molds, one heavier 38/357 mold and a additional mold for .375 H&H


Wednesday, March 11, 2015

Lee speed die 357 magnum 38 special picture comparison


As promised previously pictures of the .357 speed die and its parts (left parts) and .38 special speed die parts (right) in comparison. The die body has internal differences, also the carbide inserts are slightly different.  Obviously the decap/flare stem and seater stems are different.  


P.S. As spring approaches rather rapidly I hope to have at least two and at most three more book reviews up before I officially leave the reading room for the range for the season.

Thursday, February 26, 2015

.357 Magnum and .38 Special LEE Speed die update : Observations

In my .357 Magnum Speed die post  I pondered what made the .357 mag speed die specific to .357 magnum. I fathomed  that it was only the decap flare stem that made it .357 specific but alas I was wrong! In fact not only is the decap flare stem different, the die body itself has different INTERNAL dimensions...Looks like just over 1/8"  which is how much longer the .357 is to the .38 special. But the bullet seater stem is longer in the .38 special set as well, which makes sense since it would have to reach further down into the die to seat a bullet.

Picture of compared parts coming soon, If you are looking at getting one of these speed dies to load both 38 special and .357 mag I'm sorry but it will not work. The dies are very cartridge specific as the the case lengths are different .135" difference actually.  The whack a mole type lee loader will work for both .357 magnum as well as .38 Special as will most 3 or 4 die sets.  Would you rather have 2 dies to load 2 cartridges or 3 dies to load two cartridges when those 3 dies are still in production and widely available.

Sorry for any inconvenience I may have caused on this assumption of interchangeability. I myself would have liked to see one speed die be able to load both as that would have made a very handy on the range set up for testing. Stay safe out there.

Lee loader overview: or : possible reloading tools for beginners


As winter gives us here in Ohio another round of 10° highs and constant wind with sputtering precipitation I start to think more about long days spent out at the range.  Even though simple pleasures like ringing the steel gong at 200 yards is still weeks away I have (as some of you may have noticed with my recent trend of posts) been obsessing over the .38 special / .357 Magnum combination, range time with the new carbine has been exceedingly limited. But as I mentioned in this post about the 38/357 carbine teamed up with like chambered revolvers  I wanted simplicity and utility in a revolver/carbine package that would be hard to beat. For going on 2 years now some ammo like .22LR has been cost prohibitive for a lot of folks, myself included in fact. No, we are not hurting for ammo at the wonderwolf residence but we aren't acting like we're in a time of plenty either. The way I see it is its more important now than ever to make every shot count. If you're not learning something from every pull of the trigger (even in dry firing) then you're not bettering yourself as a rifleman.  Reloading as has been mentioned before can save money, time and resources are your limiting factor. Getting the most utility out of your chosen tools (be it sewing kit, firearm, lathe/mill, car) is important.  Simplicity when starting to reload is important so you understand the basics steps and learn what to look for. As you see your need grow you can determine if its worthwhile to put more resources into tooling. Start with a few select books on the subject if you are just starting out, here is a good place to start if you are not sure where to look .  

"Lee loaders" through the years, these 4 boxed sets show the various ways these tools have come packaged.
                          
Reloading equipment-
The most basic tool for reloading a complete round of ammunition be it metallic or a shot-shell cartridge is the "Lee Loader".  Economic and somewhat versatile the "LL" is designed to offer everything except the components to load ammunition. A note here however, these dies in the bottle neck cases ,30/06, 223, 30-30 etc only neck size. As you will find in the directions you are instructed to only use cases that have been fired in your gun. Which works out well if you think about it, save your brass for that Savage axis in 30/06 or Ruger American  and when you go to load it with this kit you'll only be neck sizing for your rifle, something that can aid in accuracy as well as brass life though your mileage may vary. Lee comments that cases fired in pump, semi or lever actions gun can not be reloaded with these kits. I imagine that this mostly applies to the bottle neck/tapered cases. However I would keep this in mind no matter what gun you are looking at reloading for.

Top left and top center kit are pistol kits, top right kit is 30/06 , bottom is .410 shotgun kit.
If you take a closer look you'll note 2 of the kits are missing parts, Common when it comes to used kits. Easy to fix though if you have a lathe. 

Pistol kits come with a flare tool as most pistol bullets have a very flat base and do not start as easy as rifle bullets with which boat tails or bevel bases are more common. If you find yourself wanting to flare your rifle cases I recommend being a little resourceful and look for a short punch at the hardware store that would give you a little flare...not much is needed however so beware. Lee makes a universal flare die for presses but that is outside the scope of this post.

A complete .38 special lee loader kit, Note this kit can also be used to load .357 Magnum as well.

The major parts of the .38 special set can be seen below, not much to it really. Midway currently sells the most if not all lee loader kits for $27.99.....How much is a box of 20 rounds for that 30/06 or .38 special again?

Pistol kit parts, Decapping chamber,  capping rod, priming base & bullet seater, flare tool, die body, decap rod & powder measure appropriate to caliber. All that is needed to convert to .357 mag would be a different powder measure (or scale) and load data.


Rifle set has a lot in common with the pistol set, die body is a 2 part die however, adjustable for bullet seating depth.
Incomplete 30/06 die set (missing decap stem, something I'll make on the lathe later), Note the die body on this set has a little more to it, the bullet seating depth is adjusted by adjusting the die body instead of a knurled knob on the bullet seater as can be seen with the pistol set. 


Although Lee no longer makes the shotgun shell loaders as pictured below they can still be readily found online for sale in various places as well as at gun shows. I have been told that it was a different "LEE" company that produced the shot-shell loaders. They probably went through some restructuring at some point and came out a new company. I'm not sure on this but LEE does not support the shot-shell loaders any longer.
.410 Shotshell kit, Powder & shot dippers, skive tool decap rod, priming rod, wad/crimp tamp and die body.


That gets most of the information out of the way I wanted to get out there before I started reviewing the individual dies, the end product they make and their accuracy. As time and weather permits I will post tests and results, for accuracy I'll be using the 30/06 dies out of a bolt action scoped rifle I have handy. 

I'll also make mention at this point that as I believe I said in my review of the "LEE LOAD MANUAL" the instructions for most all of their products are in the manual (load book) if you are curious about starting to reload this book is a good one to have besides "The ABC's of reloading". And as always if you don't know if you want to put money out yet for books.....check your local library! Stay safe out there.

Cost of reloading: or : 22LR in stock ?

 This post is meant for folks who reload or thinking about starting to reload, to everybody else you may be bored by the following. In preparation for the aforementioned lee loader review I wanted to share a fun fact I discovered a few months ago while talking about the availability of .22 LR with some other shooting folks. It seems to me that some people in the firearms culture are static when it comes to ammo availability. They obsess over what they can't get instead of seeing the opportunity to see what they can get in order to prepare for the next "paradigm" shift we will experience in this crazy world. IE.....primers are widely available right now, remember in 2007/8 or so when primers were none existent on shelves? AR mags were kind of the same thing there for awhile as well. Now .22 LR has seemed to have held on the longest to being absent from the shelves.

 Now, that isn't the fun fact I discovered....the fact is reloading (small center fire pistol) is now cheaper than buying .22LR ammunition (even cheaper if you are REALLY lucky and get it for shelf price of  $27) but it seems like everybody has it (2nd hand) at $60 per 550 round bulk packs. This isn't a new fact really for those of us who have reloaded for awhile, but it wasn't until now when I actually looked at the cost and was kind of pleased to see what it was(n't) costing me to shoot as often as I like.

Lets take a look at the numbers really quick, these are prices I have paid within the last 3 months. Store shelf purchased, no special deals here. Though I will admit availability in your area will vary. obviously reloading equipment is not factored in.

1lb of Bullseye powder- $19
1,000 small pistol primers $30
Lead is for the taking really, you just have to know where to look.
Brass...you've been saving your brass haven't you? I have only traded or picked up all the pistol brass I have with few exceptions.


Now on that 1lb of Bullseye, if  I'm throwing a common 2.7gr charge it will give me 2592 charges, that is less than 7/10 of a penny per round. Let that sink in for a moment and at the same time remember .22LR is selling between $.05 and $.11 per round....with some brands going for more. The proof is in the math however, start multiplying and we quickly see that in 500 rounds of .38 special we've only used $3.66 worth of powder. Primers??? $15 for that same 500 rounds. That's $18.66 for 500 rounds of ammo.....

You can get well into reloading for under $100, you really don't need much in fact the most expensive thing is going to be a good powder scale. Even if you use a lee loader you will want a good powder scale to double check your charges. Used lee loaders are everywhere and affordable. Even if you want to get into die sets you can still do it for under $100 with a press. My point is be dynamic to the situation, learn to be resourceful as well as frugal as time permits (and resources). If you're not happy with the availability of one commodity like .22 rimfire, don't focus on it especially while the price is so high. Instead look elsewhere for the things you need.

A 2 cavity mold would cost you somewhere around $20 or so from lee, smelting pots can be found cheap at garage sales or flea markets (plumbers pots as well).

This is also a good argument for staying with common calibers like 40 S&W and 9mm.....I don't think I will ever have a want for 9mm brass for all the range pick up I have, same with 40 S&W....and .223 rem in fact. Now obviously there are lots of exceptions, if you have a 50bmg or a 5.7x28 or any other cost not a factor type gun and you don't reload and have not won the lottery or are otherwise well off then reloading is a way for you to shoot that firearm more. Nobody is a master of a safe queen, practice practice practice. May be time to look at options that would allow you more range time, true you may have to buy a gun in a different caliber....but last I checked not a single one of us ever complained about that. Just remember to clean/lube that .22LR gun before you put it up for awhile, this foolishness with the .22 ammo may go on for some time.

Monday, February 2, 2015

Practical Dope On The BIG BORES- By Fred C. Ness

As we continue to skim the bookshelves of home and the library another promising volume comes up packed with information....some obsolete and some useful. "Practical Dope on The BIG BORES" By Ness is a 300+ page reference work on everything from where his book on the .22's left off. In fact this book goes all the way up to the .50 cal cartridges including the .50 BMG. If you have read "PD on .22's" then you would quickly gather  that Ness loves to hunt varmints and do most of his testing on them. "PD on The BB's" starts of course with some smaller big bores in the 25 caliber range and their use on varmints and the like, in fact all the way through the book Ness discuses a good many varmint loads for the various big bore rifles excluding the very large ones however. The book printed after WWII of course has a lot of obsolete load data with obsolete components, however one would be surprised at how much still remains today with some calibers, the bullets they use and powder still in use....proven load combinations that have stood the test of time. The book covers some very obscure cartridges and is packed with great ballistic data as well, great for those interested in the progression of precision performance hunting rifles post WWII. I found a great wealth of knowledge covering America's favorite center fire hunting cartridge the 30/06 as well...Ness dedicates a large number of pages to various loads for the famous '06 including yes....varmint loads sporting pulled 93gr .30 cal luger bullets. Brown bear as well as moose loads with 220gr bullets are also talked about and everything in between that and those little 93gr pills. The book as stated before is older but we find it still has a lot of  great information on design, ballistics and challenges overcome by what was then cutting edge technology.....or desperation for needed performance out of what was at hand.

"Practical Dope On The BIG BORES" By Ness is a great book to add to your library and read if you are the kind of person that is interested in attaining a more intimate understanding of the performance requirements of rifle, cartridge, powder and bullet of choice for either target work or deep woods hunting. You might not agree with everything contained in the 300 some odd pages but a lot of good information is covered all of which gets a body (novice or advanced) thinking about the physics of bullet performance. 

The copy used in this review was obtained through my local library loan program but I sure will be on the lookout for a copy for myself as I learned a great deal and desire a permanent copy for future reference. Like Ness' previous book  this one was a copy of a special 1500 edition run. 

Saturday, January 31, 2015

The Lee Speed die in .357 Magnum : Can one die replace 3?


Continuing with the Lee products reviews here is one that did not survive for long and was discontinued some time ago. The "Lee Speed Die" was Lee's answer to try and replace a 3 die set with one single die, or was it? Lets take a look at a .357 Magnum Carbide Speed die and see how well this was thought out.


The Lee speed die ad line is as follows "One die replaces three. The first significant pistol die breakthrough since the carbide die. When used in any single station press, the Lee Speed Die reloads faster than three die sets because you don't have to change dies between operations. Carbide Speed Die, shellholder, powder measure and loading data included."

My particular die set is missing the powder dipper...no worries I have a full set under the bench if I wished to utilize the dippers, everything is present and clean though does show use prior to it coming into my hands.
Seems like Lee was more interested in selling the die as a "faster" option than having to swap out individual dies. Hence "Speed die" I believe they marketed the wrong attribute of the die here. For one I don't believe that hand-loaders as a group really look for any quick way to change out dies really, we'll just go to a turret or progressive press. Correct me if I'm wrong but we don't mind swapping out dies. So what does that mean for the Speed die? can it be the "jack of all trades" and really replace your 3 die set? Lets take a look at how the die is put together.

L-R Carbide sizing ring, die body, decapper/flare stem and seater stem.

The die is basically made up of 4 major components, the carbide sizer ring, die body, decap/flare stem and seater stem. The carbide sizer ring screws into the bottom of the body  and the two stems are placed into the top as needed. This die is well thought out from a engineering stand point I believe. The decap stem is from what I can tell the only thing that makes this a .357 Magnum die set in that the decap stem has a set length from where it would bottom out in the case and the upper stem where it gives a VERY slight flare to the bell the case mouth NOT TRUE, read here to see what I've learned about their differences . OK, so those are the parts let us see this dog can hunt.
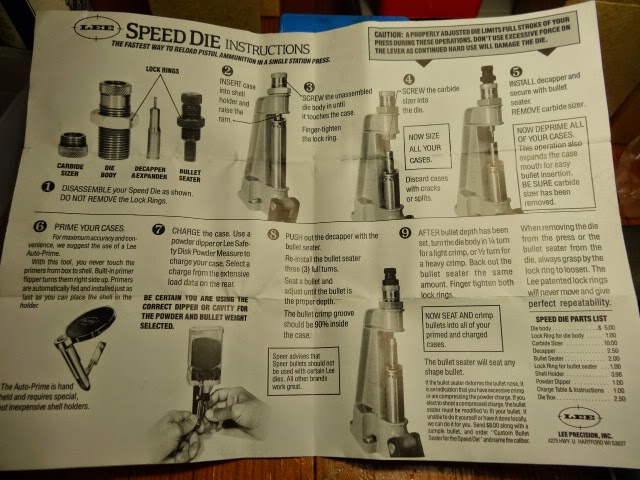
Provided instruction sheet- a link to the PDF version of this is provided at the bottom of this post
Following the provided instructions we set up the stripped down die body in the reloading press as instructed making sure the case mouth slightly touches the die.

Next we install the carbide sizer ring and we FL size all of our brass, in this abbreviated test I am sizing 15 pieces of various .357 Mag brass all range pick up that are all various sizes. After sizing the brass I measure the OD of them and compare with my other 3 die sets...exact same OD on both, in fact with the way the carbide sizing die ring is set up it seemed like it sized further down on the case even. On other die sets the carbide ring is recessed a little to protect the carbide, so failure of this component is a concern if die is not set up correctly. 

After our 15 pieces of brass are sized we remove the carbide ring (with die body still in place) this is what makes it a "speed die" remember!? We move on to decap/flaring.


Next in following the directions we drop in the decapper and secure with the bullet seater

Bullet seater threaded on top holds decapper in place. Position is not critical

From here we decap/flare our 15 pieces of brass. Some Lee fans out there might know that the Lee loader (whack a mole type) for the .357 and .38 use all the same components in the kit EXCEPT for the load data and powder dipper (whack a mole review coming soon).  This kind of utility is a boon to the minimalist, so I started thinking "what makes this speed die a .357 mag specific set and it dawned on me The decap/flare stem is the only caliber specific component for this die, a body could make another decap/flare stem and be set for .38 special as well....in theory. I'll report back later on this....NOT TRUE! click here to read what I have learned about their differences


Basically what I'm saying at least in theory as I have not had a chance to compare it with the .38spl speed die I also acquired, is that all you need to make your .357 magnum speed die into a .38spl speed die is the appropriate proportioned decap/flare stem.....something to think about.

Sorry, got sidetracked, lets finish up this batch of 15 rounds, we have sized, decapped and flared our brass, now we need to prime it. For this I will use the Lee Ram Prime tool which forces us to change out the die...they want you to use a Lee Auto-prime in the instructions but I only have a fancy RCBS priming unit and it takes more time to mount it on the bench than setting up the lee ram prime so the lee prime it is. If you are interested in the Lee primer unit there is a review one post down from this review. 


After we have primed our cases with appropriate primers we are ready to weigh out powder charges, charge the cases and seat the bullets. I am seating 125gr jacketed bullets on top of a healthy charge of 16.8gr of 2400, this has proven to be a pretty good flame thrower load out of my guns and is fun to shoot towards the end of range sessions. The bullet seater is easy to adjust however as mentioned in the instructions you must turn the die body in 1/4 for light crimping and 1/2 turn for heavy crimping which is usually suggested with light bullets on top of slower powders that take up a lot of case space. 


A note on seating, A page on lee's website mentions the die is not to be used with cast bullets. I find this somewhat odd as I don't really see why that would be a issue. The only thing I can come up with is the decapper/flare stem does not bell the case an appreciable amount needed for cast bullets. In fact it is just barely enough for the jacketed bullets I was using and some care must be taken to insure the bullet is started correctly or you run a risk of ruining the case.  I see no reason why you couldn't flare the case a little more and seat cast bullets with this die set....er this die. Maybe we're starting to see exactly why this particular line of reloading equipment was discontinued. It's is great for the minimalist wanting a step up from the lee loader whack a mole type dies but not wanting to have to mess with 3 dies, say a guy who has a S&W 686 that needs 100 rounds a month for matches and or plinking and is loading on his coffee table. I am not sure what the original MSRP was on the speed die compared to other 3 die (or 4 die sets) of the same manufacture. I'm willing to guess it was at least half or 3/4 of the cost of a full die set. But say you wanted to add on a lee universal flare die so you could load cast bullets with this die.....at that point you might as well start looking at the regular carbide 3 die sets.

 Speed dies were discontinued in the late 90's.
The Speed die does everything a 3-die set does by combining some steps, and by providing a removable carbide-sizing ring. When used in a single stage press, the Speed die is faster because one doesn't need to keep changing die bodies to perform different tasks. Simply swapping internal components accomplishes the same thing. The speed dies can only be used for jacketed bullets, can't be used for cast bullets.
Cartridges that were available at one time:
  • 9mm Luger
  • 38 Special
  • 357 Mag
  • 44 Mag
  • 45 ACP
Conclusion- The Lee Speed die I'm sure was met with some trepidation at its unveiling to the reloading public. Replacing 3 dies with one for the sake of speed was not the pitch I would have used to sell this product. The fact it was offered in probably the 5 highest selling calibers should have helped but it still was discontinued most likely to people not really sure the best way to use this die, or perhaps expected too much from it. These dies sell around $30 or so when found I have seen, so obviously some people have found a way to utilize the die. I myself will keep mine under the bench to go along with my hand press when I head to the range with plans to load test ammo on site. The 15 rounds we loaded all look very consistent, in fact with the way the decap/flare stem works its impossible to over bell the case mouths so brass should last a little longer. The crimps are consistent and the bullets all seated at the same depths....I'm very happy with the results.I would in fact say that yes 1 die CAN replace 3 however this one die does not have the versatility that 3 can provide...now for the weather to clear up and some range time to take place. The bullets I used in these loads were pulled bullets so it wont be fair to measure accuracy on target and compare results with like loads from 3 or 4 die sets as some of their noses were slightly deformed from being pulled down.  If you are a minimalist and wish to not accumulate a great many dies and accessories I believe it may be worth your while to try to track down a Lee Speed die if you are looking to reload for only one caliber (and hopefully its one of the 5 calibers they made). Stay safe out there!


Lee Ram Prime : or : The easiest priming unit I've tried


Lee Precision has some very simple and easy to use tools that I seem to always be pulling out to use. Their powder dipper sets are always utilized when I'm running small batches of test ammo, they allow me to get to within 5% of the intended load and trickle powder into my measure until I get the desired charge. Another one of their handy items is their "Lee Ram Prime" unit.  

The Lee Ram prime is a 2 part tool, the shell holder and ram adapter.
                                    
  This is not a priming unit for doing massive runs of ammo and you are forced to handle the primers one at a time....something a few reloaders really dislike doing. I have a nice RCBS priming unit that does not have a dedicated spot on my table, it uses pickup tubes and though its easy to use  I dislike setting it up to only load 15 rounds or so. Which is where the Lee Ram Prime comes in.

Shell holder installed.
The Priming unit is quick and easy, The shell holder...er holder...screws into the top of your press in place of your reloading die. The ram adapter goes where the shell holder normally would and you are ready to prime!
The priming unit does come with two sizes of "piston and collar" assemblies for the two sizes of primers you will be using. I even use this set up with a special 12ga shell holder to prime magtech all brass hulls for black-powder loads in my coach gun.


I always leave the press handle down and load a new primer in from this position. No real need to drop the ram all the way down to try and fumble a primer in there.

Primer in place

Case being primed
The lee ram prime is also really handy with the Lee hand press. For a small reloading set up it is a really convienent way to prime your cases. Now I know some will point out the fact my Rockchucker HAS a priming station on it, however for various reasons I've never been satisfied with the way the press mounted unit performed, I feel a lot of people have that same feeling as you see the units in junk reloading boxes often. Lee sells the tool for under $15 or so depending on where you get it from. I believe it is a worthwhile tool if you do small batch reloading and don't worry so much about production.


Wednesday, January 28, 2015

Practical Dope On The .22 - By Fred C. Ness : or : This book has me sold on a Winchester 54 in .220 Swift!


 This next book review is going to cover a sort of obsolete and  not so obsolete topic of .22 varmint rifles and calibers. "Practical Dope on the .22" By Ness is a roughly 300 page volume originally printed in 1947 covering everything .22 caliber that was around at the time. Both Centerfire and Rimfire cartridges are covered here including but not limited to .22 short, .22 Hornet &  K Hornet, 2-R Lovell, .219 Zipper, .22 Savage HP as well as the .218 Bee. 

This book is a MUST read for anybody interested in early cartridge design and performance. The .220 Swift (which was only 12 years old when the book was published) is given rave reviews and some vivid accounts on its performance on larger game. Now, as it happens with most of these type of books the load data & components are LONG gone to us today. The book however shows the early struggles and solutions that the author and friends came up with to squeak every bit of velocity, accuracy and in the end performance out of their various cartridges of choice. The discussion on ballistics is intriguing and though all of it is still relevant today where applicable we have access to a good many more chamberings, bullets and powders that can take a lot of the work out of vying for that accuracy our predecessors worked so hard for. One thing that caught my attention was that Ness and company used graphite wads with their loads, these wads sometimes weighed as much as 55gr as reported in the book supposedly to reduce throat wear and fouling. I myself would not rush out to try it but if it worked for them they were on to something I guess but it died out as its not a practice we have today obviously. 

I highly recommend this book to those who have a any rifle in .220 Swift especially a Winchester 54 or a pet .22 hornet or K hornet they wish to read more in depth on than just the few pages offered in a reloading manual or a back issue of  "Hand-loader". The book is very thorough on all relevant aspects of precision .22 caliber varmint shooting that was taking place in the late 40's.....do not expect to learn anything about your .223 Remington (invented in the 60's) or .223 WSSM (early 2000's) obviously. This book is purely for the Varmint/Target shooter of yesteryear in equipment as well as in heart.  I borrowed a copy from my local library through their inter library loan program as a copy was not available at my branch. An interesting note, Wolfe publications did the reprint of 1500 copies of this book my library has copy 311/1500 and the publication notation shows it was printed in 1989.  


"Practical Dope" is a great reference for everything .22 that was available in the late 40's. To the left and right.....future book reviews!

Sunday, January 25, 2015

Lyman 4500 heated lubersizer, Carnuba Red and Lee molds : or : Some must have items for my casting pleasure


A bullet caster has a whole other set of tools he begins to accumulate besides that of just a casual hand-loader. One of the tools a bullet caster requires if he uses traditional type molds and not the tumble lube molds now produced by lee and some other companies is a Lubersizer. That is a tool that injects lube into the lube grove and sizes the bullet down to the size you have determined best for your particular needs. The lubersizer I utilize is a Lyman 4500 and its probably going to be the only one I'll need for the rest of my days.  The big thing about the 4500 that makes it work so well for me is that it uses a little heating plug in the back. NOT all lubes require a heater but I exclusively use Carnuba Red from http://www.lsstuff.com/ for all my cast bullets that are not tumble lube, it is a harder lube and the heater in the 4500 helps it flow. Carnuba red is not only the best all around lube that I've found for my shooting but its also AFFORDABLE!   $1.80 a stick (bagged) or  $2.05  (rigid tube) is FAR cheaper than any of the stick lube that I've found on midway .  I've shot the lube on cast  bullets ranging  from 75gr to 535gr and going at speeds from 500FPS to 3000FPS and if sized correctly to the bore have had little to no leading in most of the pistols and one 300 Win mag I've tried the lube out of. My 1911 especially loves bullets lubed with Carnuba red and after several hundred rounds and not being cleaned between some matches the bore has only a slight hint of leading starting to build up around the throat area. 

The lee bullets are something that will be touched on in another post but just to cover them here really quick I would like to throw my opinion out on their line of molds. I know some people really hate on lee and I'm not exactly sure why. I have had just as many issues with LEE products as I have with the higher end dies and molds like RCBS and Redding make. Lee makes an affordable product and they are well thought out most of the time. I think if you are looking to get into casting lee molds is something to consider. I like their 358-158-RF mold (produces a SWC type bullet)  6 cavity mold so much I purchased another one so I can cast with two molds at once and not risk overheating the one mold. I learned awhile ago casting with two molds of different calibers and designs gets to be frustrating when it comes time to sort the bullets out especially if you dump the castings in a water bucket like I do. So now I just cast one caliber at a time. 

Thats pretty much all I wanted to share right now, The lyman 4500 is a great press and lee molds are a lotta bang for the buck. If you're a bullet caster or are thinking about getting into casting you might want to check out the Lyman 4500 and lee molds...also check out the lars lube site   http://www.lsstuff.com/ for stick lubes as well as liquid alox type lubes that are used for LEE tumble lube bullets.....Carnuba red might not be the lube you need so  I urge you to research his other lubes and see what you think might work out for you. I have done business with him several times getting over 100 sticks of lube (mostly Carnuba red) from him. Great small business to do business with.


Lyman 4500 with ram down, bullet would be pressed into the die and come out sized and lubed.

The Lyman 4500 uses changeable dies (not included) to produce sized and lubed bullets appropriate for your needs....So long as you've predicted your needs well enough.  

A batch of LEE 158gr LSWC were lubed in about 45 minutes with the Lyman 4500

Monday, January 19, 2015

Bumping up jacketed bullets: or : The 9mm gains girth

I am mostly a cast boolit (bullet) kind of guy but sometimes jacketed bullets are needed or desired or are simply all you have on hand. In looking for versatility out of a gun (recently the .38 special/.357 magnum) In a pinch 9mm diameter bullets could possibly be loaded in .38/357 but accuracy would most likely suffer if left at their present diameter. This would be a sort of last ditch method to procure jacketed bullets if all other solutions have been exhausted. Access to a lathe could make a simple set of swage dies for a reloading press that could allow one to bump up the size of the bullets to proper jacketed diameter as well as change the nose shape.  Which could tailor the bullet to the intended use, one example could be to made a die and punch set that would give 9mm 124gr FMJ's a deep hollow point decreasing the likelihood they would over penetrate game or other predators. A letter drill bit size "T" has the happy coincidence of being exactly .357 diameter and could be used to make the die body.  If a reloading press is not a ready option (such as for people reloading with a lee loader kit or a small hand press) A thick plate of steel and a top and bottom punch used with a arbor press or even a hammer could be used to bump up the bullets in size.

I have a small box of range pick up 9mm jacketed bullets I have slowly pulled down over the years, people are always dropping bullets in the snow and rain or simply eject duds and I happily pick them up as there are always ways to recycle such things. Powder however is always disposed of as it is unsafe to try to identify and reuse such pulled down powder in such tiny lots. Just as an experiment I took a small sampling of bullets and ran them through my .357 single step swage dies pictured below are the resulting mostly formed SWC .357 bullets, all 124gr in weight. These could be loaded in .38 or .357 easily from here and sent happily down range. As with most things this novel concept is not new...it is simply not practiced often.


9mm bullets bumped up to .357 in a single swage die, not perfect but they should fly just fine.

Monday, December 29, 2014

Some 38 special & 357 magnum carbine observations: The Ruger 77/357 carbine hand-loaded part 1

There are few things in life that make more sense than to have a good rifle in the same caliber as your sidearm. There are passels of carbines, as they should be called as they are of a sub class of what would otherwise be a battle rifle, not for their physical size as the M4 "carbine" is called but as for their caliber to be had in nearly any pistol caliber one desires. This idea is not a new one, it just makes logistical sense to have a pistol and a rifle/carbine take the same ammo. The practice is sound, having to only worry about obtaining and carrying just one caliber such as .45 colt or two if .44spl/44mag is your choice as it keeps things simple....so long as you can obtain that one caliber at least.

The primary focus on the following concerns specifically the Ruger 77/357 bolt action carbine (or rifle if you prefer). The little 5.5 lb 4-5 shot package just at 38.5" overall has a lot to offer somebody who is looking for a rugged firearm to accompany them into the middle of nowhere which isn't a bad place to find oneself now and again. Mostly this post is focusing on the increased performance you can expect out of the longer barrel of such a handy carbine, the same could be expected from a handi-rifle, Contender rifle or lever action. The fact that this carbine features such a mild to wild caliber in such a rugged offering being it bolt action stainless gun with synthetic stock! Gives this little package a good deal of versatility when it is put up to say a wood stocked lever action that may have trouble feeding a large variety of rounds one may wish to put down the pipe.

Note- the previously discontinued offering of the 77/357 was blued steel....to my knowledge only stainless is being offered now.


All data was with using CCI primers and given in feet per second. The LCR was tested out of curiosity, not for serious comparison however it does show some problems that could crop up in load selection.


  • .38 Special - 92gr Round nose cast 4.9gr of Bullseye  
              77/357-   1278,1297,1302
              GP100 4"-  913, 927, 939
              S&W 65 4"-906, 965 , 907
             LCR-  544? 900, 916, 746

Note there are 4 velocities given for the LCR, the first 544 FPS  may have been a error of some sort, maybe the chronograph caught something other than the bullet, some shed lube perhaps. But the fact the 4th shot is so much lower than the middle two make me think either my charges were not consistent or we were having ignition issues with such a fast powder compared with case capacity and bullet weight. Something to keep in mind when wanting to use a given round across such a wide variety of barrels

  • .38 Special - 148gr Speer Factory hollow base wad cutter (HBWC) with the classic 2.7gr Bullseye
         77/357- 769, 760, 754
         GP100 4"- 587, 618, 598 
         S&W 65- 608, 595, 617
         LCR-563, 589

This is a popular target load for the .38 Special, it seems the 2.7gr load is the staple for a lot of shooters. Not to mentioned highly economical as you get 2592 loads per pound...that is less than a penny of powder in each shot (I purchased Bullseye @ $18 a lb in November of this year).

  • .38 Special- 160Gr WC 3.8gr Bullseye
          77/357- 974, 973, 976
          GP100 4"-817, 795, 797
          S&W 65 4"- 801, 813, 793
          LCR- 755, 729, 729

This load I kind of just came up with, I had a lot of these heavy 160gr Wadcutters already cast up from a while back just needed a excuse to send them down range. It is interesting to note just how little difference there is in this load between the revolvers and the carbine....Though velocities were exceedingly consistent in the rifle there is only about 250 fps difference between the LCR and the carbine. My thinking is the powder being Bullseye it burns too quickly for the longer barrel to give it any sort of major boost one might be looking for as a benefit to toting a longer barreled version of their sidearm around.

  • .357 Magnum- 158gr Lee SWC 14gr Alliant 2400
           77/357- 1702, 1629, 1675 
           GP100 4"- 1174, 1205, 1123
           S&W 65- 1241, 1216,1213
       
 No LCR data was collected due to our fondness with the feeling in our hands (Read, this load is stout in snub nose guns) not to mention accuracy was questionable since the chronograph was set further away than normal.

This bullet whose mold is offered by Lee is quickly becoming one of my all time favorite bullet selections available in the 38/357 realm. It cuts a nice clean hold in targets and is easier to load that most SWC bullets from a speed-loader into the cylinder of a revolver. It feeds easily in the 77 and offers a versatile all around bullet in the 158gr realm.


These were just some observations, testing will continue along with other bullet designs being added as time and equipment allows.  I plan to add some swagged projectiles to the lineup as well as a light 125Gr cast bullet, 173gr cast bullet, 215gr cast bullet and a .375 round ball pushed through a .357 sizer for plinker/small game rounds.

As I stated before I can see the sense in stocking only one caliber of ammo but you can quickly get into a lot of specialty loads if you deal with 38/357 or .44spl/.44mag  and want small game loads, shot loads and medium/big game thumpers.


A simple firing pin gauge

Whats a good method to measure the firing pin stick out as it relates to the breach face? 
I've been working on some  H&R Pardner shotguns and Handi rifles lately trying to track down the source of misfires and other such failures to perform as designed. The first hypothesis of the problem was presumed light firing pin strikes, possibly caused by short firing pin protrusion. Although this has turned out not to be the case with the two Handi rifles I am working on currently both rifles had shorter than minimum firing pin protrusion to be reliable. Having tried to measure the firing pins accurately proved a bit of a challenge as I was using the depth measurement on a dial caliper to try and get a measurement, this quickly proved inaccurate as one must hold the trigger to the rear while at the same time taking the measurement keeping the instrument perpendicular to the breach face. I knew there must be a quicker, easier and more accurate way to get the measurement I was looking for...and there was. Brownells sells a marvelous little tool that is comprised of 3 parts and costs $30. Yes, $30...so that wasn't going to happen any time soon. I happened to have a good stock of 0-1 in the shop so I set to work making a rough copy of the brownells firing pin protrusion gauge. Yes they make and source excellent tools but I wasn't going to pay $30 for something so easy to make myself.

The actual making of the tool will not be pictured here as it is fairly straight forward.
Materials include:
1/2" drill rod
1/4" drill rod
1/4" drill bit
Socket head set screw of your choice with offending tap and drill.
Lathe and necessary accouterments for the proper use thereof.

Taking your 1/2" drill rod, drill a 1/4" hole about 1" deep, take cutoff blade and part so you have a piece about 3/4" long or so, this dimension is not critical but do make sure both ends are faced. Deburr drilled hole as needed.. About 1/4" or so from one end drill and tap a hole into the side of the cylinder for your set screw.

Take your 1/4" drill rod and accurately measure and cut off a 1.000" piece making sure both ends are faced. It really can be any length you want it to be so long as its longer than the 1/2" stub you made earlier. It would save you time and math in the future though if you just took your time and made it a accurate 1.000" long.

The best things are simple, I made two of these gauges in about 45 minutes.

Tip- if you know you will be using this gauge on bolts with recessed faces it would be a great idea to turn the end farthest from the set screw hold down so it can sit inside what you think will be the smallest case head you might work with would be.


This is one possible method to measure the stick out, lets see how it works. (Photo by CP)

Might look good side to side but what you can not tell is the instrument is badly tipped causing the reading to be misleading. (Photo by CP)


Here is our gauge in action, simply tighten the set screw and take measurement with the same dial calipers from before. Don't forget to subtract the 1.000".....

Small yet critical
Simple tools like this make quick jobs of measuring critical things such as firing pin stick out on a firearm when trying to diagnose a problem. Though my issue still has not been resolved I have been able to confidently measure and eliminate the firing pin as a variable. 


Friday, December 12, 2014

"Ammunition Making By George E. Frost" ......My version of rare old comic books worth a lot more now then when purchased.

If there is one thing we all understand in the gun culture it is the term "collector" as it is used to define the varying degrees of our involvement in the various tasks of obtaining, cataloging, shooting..etc etc the firearms which appeal to us.

I have not considered myself a "collector" of books until I sat down to write this review and did some quick searching online as to where the general public could get this book. Then it dawned on me, I have never seen another physical copy of the book since I purchased mine new in the wrap some 14ish years ago I think for under $15 I'm sure as I was young and pocket money was scarce. So I must apologize ahead of time, if this review makes you want a copy of this book and you get sticker shock (cheapest I found was $179, going up to $400 quickly). To the point, I went back to the shelves and really just realized how many books I have I could review but this one seems a natural step in the progression of learning about reloading so I will review it anyways. Note: There are E-book type downloads and copies that can be had very CHEAP...at the risk of spoiling the review....I recommend going the E-book route unless you are looking for investment grade publications??


The book in question is "Ammunition Making" By George E. Frost 1990, published by non other than the NRA...they could use some sense and print up a few more copies of this book and sell them for a steal at $35 a copy and negate the need for the twice a month phone calls I get asking for additional funds to fight the good fight. Yes, right the book.....The book itself is a 161 page mind blowing look into how a lot of things we take for granted in the shooting community is made. The index is very intriguing and is covered as follows with sub categories omitted for brevity

    The Cartridge case
     The bullet
     Shotshells
     Clay targets
      Primers and priming
      Powder
        Loading 
    Ballistics in the factory
      Troubles
      Accuracy
     The .22 Match cartridge
    Quality Control
     Fires and explosions
      Working in foreign lands
     Tidying up
     Final thoughts

I could rave about the depth and usefulness of the information this book covers for pages and pages but I'll try to keep it short. If you have a interest in learning how small arms ammunition is made, the actual physical process of forming the various components, including the Clay birds mind you (though only a page and some change covering that topic)! Then you will find this book exceedingly delightful. It could be a book you pick up every so often and reread sections on how this or that is made so you better understand the industry standpoint on a massive production scale. But I'll be honest I read the book when I first obtained it, absorbed all I could at the time and have not looked at it again until now. Re-reading it I have a better understanding of some processes. Especially after having started swagging my own bullets and modifying cases for reloading. 

You do not have to reload to get this book and enjoy it, you merely have to have a interest in production methods and small arms munitions really.  The information this book divulges is worth the money I originally paid for my copy.....though I could not see paying more than $35 for a copy when electronic versions are available....its a really great reference work however to the average shooting Man/Woman the book is out of reach at the price the "collectors" have positioned it at in the market. Too bad really as it is a wealth of knowledge that should be out there in the world more readily available. Hey NRA!....wanna do a reprint??