Saturday, December 21, 2013

Loading with a Lee Load-All II shotgun press

   The following is a picture heavy step by step "how to" load a shotgun shell on a Lee Load-All II shotshell press. This is basic stuff, I have already installed the correct shot and powder bushing as reviewed in THIS post on my blog. This is to show both instructions on the use of the press and just how simple it can be to "roll your own". If you want info on loading buckshot 12ga "OO" buckshot on the cheap click HERE
We start with a spent hull.


Slip the sizer ring over the hull so the notched end is towards the top.

Place hull into "station 1" and pull down the handle all the way if you feel a hard stop re-position the hull as it may not be centered with the depriming unit, this can be common on 20ga and 16ga hulls.

Hull has been sized and deprimed in station one, now grab a primer!

Push start the primer into the hull so it will seat straight.

Place hull in station 2 and pull down smoothly on the handle, At this point you have primed the hull and removed the sizing ring off of the hull.

Sizing ring pushed up hull.

Slip the ring off the hull and place it nearby where you will grab it after this shell is loaded.

Place the hull in the third station. Pull down handle, and with the powder/shot bar starting at the left (with shot insert showing) move the bar to the right. * NOTE- if at this point you are not sure of your powder charge refer back to my earlier post on the Load-All

Powder charge has been dropped. Now for the wad, let up on the handle and grab your shot wad.

Shot wad in place, pull down on the handle until you feel the wad seat. It is important now to be consistent with your wad seating pressure between loads so try to do it the same every time.

The wad is in place and the handle is down lets drop some shot, move the powder/shot bar back to the left this drops the shot.

Moving the hull to the forth station try and position it so that one of the star crimp dents is closest to you. This helps ensure a well formed crimp every time. Pull the handle down (the station directly behind this station is for starting either 6 or 8 star crimps depending on what gauge you are using)

Move the loaded round to the final stage and pull down on the handle, you will get the feel for it after awhile. You have now completed a loaded round of 20ga birdshot ready for the field! After some practice this can be done quickly. You might not save a lot of money over the economy loads but you can tailor payloads to your gun and try various combinations, if you start loading buckshot and slugs you can save a LOT of money quickly. 

A trick to the Lee Load-All shotshell press

   In a previous post about loading buckshot (found here) I used a Lee Load-All II shotgun press that I had purchased new. If you have found yourself with one of these presses (which you can get cheap used) this post is a overview of how best to go about getting started with your selected load. As well as 2 handy tricks for getting where you need to be with your selected powder charge.  The first trick is how to make sure you get consistent powder drops the second is how to switch out powder bushings without much hassle.

This pair of Lee Load-II shotshell presses able to load 12ga,20ga and 16ga cost me under $100

Before I go any further there are better presses out there to mass produce shotgun ammo on, I have gone with the Lee Load-All for the simple fact that I do not want a larger machine taking up space nor do I want one that has all the bells and whistles, if you have read much more of my blog you will understand I like simplicity. Also the 2 presses I have now plus their conversion heads have combined cost me under $100....thats $100 for two presses that can load 3 gauges.

The Lee Load-All is a simple press that comes with everything you need (except components) including powder and shot bushings. When I had obtained my first Lee Load-All it came in 20ga....now I didn't need a shotpress in 20ga....I needed 12ga. Luckily Cabela's conveniently stocked the 12ga conversion head there as well......I smelled a bit of a marketing scheme but I digress.  The Fact the press is easily converted between gauges appealed to me. I later on purchased a 16ga conversion head so now I had one press the size of a long thin shoe box that could load 12ga, 20ga, and 16ga......pretty slick huh? I wont get into the parts swapping of the conversion here (just yet)  but you know the story, you get tired of changed around the parts and start looking for another press. A few months back I stumbled upon another press, this one was set up in 16ga and was missing the sizer ring, had everything else bushings and even the instructions, but was missing the sizer ring. No bother I had a complete 16ga conversion already so I slapped down my $8 for the lot (I did say you could get them cheap, didn't I?). Since I don't even own a 16ga shotgun I decided to convert the press over to 20ga so now I would have a dedicated 12ga and 20ga press.........the 20ga press will get converted whenever I need to load 16ga ammo.

The priming system on the LA can be upgraded to a primmer feeder as pictured below, this allows you to load a couple dozen primers and with a simple jiggle and lift of the trough you will feed the next primer that will automatically be seated with you move the shell into the 2nd station.
Lee offers this primer feeder (red trunk looking thing) for the 209 primer, handy if loading a lot of ammo

Pictured in the 2nd bay from the left is the standard primer seating stem.
 The powder and shot bushings are in Lee Precision fashion, formed plastic. These are labeled with numbers, as I will get into here in a bit you will find the powder bushings are off by what the chart claims causing you to throw a lighter charge of powder than you were wanting, I will show how you can quickly get to the powder charge you want without undue hassle (like emptying out all the powder every time you find you are throwing the wrong powder charge).
Large shot charges up to 1 7/8 oz can be thrown.
Powder bushing on left, shot bushing on right.

Supplied bushing capacity chart, As noted most of these will throw lighter than advertised charges so its important to use a scale to verify.

When you start using a new Lee LA press here is a simple way to get the powder weight you need

Step 1: Remove metal face plate from the front of the Loader

Step 2: put in the starting powder and shot bushings you intend to use

Step 3: Replace metal face plate, ONLY put the powder in the hopper DO NOT PUT SHOT IN YET!


Step 4: With spent hull in place cycle the charge bar a few times and dump back into the hopper. Then dump 1 charge and.....you guessed it ....weigh it

 Step 5: The LA press will give you 2 weights of powder depending on the type of powder you are using if you just throw a charge without depriming the case and sizing it first your charge will be light because the powder is not settling as the press is being manipulated. I proved this by simply throwing 3 charges all weighing 13.8gr of unique Then actually going through and sizing and priming a case AND THEN priming it....same powder bushing dropped 14.1gr consistently.

 Now if your load is calling for around 14gr of unique I would stop at that point, but the load I am using is calling for 15gr of unique.....but I already put powder in the hopper? I don't want to dump it all out and dump it back in and possibly spill powder all over the place if it can be avoided. I want to jump from the .105 bushing to the .110 bushing. Here is how you can go about that without much hassle.

Step 6: With the charge bar moved to the right so the powder bushing # is showing remove the faceplate.
Position of the charge bar for bushing swap.
Step 7: This is why we didn't fill up the shot hopper (shot would be pouring out right now if we had), with the face plate off rotate the charge bar so that it pivots underneath the hole the powder drops through. Now the powder and shot bushing should be exposed, pop out the powder bushing and replace it with the one you want to try next.
110 bushing in place, replace face plate and throw charges.
Step 8: Cycle the charge bar a few times with a hull in place and dump in the hopper. Now take a hull run it through the first 2 stages, prime and then dump the powder charge and weigh. If you have thought ahead at this point you might say "hey, if I size and prime a bunch of cases and do not load them how am I going to load these and get the correct powder weight when I do load them". One solution is to use one scrap case and run it in the first 2 stages over and over again to give the press the jigging and jarring it needs to get the powder to settle, it is how the press was designed to work.
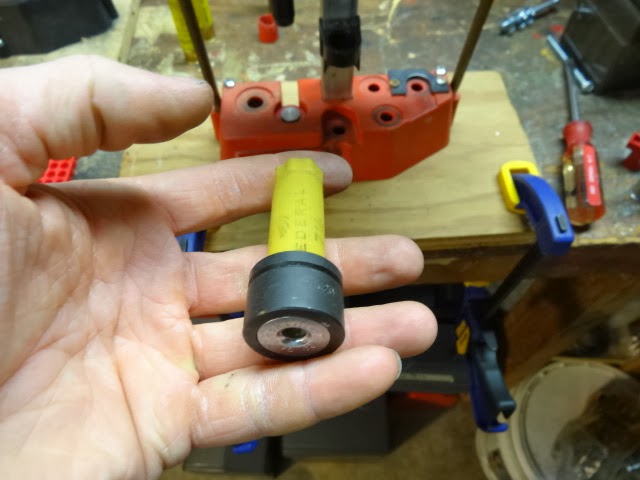
"Dummy" shell in place to ensure correct powder settling is
achieved. 
Repeat the process until you get close to your goal, I was aiming for 15gr I got 14.9 on several throws that is plenty good for shotshell.


Now that we have a the powder charge weight we are looking for we can fill the shot hopper with the desired size shot and begin loading.


All set!


Thursday, July 18, 2013

Quick look at why I prefer the Ruger Mk II over the Mk III handgun.


I've been able to shoot a Ruger Mk I, Mk II and Mk III on and off for the past few years, It wasn't until I laid my hands on a Mk II that I realized how much more I preferred the Mk II over the I and III. Usually the most current versions of firearms are somehow improved upon on, I feel like this is not the case in recent years especially with the Ruger Automatic series of handguns.

The implementation of various safety features detract much of the ruggedness and value of the firearm, even if the devices have little or no effect on function. The Mk III was downgraded it seems when you start to look at exactly what was changed. Really quick the big difference between the I and II is the last shot bolt hold open lacking on the Mk I.

There are 5 main differences between the Mk II and Mk III, differences that I feel make a major impact in the guns value and usability. The following is what I recognize as the shortcomings of the Mk III over the previously produced Mk II.

-Loaded chamber indicator
-Lock out
-Magazine release (Button vs. European)
-Charging tab width
-Magazine safety (found on the MK III)

Here we see the Mk III, 3 things to see here #1 the magazine release right behind the trigger. #2 The loaded chamber indicator located on the receiver (long strip) and the lock out located just below the safety.

Here we see just how much "cleaner" the side of the Mk II is 

Mk III Tabs are narrower, could be a boon if you are worried about snagging.
Mk II tabs are noticeably wider allowing better grip to charge the firearm. 


Mk II on left - Mk III on right , tabs are just a little wider than the receiver. As an aside notice how much taller the adjustable sights are on the Mk III, I have a thing for sights that are low on the gun, they always seem more natural to shoot.

here we see the Mk III stock gun/magazine is most of the time not drop free.

Mk II magazine release, the author finds this easier to use with gloves than the Mk III.
The mark II magazine release is that of a European style. I much prefer this over the Mk III style stock release because if you'll notice your mags don't always drop free (stock gun mind you). Your hand goes down to the bottom of the grip to remove the magazine in both cases. With the Mk II gun your weak hand goes to the base of the grip to release the magazine as well remove it. The Mk II is also easier to load and unload while wearing gloves from my experience. 

The Mk II is lacking the mandated safety devices Ruger has applied to their Mk III models, a lock and loaded chamber indicator now adorn the Mk III making them marvelous dirt traps and extra parts to clean. I have not personally had any problems with my Mk III and the two installed safety devices, but I have "heard" of some people that have had problems with the loaded chamber indicator. These isolated cases should not be considered a major or even a minor problem (I would be interested in hearing specific issues with these features however if you have had them). The Mk III I own has performed exceedingly well for me.

I will admit this evaluation was done under the thought of a functional woods carry gun and not a range only gun. I will also add the fixed sights on the Mk II are very accurate for fixed sights, the front blade is  narrower than that on the adjustable sights which mean aim small miss small when your plinking game.

If you are considering a Ruger .22 Automatic handgun see if you can get your hands on a Mk II and a Mk III to compare side by side. I feel like the Mk II has much more to offer over the Mk III if you are looking for woods/pack gun.

Friday, June 28, 2013

M261 dedicated .22 LR upper build Prototype part 2


 Now that we have the barrel turned to the correct specs we need to focus on the "barrel extension" part of the build and mill it so it will work in combination with the M261 bolt conversion. We will need to make four cuts (5 if you are using a blank barrel) the first cut will be at the top dead center, this is made to clear the charging handle as the extension goes further into the receiver. The second cut is made on the bottom to clear the magazine you just need to cut away enough to offer proper clearance. The next two cuts are made using a woodruff cutter. Luckily I had the two sizes I needed already on hand so for once I didn't need to buy tooling for a project! The right side of the extension gets a 1/8" slot milled for the extractor and the same for the left side for the wire that helps retain the case (this cut may need hand finished with a round file so the wire does its job). The left side is then cut again for the bolt guide rod. You must measure this cut correctly or the bolt will not seat in and cant possibly causing undue stress and twisting on the whole unit.  I will get more detailed pictures up of each cut. This was the prototype so its not really pretty.


Top has been milled off, slot for extractor is milled (note new garage walls being put up)


View of extractor slot, over sized a little but it will work.


Left guide rod slot being milled


Wednesday, June 26, 2013

M261 dedicated .22 LR upper build Prototype 1


The M261 .22 LR conversion is great for what it was designed for....general familiarization of the weapon platform with accuracy taking a backseat to trigger time and dynamics. With this in mind more and more "designated uppers" as they are called in .22 LR have been manufactured. Some of these are costly and take proprietary parts which may be hard to obtain from time to time. My idea here is to make my own dedicated upper in .22 LR using the M261conversion bolt as a host bolt and a "demilled" A1 upper receiver.  I acquired a pair of these A1 upper receivers cheap and needed to put them to use . I wont say my idea here is original, however I have not seen an example in person and I'm pretty sure this has been done using the M261 bolt before.  I'm starting with a Marlin 60 take off barrel I happen to have a few of in the old parts box. The idea is to use M16A1 upper parts to build a trainer rifle that is more accurate than just the barrel conversion used in the M261.

Since barrel length is not so much of an issue with .22 LR we will go with a 16.25" barrel. I've kind of always liked the looks of the dissipator AR-15 sight radius and shorter barrel length but have never felt the need to have one in .223/5.56 I thought the design could be applied to my project here.

Below is mostly pictures of my yet to be tested prototype. I need to spend another hour or two on it and it will be up and running. I put this all together in about a day...most of that time spent hunting for tools and putting the shop back together as we just had a new garage floor poured.


Shortened barrel with muzzle end turned to fit M16A1 triangle end cap and Front sight.
Bushing needs fitted, final length determined and threaded. 

 Above and below we see the start of what is to be the modifications needed to morph the old Model 60 barrel into what we need it to be for our project.


Barrel being turned to fit M16A1 front sight and end cap

 We started with 1 1/4" mild steel round stock for the barrel bushing (pictured below) Since the shank on the barrel was close to 5/8's I chose to drill the center of the bushing to 5/8's and then fit the dedicated barrel closely to that.


Roughed out barrel bushing ready for final fitting.


Final turning of the bushing collar.

Above we see the bushing being shortened up a little, Here is where my prototype took a wrong turn but more on that further down.


Test fit


Ready for a barrel


Barrel bushing fit is very important as it must be tight since this is where the accuracy comes from. Note on above picture the upper receiver is missing the area under the ejection port, this was bashed in to "demil" the receiver, why? I'm not sure. I have it on good authority you can not bend and weld 7075 alum so I removed this lower section, it should not greatly hinder anything with this particular build.


Barrel press fitted into the bushing, for future designs this should be pinned into place.


Note barrel bushing stick out into upper rec.

The place where this prototype took a wrong turn was in the distance the bushing goes into the upper receiver. I measured wrong somewhere and made the bushing nearly 1/4" too short, what happens is the bolt goes too far forward and binds on the magazines. This will be a easy fix 


Upper mocked up to take a look at the progress. The "Ohio" hand-guards were the only spare ones I had around, they were left over from team shoots.


Threaded for 1/2x28 

Now politicians can worry.......its the dreaded bird cage. 

The flash hider and threaded barrel are really not needed for this particular build but I chose to thread it and put one on as it makes the build look more complete and is a nice finishing touch. The fact that this is a trainer upper also pushed me to put one on as when I'm working with trainee's this will be closer to what they may find "off the shelf" also it protects the muzzle which tends to find its way into the floor from time to time if shooting prone.

Mocked up again with the flash hider installed. Rubber bands make a dandy quick delta ring.


So from here we will need to mill the barrel bushing to accept the M261 bolt, drill and pin the front sight base in. The fix for my mistake can be done one of two ways, either make a whole new bushing which wont be hard or further modify the barrel to extend a little farther into the receiver. either way I will have to pin the front sight base a little farther forward than initially intended as the distance between the delta ring and the end cap would be too short. I plan on making a few more of these uppers once I get all the kinks worked out. Recycling has never been so cool......