A few weeks ago I ventured into Northern Ohio to shoot a pretty famous (locally speaking) combat shotgun match that I had heard about from a security guard at work who also taught defensive shotgun in his free time. The match is simply the "Francis Marion (Swamp fox) memorial" but I would add "Combat shotgun swamp match" the that title...but that may be too long seeing as the T shirts we got were already limited on space because of the art work they chose.
The match had 3 stages, a swamp stage, dry land and woods stage, which had a creek element in it as well. The swamp stage is what I want to talk about here since the woods and dry land were not difficult. I don't usually give match reports like this, in fact this is the first one I've ever done but this shotgun match is so unique it deserves honorable mention here.
Going into this match you have to know your shotgun well where the controls are and how to work the safety under stress.
Some rules I made up for myself on the fly in the swamp stage.
#1. Keep the gun out of the mud and generally clean
#2. Keep the hand loading the gun clean, your trigger finger hand can go in the mud that is fine. It only pulls the trigger
#3. When you stop to engage a target...reload on the spot before moving on.
Below is a video of a guy in our relay that shot the swamp stage.
Swamp run
The shotgun match required nearly 75 rounds of buckshot or shot (depending on if you could afford or reloaded buckshot) and 15 rounds of slugs in all 3 stages. I used the buckshot I spoke about earlier on in a post and had no issues at all I'm proud to say with my developed load. Except 1 miss on a 3"x3" square target at about 10 yards...might have been a hole in the pattern or been me not taking my time.
Either way, the match was physically challenging, Something I look for in a match where I want to learn more about how I act under physical stress and can manipulate my weapon. My gun was not flawless, the 870 I used had a jam or two that were easy to clear on the fly and a hung hull or two as well. But I still posted good times because I practiced practiced practiced clearing jams and failures, almost more than I did practicing loading the gun. In the end though I got hurt in the dry land stage with after shooting 6 rounds of factory slugs something caused a hung hull that I could not quickly get out, I missed with my 1st slug and since the clock stopped and that was the last shot needed for score I took the 5 second penalty for a miss instead of take 5 seconds OR more to try and clear the stubborn hull.
Saw a lot of close range misses with the shotguns as well, especially those with rifle and ghost ring type sights. Seems at 7 yards you shoot WAY low with them when holding center on a small steel plate. One shooter took 4 shots to knock down a very close steel plate right off the buzzer.
Hope you guys got out some this summer and shot some challenging matches. I hope to find more matches like these in the future, its hard though...shooting sports I've found are starting to cater to lazy and fat people....and yes sometimes old people that can't move so well. Those of you who have noticed we don't stand any more at Camp Perry for the Sitting and Prone rapid fire know of this change and why they did it....I think its BS and does not allow people to learn to establish GREAT NPA AUTOMATICALLY. Get out shoot some matches and learn your equipment!
Wednesday, August 1, 2012
Thursday, June 21, 2012
1000 Yard front sight base and rifle Update
I shot the Bob Wright memorial 1000 yard match with my new 6.5/06 rifle last weekend, 3-20 shot matches and I put about 84 rounds downrange using unlimited sighters in the 1st and 3rd matches, had some issues getting on target to start with. The front sight base worked very well. didn't budge, did not get loose, nothing! stayed right where it needed to be.
Being that this is the 1st time I've had to fuss with getting MY OWN rifle on at 1000 yards with iron sights I had made a thermometer target and shot it at 100 yards to zero. The only issue I think I ran into however is my home range shoots a bit downhill and Camp Perry is near level I think. Everybody said I needed to zero 27 MOA high to be on at 1000. Later on the ballistics program I ran some numbers on after finally getting the chrono to catch the bullet and not the bits of grass or my muzzle blast said 32 MOA was what I needed.....The ballistics program was correct and when I came off the line having just finished with a pair of X's I had exactly 32 minutes on my rifle (128 Clicks). But when I shot on my home range to confirm this I was still only 27 MOA high? and the two shots I fired at the thermometer target were touching and 7 inches out to the right (that was my wind correction from the last match and I hadn't returned it back to mechanical until I shot on the thermometer target) So I'm still doing a little head scratching there. Soooooo I'm not really sure where my 5 MOA went to at this point in time, May re-fire the target again and see if I was just holding different that day. I hung the target with a plumb bob so that wasn't the issue....only other thing I could think of is the cold bore shots vs very hot bore shots....but 5 MOA??? the aiming black is 4.4" at 100 and 44" at 1000...hmmmm
Anyways my scores were pretty good I shot a 188-3X, 182-2X and a 176-1X I had some position problems and stock/cheek weld problems which resulted in a nasty abrasion on my cheek.
Monday, June 11, 2012
Shop project: Front sight riser/base for new 1000 yard rifle
With the help of my gunsmith mentor I've been putting a 6.5/06 rifle together for 1000 yard matches. This rifle is going to be using iron sights and shot all prone. The issue here is that the rear sight mount on this rifle puts the rear sight nearly 1 5/8" above the center line of the bore. The barrel which started out life as a 1.25"x28" blank is now a tapered barrel going down to .850" at the muzzle. The Redfield sights that I am using should parallel with the barrel so I can zero and practice at 200 yards and move out to 1000 yards easily, right now the rifle would shoot about 20' high at 200 yards if the front sight was mounted so low. So I need a front sight base that raises the front globe up about 1/2" roughly or so. Did I mention the first match I plan to shoot the rifle in is in a week? I've only had the action for a month so its been a bit of a race to get everything together. Sadly my mentor is very busy this month so I'm on my own to make a front sight base for this rifle. I'm choosing to make a single piece clamp style out of 6061 Aluminum. Its simple lightweight and pretty straight forward to make.
Note: I used a webcam for the pictures, did not have a camera to use while I was making chips sorry.
 |
| The design is a one piece clamp style. |
 |
| Attempt #1 ended in a off center hole, Yes I could have machined material off the large side but I chose to just try again, I can always rework the 1st piece. |


From the front it looks pretty crude...I think it was just the angle, the side view looks a lot better in
my opinion and shows just how bulky it is. Like I said 1st attempt, very utilitarian, may make some modifications with it....then again if it works I may just leave it.
Sunday, May 27, 2012
.375 H&H Swage die update
Core uniform swage die is finished, I choose to have it make .312" cores so I could use it for other calibers like 35 and such. The cores actually come out .314" however but they will work either way....I'm not actually sure why they come out slightly over sized from what I reamed the die body to but it wont hurt anything since these will be seated into the jackets then squished again.

Once I get going I don't wanna mess with pictures, Here is the finished product with a sample swagged core. Note excess being squished from the side of the die. Also got 2 of the 3 pieces done for the core seat die done today....Should have a finished die set in the next week or so. The reamer for the point form die must be heat treated and ground so that will take some time.

Once I get going I don't wanna mess with pictures, Here is the finished product with a sample swagged core. Note excess being squished from the side of the die. Also got 2 of the 3 pieces done for the core seat die done today....Should have a finished die set in the next week or so. The reamer for the point form die must be heat treated and ground so that will take some time.
Monday, May 14, 2012
Slings for the working gun
Rifle and shotgun slings are accessory items that should be seriously considered on working long arms, that is long arms that are going to go into the field with you, hunting or checking on the buildings and livestock when you know there have been coyotes in that back pasture or ground hogs in between the buildings and we all know what it feels like when we come across a job for a rifle that is back at the house...... "the things you see when you haven't got your gun...". The same argument could be made to a greater extent to carry a sidearm. Its completely hands free until you need it and when you need it YOU REALLY NEED IT. And as the man said..."a sidearm is there so you can fight your way to a rifle (or shotgun)".
Slings come in many flavors from top grade leather with sheep skin pads to synthetic jobs with more adjustments and sliders you can shake a stick at. My argument pretty much here is you're much more likely to carry the gun with you slung over your shoulder than if you had to constantly occupy the use of one hand to carry it. Tactical conditions not withstanding slinging a rifle over your shoulder is perfectly fine. The only thing I would keep in mind is muzzle up or muzzle down. It does vary how you deploy the firearm when it is needed. I prefer muzzle down myself as it is easier to deploy, I grab the forearm of the rifle and bring it up instead of un-slinging and grabbing with the weak hand and climbing up the firearm as it were. Being taller, rifles like a Mosin Nagant with the barrel up would put the barrel at about the perfect height to run into the top of door frames and brush if I'm walking through either or.
Home defense guns 99% of the time should not have a sling on them at all, especially in smaller homes. The sling is made for 3 reasons, to carry the gun, to support a shooting position and to retain the gun when freeing up both hands is a must but slinging the gun on your back is not a option. If you are clearing your dwelling with a sidearm yes then use a sling but make sure you train with it, aware of how it snags and decide if its worth the risk of tangling up your long arm. The basic M1 Garand and M14 cotton and nylon sling are great starters for teaching positions and use of a basic sling, really wanna get the basics down before we try to teach anything else more complex.
You need to really understand with guns why we are using what we are using and putting on the gun as an accessory , it may not work the same for you the way we are making it work for ourselves. You need to start with a standard firearm and use it train with it, and then add to it as necessary. It is ok to get a AR with a rail and try combinations of accessories while you find what you like, what you don't like and what works/does not work. But do not go buying something with lots of stuff hanging off of it you think you need especially if you don't know why its there or how best to utilize it.
One thing you should take into serious consideration in a defense firearm is quick detach (QD) sling attachments. There are a lot of good ones out there for your use (if you have a use). I don't understand needing two QD points unless you need to remove the sling completely or put it on quickly...which may be a good option for long arms that may go on post apocalyptic patrol with you after you sweep your apartment and bug out? But in all seriousness a sling with 2 QD points will allow your shotgun or rifle you use in the 2 gun matches to be quickly modified for use as needed. I stay away from single point slings as I view them more as a modified lanyard of sorts more so than a sling. If you are hands free of your long arm and crouched the muzzle may go into the dirt with a single point sling. Try one out and see how you like it, I will stay with a modified 2 point.
Sling position on the gun will have a lot to do with how it functions as a useful accessory. Positioning the sling correctly to maximize use and comfort when the option is in your best interest. Try not to mix the side mounted front sling stud and a bottom rear sling stud.....esp if you are using the sling to transfer to a secondary weapon.....you will nail yourself in the groin with the pistol grip of your AR or other such flavored rifle or shotgun...and I'll laugh...at you...for a while. For firearms that are going to be used for 2 gun matches or otherwise are "worn" and "retained" when transitioning from long arm to pistol or revolver I highly recommend side mounting the sling. Again train with it, learn it and modify it as needed....shoot matches and put it in use! You need to know how your gear is going to perform when you go to use it...either for farm use...or for matches.
Slings come in many flavors from top grade leather with sheep skin pads to synthetic jobs with more adjustments and sliders you can shake a stick at. My argument pretty much here is you're much more likely to carry the gun with you slung over your shoulder than if you had to constantly occupy the use of one hand to carry it. Tactical conditions not withstanding slinging a rifle over your shoulder is perfectly fine. The only thing I would keep in mind is muzzle up or muzzle down. It does vary how you deploy the firearm when it is needed. I prefer muzzle down myself as it is easier to deploy, I grab the forearm of the rifle and bring it up instead of un-slinging and grabbing with the weak hand and climbing up the firearm as it were. Being taller, rifles like a Mosin Nagant with the barrel up would put the barrel at about the perfect height to run into the top of door frames and brush if I'm walking through either or.
Home defense guns 99% of the time should not have a sling on them at all, especially in smaller homes. The sling is made for 3 reasons, to carry the gun, to support a shooting position and to retain the gun when freeing up both hands is a must but slinging the gun on your back is not a option. If you are clearing your dwelling with a sidearm yes then use a sling but make sure you train with it, aware of how it snags and decide if its worth the risk of tangling up your long arm. The basic M1 Garand and M14 cotton and nylon sling are great starters for teaching positions and use of a basic sling, really wanna get the basics down before we try to teach anything else more complex.
 |
| Pictured are two popular rifles with two different sling set ups. The top M4 type rifle has a side mounted sling the rear point is supplied by a side stock magazine pouch. |
One thing you should take into serious consideration in a defense firearm is quick detach (QD) sling attachments. There are a lot of good ones out there for your use (if you have a use). I don't understand needing two QD points unless you need to remove the sling completely or put it on quickly...which may be a good option for long arms that may go on post apocalyptic patrol with you after you sweep your apartment and bug out? But in all seriousness a sling with 2 QD points will allow your shotgun or rifle you use in the 2 gun matches to be quickly modified for use as needed. I stay away from single point slings as I view them more as a modified lanyard of sorts more so than a sling. If you are hands free of your long arm and crouched the muzzle may go into the dirt with a single point sling. Try one out and see how you like it, I will stay with a modified 2 point.
 |
| Not all mounts are steel or plastic...at least hard plastic. The M4 you can see has a paracord point which is silent and movable. It will not melt where it is mounted and does not get in the way The M44 has leather fasteners which should occasionally be oiled to keep from cracking if its a truck gun. |
Sling position on the gun will have a lot to do with how it functions as a useful accessory. Positioning the sling correctly to maximize use and comfort when the option is in your best interest. Try not to mix the side mounted front sling stud and a bottom rear sling stud.....esp if you are using the sling to transfer to a secondary weapon.....you will nail yourself in the groin with the pistol grip of your AR or other such flavored rifle or shotgun...and I'll laugh...at you...for a while. For firearms that are going to be used for 2 gun matches or otherwise are "worn" and "retained" when transitioning from long arm to pistol or revolver I highly recommend side mounting the sling. Again train with it, learn it and modify it as needed....shoot matches and put it in use! You need to know how your gear is going to perform when you go to use it...either for farm use...or for matches.
Saturday, May 12, 2012
Zen and the art of Browning high power maintenance :or: Talk to your kids about font size before somebody else does....
My only 9mm (non conversion) pistol I own is a Canadian Inglis Browning high power built for the Canadian military. Recently I've had some problems with it bulging cases and the safety gets snicked on and off at random while I am shooting and while its riding in my holster...not cool or safe. I found a weak recoil spring was why it is bulging cases, the gun was unlocking too soon and the barrel was not supporting the entire rear of the case during the firing process. A stronger recoil spring is the answer for that, specifically a 18.5lb Wolff spring. I highly recommend Wolff springs for all firearms that they can be had for. I've used them as replacements in revolvers and automatics as well as some rifle. If you can field strip the gun....you can replace the spring.
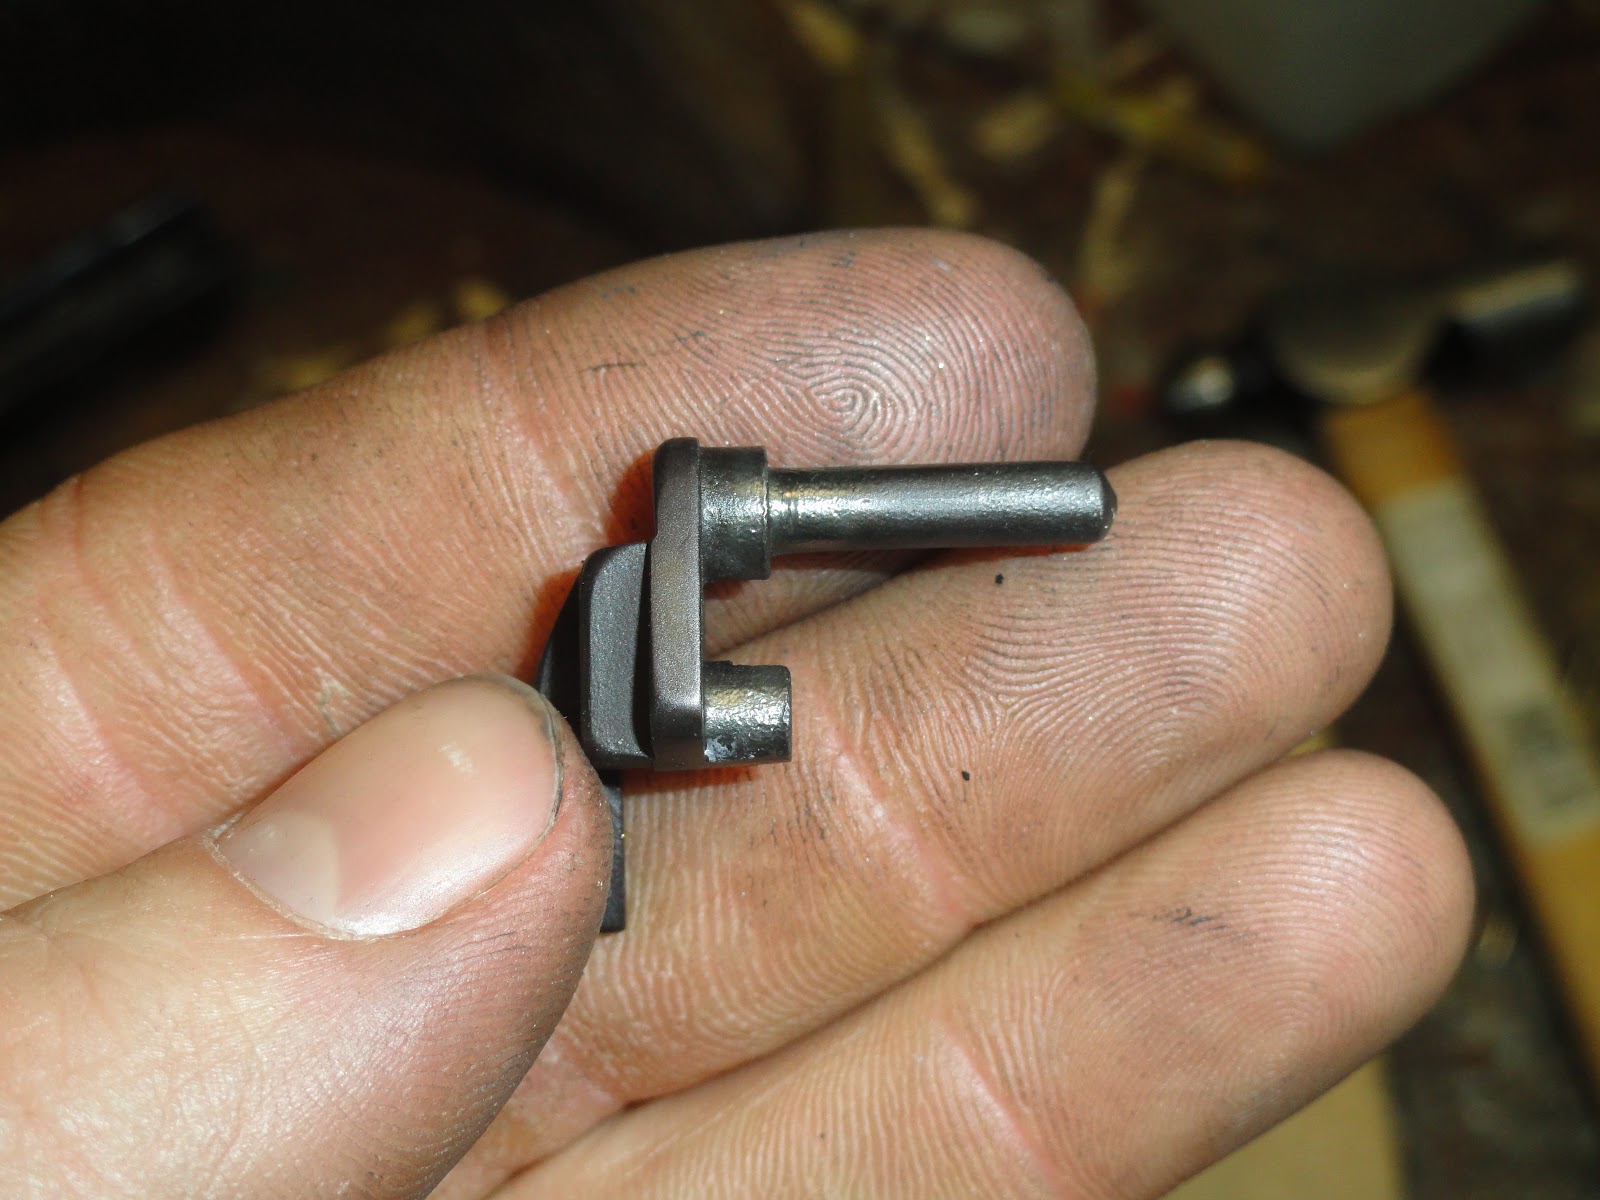
Ok, so the spring is the easy fix, the harder fix being the safety going on and off when not intending to do so. Firearm controls should be positive and smooth. The low profile safety on this gun was smooth in going on and off when I didn't need it to and it was positively a pain. Knowing I would like a slightly larger safety on the gun I looked at getting an extended safety I could fit to the gun and would have better control over. I ordered through midway a Cylinder & Slide extended BHP safety that would be required to be installed by a competent gunsmith......yeah not a drop in part. But I got lucky, installation was easy on my particular gun sear and safety engagement was good, the only problem was the ejector insert when pinned back into place caused the ejector to lift significantly to the point it was binding the new extended safety. Some fitting will be required to allow the safety to move freely. Upon closer inspection after test fitting the new safety I found the place on the shaft where the ejector was rubbing. It turned out there was a high spot on the part that would need to be removed.
 |
| Here we see the ergonomic differences offered by the C&S extended safety. |
To sum everything up, certain gunsmithing projects can be fairly straight forward if you take your time and don't rush. I am not a gunsmith by profession and I am not a expert....I'm still learning and will continue to do so till the day I die...which will probably be the day I learn about how to piss off a Cape Buffalo. With care and skill and taking the time to learn and research before starting most gunsmith tasks are fairly straight forward. Read, re-read, watch, learn, practice and improve....its how we do good work. Even though the instructions for the safety had touched on fitting it if the sear blocker did not work we ran into a issue that was not addressed in the instructions. We noted how the parts interacted and test fitted many times before removing any metal. Only taking a few strokes at a time we did the job right the first time. I could have modified the ejector plate but that was not the issue...there was nothing wrong with it and I would have been making a part fit another part that was not the correct dimensions. Go slow with a steady hand and most of the time you'll have a job you'll be proud of. Or make sure other parts cover it up....
 |
| The wear spot being marked by a yellow dot needs to be uniformed with slow even rounding strokes with a file. The result should take off the high spot and allow proper function of the safety. |
 |
| Leave the power tools to the idiots on TV....assorted small hand files will do a lot of jobs well. |
 |
| The author finds this self made gunsmiths block very helpful when disassembling and assembling handguns and parts groups for various firearms. Note space for small parts and punches. |
 |
| Finished part buffed with Dremel wire wheel to blend and clean up the tool marks left by the file. (SOME power tools are "ok") |
 |
| Here we can kinda sorta see the issue, imagine the plate part being forced up counter clockwise causing the shaft of the safety to bind. |
 |
| Installed and properly fitted the new recoil spring and safety should bring this firearm back into service without any further problems....and I pray I don't break an extractor...cause those are hard to find for these Mk 1* guns. |
Tuesday, May 8, 2012
.375 H&H Swage dies update #4
Working on reamer design some more and exactly how to make the dies the best way. I think I've found that machining the dies from the inside out provides the best accuracy and lessens time spent on retooling for each step. When I say from the inside out I mean do the precision internal stuff near the center of the die first and thread last. Hopefully I'll have a complete die set done by mid May!
Thursday, March 22, 2012
.375 H&H swage die update #3
The D reamers I made work, new 4 jaw chuck is in and works just fine. Got a bit less done than I wanted to but theres always next weekend to get the die set finished. New project landed in my lap for somebody else so my .375 H&H project will get shelved for a few weeks. May put a few late nights in on it if I can sneak them in
Tuesday, March 20, 2012
Improving the simple single shot
Just a quick post on a easy upgrade for Shotguns of limited capacity. My focus on this is single shot shotguns and being able to carry some spare ammunition on the gun instead of in your pockets. First off I'll just say that you should avoid the cheap Wal Mart all black elastic butt cuff loops altogether, they may work for awhile but after some time you will start to see the elastic wear out and you'll be fighting it all the time. If you have any experiance with leather work this is a simple project. I had a custom holster maker friend of mine give me the parts to assemble my first few butt cuffs for 12ga. They do take time and effort but at the end you can be proud of what you've created. And you can carry 5 or more rounds on the gun.

Top and bottom are the two 12ga leather butt cuffs I made
from previously cut patterns
The middle 2 are 20ga and were purchased at a show for $5 each!

The bottom "green" shotgun is a project gun that is under repair, Picked it up for $40 only needed to replace the forearm and find a buttplate for it, may make one out of stippled steel
Saturday, February 25, 2012
.375 H&H Swage die project update #2
Last weekend I spent the better part of 2 days working on die bodies and punches for this die set. I had just threaded a few die bodies and was getting ready to finish up base punches when I broke the adjustment screw on my only 4 jaw chuck for my lathe. My other chuck is a 3 jaw scroll chuck and isn't nearly as accurate as using the 4 jaw...as soon as I get a new part or a better chuck (chuck I have came with the lathe as is indian made) I'll be back in the shop.
I did work on a few D reamers for dies and worked on bullet shapes some more for the point form dies. I'm very pleased with how easy the 0-1 steel is to heat treat. I'm just not sure if the die bodies need heat treated or not. If I do more of these I'll want to get cheaper steel for non important parts as doing a entire set out of 0-1 is not the cheapest way to do it. However I wanted the option of heat treating.
I did work on a few D reamers for dies and worked on bullet shapes some more for the point form dies. I'm very pleased with how easy the 0-1 steel is to heat treat. I'm just not sure if the die bodies need heat treated or not. If I do more of these I'll want to get cheaper steel for non important parts as doing a entire set out of 0-1 is not the cheapest way to do it. However I wanted the option of heat treating.
Wednesday, February 15, 2012
.375 H&H swage die project

What you see above is a die set turned and threaded on my South Bend lathe for making .375 jackets out of 9mm and .38 spl cases (with rims turned off on lathe). I had to make 2 punches for each of the cases as the .38 spl can go through base first but the 9mm is better off going through case mouth first. The short stub is the knock out punch. All done from 0-1 tool steel. The power zone on the Walnut hills press is from 4.25" to 3.75" of the ram closure. So you have to make the base die fairly tall. Keep tuned in for the other dies I'm making and process to make a complete die set including making reamers and such. Only thing I really learned from this die set (besides which way to throw my threading gear to get right hand threads) is to make the die .003" undersized as the annealed cases have about .001" spring back. I'll have to make another die which won't be hard this one gives me .376" jackets and they need to be undersized from the get go unless you have a lot of pressure to work with which I do on the walnut hills press but I wanna go easy with them at first. I only want to undersize them a few thou on these first sets.
Wednesday, January 18, 2012
Champion shooting gear 10/22 Magazine loader
I usually don't like mechanical gadgets for loading magazines esp .22 magazines but after I got the 30 round 10/22 mags and loading them became somewhat of a chore I looked around and found that Champion shooting gear brand makes a magazine loader that is fairly easy to use and costs around $32 ( I got mine at Cabelas and did pay full retail) I purchased it with a Christmas gift card...about the only reason I got it really, would not have gotten it otherwise but I really was intrigued by the design.
The hopper holds up to 75 rounds or so max. Good if you want to watch your ammo consumption....keep from going through a brick of ammo in a half day. The winder is like that of a wind up alarm clock. I'll post pics later. You pop the magazine to be loaded in and with each full rotation of the winder you load 1 round. It has worked on the factory and after market mags I have. Have not taken it to the range yet so we'll see how it holds up to a full day of use and semi abuse. Product number #40430
Subscribe to:
Posts (Atom)