Monday, December 29, 2014

Some 38 special & 357 magnum carbine observations: The Ruger 77/357 carbine hand-loaded part 1

There are few things in life that make more sense than to have a good rifle in the same caliber as your sidearm. There are passels of carbines, as they should be called as they are of a sub class of what would otherwise be a battle rifle, not for their physical size as the M4 "carbine" is called but as for their caliber to be had in nearly any pistol caliber one desires. This idea is not a new one, it just makes logistical sense to have a pistol and a rifle/carbine take the same ammo. The practice is sound, having to only worry about obtaining and carrying just one caliber such as .45 colt or two if .44spl/44mag is your choice as it keeps things simple....so long as you can obtain that one caliber at least.

The primary focus on the following concerns specifically the Ruger 77/357 bolt action carbine (or rifle if you prefer). The little 5.5 lb 4-5 shot package just at 38.5" overall has a lot to offer somebody who is looking for a rugged firearm to accompany them into the middle of nowhere which isn't a bad place to find oneself now and again. Mostly this post is focusing on the increased performance you can expect out of the longer barrel of such a handy carbine, the same could be expected from a handi-rifle, Contender rifle or lever action. The fact that this carbine features such a mild to wild caliber in such a rugged offering being it bolt action stainless gun with synthetic stock! Gives this little package a good deal of versatility when it is put up to say a wood stocked lever action that may have trouble feeding a large variety of rounds one may wish to put down the pipe.

Note- the previously discontinued offering of the 77/357 was blued steel....to my knowledge only stainless is being offered now.


All data was with using CCI primers and given in feet per second. The LCR was tested out of curiosity, not for serious comparison however it does show some problems that could crop up in load selection.


  • .38 Special - 92gr Round nose cast 4.9gr of Bullseye  
              77/357-   1278,1297,1302
              GP100 4"-  913, 927, 939
              S&W 65 4"-906, 965 , 907
             LCR-  544? 900, 916, 746

Note there are 4 velocities given for the LCR, the first 544 FPS  may have been a error of some sort, maybe the chronograph caught something other than the bullet, some shed lube perhaps. But the fact the 4th shot is so much lower than the middle two make me think either my charges were not consistent or we were having ignition issues with such a fast powder compared with case capacity and bullet weight. Something to keep in mind when wanting to use a given round across such a wide variety of barrels

  • .38 Special - 148gr Speer Factory hollow base wad cutter (HBWC) with the classic 2.7gr Bullseye
         77/357- 769, 760, 754
         GP100 4"- 587, 618, 598 
         S&W 65- 608, 595, 617
         LCR-563, 589

This is a popular target load for the .38 Special, it seems the 2.7gr load is the staple for a lot of shooters. Not to mentioned highly economical as you get 2592 loads per pound...that is less than a penny of powder in each shot (I purchased Bullseye @ $18 a lb in November of this year).

  • .38 Special- 160Gr WC 3.8gr Bullseye
          77/357- 974, 973, 976
          GP100 4"-817, 795, 797
          S&W 65 4"- 801, 813, 793
          LCR- 755, 729, 729

This load I kind of just came up with, I had a lot of these heavy 160gr Wadcutters already cast up from a while back just needed a excuse to send them down range. It is interesting to note just how little difference there is in this load between the revolvers and the carbine....Though velocities were exceedingly consistent in the rifle there is only about 250 fps difference between the LCR and the carbine. My thinking is the powder being Bullseye it burns too quickly for the longer barrel to give it any sort of major boost one might be looking for as a benefit to toting a longer barreled version of their sidearm around.

  • .357 Magnum- 158gr Lee SWC 14gr Alliant 2400
           77/357- 1702, 1629, 1675 
           GP100 4"- 1174, 1205, 1123
           S&W 65- 1241, 1216,1213
       
 No LCR data was collected due to our fondness with the feeling in our hands (Read, this load is stout in snub nose guns) not to mention accuracy was questionable since the chronograph was set further away than normal.

This bullet whose mold is offered by Lee is quickly becoming one of my all time favorite bullet selections available in the 38/357 realm. It cuts a nice clean hold in targets and is easier to load that most SWC bullets from a speed-loader into the cylinder of a revolver. It feeds easily in the 77 and offers a versatile all around bullet in the 158gr realm.


These were just some observations, testing will continue along with other bullet designs being added as time and equipment allows.  I plan to add some swagged projectiles to the lineup as well as a light 125Gr cast bullet, 173gr cast bullet, 215gr cast bullet and a .375 round ball pushed through a .357 sizer for plinker/small game rounds.

As I stated before I can see the sense in stocking only one caliber of ammo but you can quickly get into a lot of specialty loads if you deal with 38/357 or .44spl/.44mag  and want small game loads, shot loads and medium/big game thumpers.


A simple firing pin gauge

Whats a good method to measure the firing pin stick out as it relates to the breach face? 
I've been working on some  H&R Pardner shotguns and Handi rifles lately trying to track down the source of misfires and other such failures to perform as designed. The first hypothesis of the problem was presumed light firing pin strikes, possibly caused by short firing pin protrusion. Although this has turned out not to be the case with the two Handi rifles I am working on currently both rifles had shorter than minimum firing pin protrusion to be reliable. Having tried to measure the firing pins accurately proved a bit of a challenge as I was using the depth measurement on a dial caliper to try and get a measurement, this quickly proved inaccurate as one must hold the trigger to the rear while at the same time taking the measurement keeping the instrument perpendicular to the breach face. I knew there must be a quicker, easier and more accurate way to get the measurement I was looking for...and there was. Brownells sells a marvelous little tool that is comprised of 3 parts and costs $30. Yes, $30...so that wasn't going to happen any time soon. I happened to have a good stock of 0-1 in the shop so I set to work making a rough copy of the brownells firing pin protrusion gauge. Yes they make and source excellent tools but I wasn't going to pay $30 for something so easy to make myself.

The actual making of the tool will not be pictured here as it is fairly straight forward.
Materials include:
1/2" drill rod
1/4" drill rod
1/4" drill bit
Socket head set screw of your choice with offending tap and drill.
Lathe and necessary accouterments for the proper use thereof.

Taking your 1/2" drill rod, drill a 1/4" hole about 1" deep, take cutoff blade and part so you have a piece about 3/4" long or so, this dimension is not critical but do make sure both ends are faced. Deburr drilled hole as needed.. About 1/4" or so from one end drill and tap a hole into the side of the cylinder for your set screw.

Take your 1/4" drill rod and accurately measure and cut off a 1.000" piece making sure both ends are faced. It really can be any length you want it to be so long as its longer than the 1/2" stub you made earlier. It would save you time and math in the future though if you just took your time and made it a accurate 1.000" long.

The best things are simple, I made two of these gauges in about 45 minutes.

Tip- if you know you will be using this gauge on bolts with recessed faces it would be a great idea to turn the end farthest from the set screw hold down so it can sit inside what you think will be the smallest case head you might work with would be.


This is one possible method to measure the stick out, lets see how it works. (Photo by CP)

Might look good side to side but what you can not tell is the instrument is badly tipped causing the reading to be misleading. (Photo by CP)


Here is our gauge in action, simply tighten the set screw and take measurement with the same dial calipers from before. Don't forget to subtract the 1.000".....

Small yet critical
Simple tools like this make quick jobs of measuring critical things such as firing pin stick out on a firearm when trying to diagnose a problem. Though my issue still has not been resolved I have been able to confidently measure and eliminate the firing pin as a variable. 


Friday, December 12, 2014

"Ammunition Making By George E. Frost" ......My version of rare old comic books worth a lot more now then when purchased.

If there is one thing we all understand in the gun culture it is the term "collector" as it is used to define the varying degrees of our involvement in the various tasks of obtaining, cataloging, shooting..etc etc the firearms which appeal to us.

I have not considered myself a "collector" of books until I sat down to write this review and did some quick searching online as to where the general public could get this book. Then it dawned on me, I have never seen another physical copy of the book since I purchased mine new in the wrap some 14ish years ago I think for under $15 I'm sure as I was young and pocket money was scarce. So I must apologize ahead of time, if this review makes you want a copy of this book and you get sticker shock (cheapest I found was $179, going up to $400 quickly). To the point, I went back to the shelves and really just realized how many books I have I could review but this one seems a natural step in the progression of learning about reloading so I will review it anyways. Note: There are E-book type downloads and copies that can be had very CHEAP...at the risk of spoiling the review....I recommend going the E-book route unless you are looking for investment grade publications??


The book in question is "Ammunition Making" By George E. Frost 1990, published by non other than the NRA...they could use some sense and print up a few more copies of this book and sell them for a steal at $35 a copy and negate the need for the twice a month phone calls I get asking for additional funds to fight the good fight. Yes, right the book.....The book itself is a 161 page mind blowing look into how a lot of things we take for granted in the shooting community is made. The index is very intriguing and is covered as follows with sub categories omitted for brevity

    The Cartridge case
     The bullet
     Shotshells
     Clay targets
      Primers and priming
      Powder
        Loading 
    Ballistics in the factory
      Troubles
      Accuracy
     The .22 Match cartridge
    Quality Control
     Fires and explosions
      Working in foreign lands
     Tidying up
     Final thoughts

I could rave about the depth and usefulness of the information this book covers for pages and pages but I'll try to keep it short. If you have a interest in learning how small arms ammunition is made, the actual physical process of forming the various components, including the Clay birds mind you (though only a page and some change covering that topic)! Then you will find this book exceedingly delightful. It could be a book you pick up every so often and reread sections on how this or that is made so you better understand the industry standpoint on a massive production scale. But I'll be honest I read the book when I first obtained it, absorbed all I could at the time and have not looked at it again until now. Re-reading it I have a better understanding of some processes. Especially after having started swagging my own bullets and modifying cases for reloading. 

You do not have to reload to get this book and enjoy it, you merely have to have a interest in production methods and small arms munitions really.  The information this book divulges is worth the money I originally paid for my copy.....though I could not see paying more than $35 for a copy when electronic versions are available....its a really great reference work however to the average shooting Man/Woman the book is out of reach at the price the "collectors" have positioned it at in the market. Too bad really as it is a wealth of knowledge that should be out there in the world more readily available. Hey NRA!....wanna do a reprint??


Sunday, November 23, 2014

Speer reloading manual #10, Hornady handbook & Modern Reloading (Lee load manual) : Manuals to learn by

Continuing on with the reloading manual theme we move on to what a lot of re-loaders would consider "meat and potato" manuals. Now I'm not sure how many reloading manuals the average re-loader owns....I'm willing to risk a wager that its around 1 actually. As I've stated in a previous post it is unacceptable to not have any PHYSICAL copies of a reloading manual within your reach. I happen to have an abundance of reloading manuals that span 7+ decades of development and cartridges. If you start to load some odd or variations on a given safe load then you will find older manuals a gold mine of information. Also older manuals give a lot more information on how to figure your own ballistics and other highly interesting information not otherwise covered.  In this post I will cover 3 manuals off my bookshelf, first a Speer manual (#10 to be exact) printed 1979. Second, Hornady handbook printed 1973. A newer manual is the 3rd choice here covering a good amount of data and if one wished a SINGLE manual for their reloading needs this is one I would tend to lean towards that can still be had on store shelves, " Modern Reloading second edition" By Richard Lee.


Speer-

This Book is one I obtained really without thinking about it, I remember now I was at a gunshow and a vendor had  a haphazardly organized box of books under his table. A friend and I inquired as to prices and the guy just said "oh $1 each I guess"....we both filled our bags pretty well if I remember correctly. Later on this "Speer manual" would become one of my favorite reference manuals. I would actually read the front half of  between college classes...as well as look up load data while waiting for laundry to dry at the laundromat.  The book has more than 100 pages of detailed information on the anatomy of the cases, (speer) bullets, primers and of course all the reloading equipment as well. What makes this book interesting is that it covers the history of Speer, RCBS and CCI and gives the reader insight into their inception.

Getting into the reloading data itself the book covers not surprisingly only Speer projectiles, those weights are the most common still yet today in a myriad of calibers so it isn't as big of a issue as you may think. One of the hallmarks I believe of a COMPLETE reloading manual is a brief history of each cartridge prior to its data. This gives the re-loader a little more information on their pet caliber. A separate section on loading handgun calibers gives some tips on loading accurate handloads.

This book is over 550 pages long! it packs and incredible amount of information into a rather small volume. The last 130 pages are filled with ballistic drop charts (something one HAD to use before the advent of  personal computers) as well as other reference charts that one would find exceedingly helpful in reloading. If you can find a copy I highly recommend picking it up especially if you load for calibers that have not been introduced since the late 70's no WSSM calibers here.

Speer #10 is a compact quality manual offering a lot to the beginner.


Hornady-

First off I'll admit up front here that I think this is supposed to be a 2 volume set, as the new Hornady manual series I have is also a 2 volume set. One book contains load data and the other contains very complete ballistic charts. I have volume II which contains the load data (as well as some ballistic charts in the back...so I'm wondering what volume I actually contains?) and its worthy of some mention. The 40 some odd page "preface" as they call it contains the good reading material on mechanics and reloading. Although for a beginner there are better books out there for a "beginner's book". The point to mention on this particular book is the load data seems to cover more calibers, Usually we start with 22 hornet in most books but in this particular book we start with not one but 4 .17 caliber cartridges.  A brief half page history of each cartridge is presented in most cases and bullet selection is again as in Speers case, only Hornady bullets.  As with many of these older books you will have some frustration as you find powders are discontinued as well as perhaps some of the bullets.

The Hornady manual is a good addition to ones shelf but as above I would not recommend it as a re-loaders only manual to have on hand.


The Hornady Handbook makes for a excellent reference on jacketed projectiles but another manual would be desired if cast projectiles and a broader spectrum of weights are to be used.


Lee-

"Modern Reloading second edition"....This book is one I picked up at a Cabela's some time ago while on a road trip, I had a gift card burning a hole in my pocket and I needed some reading material. First off this book is hefty at 700+ pages, it is no light weight and is not something you will be tempted to use as a doorstop because you will always be picking it up referencing it. My particular copy is the 2008 reprint, since then a revised edition is available as I understand it. The book starts off with reason one may re-load... to save money, for accuracy (very true) and of course for fun! It will not take long for somebody to realize while working their way through the first 200 pages....yes 200 pages of instructions, information and how to's that you are pretty much reading a treatise on why one should use lee products in their re-loading.  Full blown instructions on the use of nearly each of Lee's products available at the time of printing are covered which is handy as sometimes information is more complete than in the little leaflet you get with the particular product. Lets say you want to load very accurate ammo for a bolt action and you have never owned a Lee product before, reading through the book you will learn Lee offers many specialized die sets to help you get better accuracy out of your rifle, or to make highly reliable and consistent hunting loads for a semi auto. Their factory crimp die for rifle is one I find particularly impressive. So 200 pages of various information from casting your own bullets to figuring out chamber pressures of a given cartridge (page 158 in my book) you will find this book can be very useful to the re-loader who wants to learn more about what it is he can do. After that you have 500 pages of load data on all kinds of calibers. The book is organized from smallest caliber on up. Not split up into sections containing rifle and handgun loads as most other books are.  As the book is assembled by a company that sells reloading products (as well as bullet molds) one will be VERY pleased to find that the projectiles listed are not only jacketed but also cast, so one will find that they have a very very complete manual in their hands so long as their cartridge of choice is listed (No short history of each caliber however). Much to my disappointment lately has been the lack of .500 S&W Magnum data which came out in 2003....perhaps data is in the new revised edition. I should want to find out before I make a purchase however.

The Lee manual has a lot of great information, it does seem at times you are reading nothing but lee advertisements but they are more than that really. At first I was disappointed at this fact when I got the book, but as time has gone on I'm pleased the information is there at my finger tips as I find myself using more and more Lee products at my bench as their QC has seemed to improve greatly. The book itself is a great one book resource for somebody just starting out and I highly recommend it.....but for the love of Winchester get a RCBS single stage press (read steel frame) and not a aluminum one from lee (though I think they are making a steel one now...I would much prefer green) when you are first starting out.


"Lee book" offers a great deal of information in its substantial number of pages and could open up new possibilities to those wishing to advance from beginner status which are also covered within its pages.

Tuesday, November 18, 2014

First thing's second: ABC's of Reloading , Possibly your best place to start.

Wait why are we doing book reviews? If you are curious as to why I am doing book reviews I urge you to read at least the first paragraph of the post that preceded this one.

In all honesty we should have started with this book in our series of reviews as this is what the beginner (as well as the advanced re-loader) should be picking up to familiarize oneself with the process of reloading and please remember the internet is not always a good resource for these kinds of things where misinformation can cause serious injury or worse. Even though I consider myself an advanced re-loader I still pick up this book from time to time and re-read sections I am wanting to review. I learn something new most every time even though I have read it once or twice already (yeah I am thick headed like that). "The ABC's of reloading" is as its cover states a "definitive guide to cartridge and shotshell reloading" and for once the claim on the cover does not lie. My copy being a 7th edition (mother purchased it for me from B&N sometime in 2004) probably does not have some of the updates the newer editions surely have, but is still valid in all the set up and safety information contained within.

In depth as well as a wide range of topics makes this book a fine place to start if one wishes to learn more about reloading. 


Say you are at a book store (as rare as they in physical form) and you have picked up your monthly firearms magazine (the periodical type, not the USGI type) and you flash back to the last time you picked up a box of ammo for your CCW or off the shelf varmint rifle and the hurt of the price tag. You think to yourself "I should look in the sporting section for a book on reloading"....why gun stuff is in always in the "sports" section and not the "lifestyle" section is always beyond me. You wonder on over and spy a few books with some interesting titles. Ones pieced together from magazine articles others by possibly a bullet or powder company, you pick them up and see that they have a few pages of "instructions" and a lot of data but not really what you are looking for. You see a copy of "ABC's of reloading" and pick it up....you flip to the first section and you see it covers....Safety!....well that is a great place to start you think and you begin to read through the pages...you get a great (not just good) overview of differences in ammo types and a good many things to look out for. You look around and spot a empty plush chair at the end of the isle so you wonder over and take a seat, flipping to the next section on Cartridge cases ..."how much to them could there be?" you think to yourself. You read on in soaking up all the information before your eyes, "oh that is how they do that" is muttered a few times as you are pleased with the content of the book and what you have learned so far. You notice then you have been reading the book for almost 20 minutes....and at this point your wife or significant other has started to hunt around for you and finding you asks if you are ready to go. You decide to buy the book as your wife has a small stack of a new vampire series and you only have a single magazine.

Through the next few weeks you read a little at a time and really start to pick up momentum. "ABC's" lays a good foundation and slowly feeds advanced information in as you go. Proper terminology and vocabulary are thoroughly covered in the numerous illustrations and pictures. A section on powders gives good descriptions and uses of the myriad of powders a re-loader could use at his bench. Primers, bullets  casting, loading for accuracy the chapters continue to greater depth and skill level. Rifle, handgun and shotgun sections reveal nuances that are specific to reloading for the various case designs and purposes. Want to reload for a old few old black powder cartridge guns as well? that is covered.


Illustrations & instructions from lots of manufactures as well as lots of terminology defined lend to this book being a valuable resource.

Pretty much this book is what could be recommend as a great place to start if you were thinking about starting to reload or have been reloading for a number of years and may want to pick up a few tips and tricks. Advanced books do not always give safe advice and as we may sheepishly realize from time to time it really is the basics...the "ABC's" if you will that create a quality and safe end product.

Friday, November 14, 2014

Lyman Cast Bullet Handbook 4th Edition : or : Lyman Cast Boolit Handbook

As part of my move I spoke about recently I will be doing some extensive book reviews on various publications that are (what I believe to be) foundational to the gun culture as a hobby and a way of life for us shooters, collectors, DIY'ers  and competitors (Though a lot of us I suspect are all the above and then some). The following reviews/overviews of various books are what I believe to be mandatory reading or reference for those who are mildly interested in the various topics they cover. I will only cover books that are firearm themed in these posts. Though fact is many other books could apply to our theme as knowledge is power but alas I will be limiting it simply to books intended for the gun culture. On with the first overview/review.

This newest generation some say is the most educated ever, I would tend to disagree with that notion on several fronts....knowledge and implementation of knowledge are vastly different..."no mayonnaise" still seems to cause them much confusion but I digress. The fact is information has been at our finger tips and nearly instant for more than a decade and a half, most of this unprecedented access is thanks to the internet. If you want to learn about something like how to fix your oven, what that weird bump is on your leg, how to build a trebuchet or the distance to the moon in arshins you turn to the internet without thinking twice really...at least most of us seem to. One thing that always seems to surprise me is the amount of people reloading their own ammo with not a single manual in their domicile. They glean the data off the internet from forums and run with it....so if you are new to reloading and I say run 30gr of bullseye in a .223 Remington behind a 80gr match bullet and you go out and do it....you have your own ass to blame for taking the advise of a keyboard expert. When somebody tells me they are getting into reloading I always ask them what manuals they have on hand.....half the time the reply is "none"....well that is unacceptable. Safety is the name of the game...so is knowing your decap dies from your seater and your belling dies. Knowledge is power....power can keep you alive. The first few books we will cover are reloading manuals published by Lyman. The time honored name of "Lyman" graces many of the products on my reloading bench (Lyman 55 powder measure being my favorite)....as well as bookshelf.


Old vs New the left book is circa 1973 The book on the right is 4th edition 2010


The Old -

My Father is a bibliophile in the worst way and it doesn't run it gallops in the family. One of the reloading books I have always seen out on his desk is the old  Lyman cast bullet handbook pictured at left above. Like any good reloading manual it has a introduction that gives a primer on reloading as a process as well as how to cast your own bullets. The book then goes into the data after only 40 pages starting with .22 Hornet and going up from there. Now the book does show some of its age in that some of the powders listed are no longer in production as well as molds that are no longer in production. However, this can also be a boon for those with older molds who can not find data...or obscure powders or their equivalents. Though powder formulations have stayed the same over the years (except for 2400 I have heard in a few places) you still need to cross check data between at least 2 books, I usually dig through a few books until I find data in two different books that agree with each other. This book is great for finding loads that made the Magnums the Magnums. But as always you will work up to those powder charges....you start low and go up....can't go back once you've blown up the gun. This book is the bible for old casters who like to flip to the back to the vast catalog of bullet molds once made for all the various calibers, guns and purposes. In this book alone I count 44 molds for the .38/357 line of calibers. I don't think I have enough fingers and toes and rocks to count all the 30 cal molds in this book either but its a lot (50+). You know the data within the book covers the molds listed in the catalog for the most part. My original copy of the 1973 Lyman cast bullet handbook is falling apart at the binding its so well used and for good reasons.


The New-

 Then there are the reissues of the manuals....and lawyers get involved. The new book 4th edition pictured above right is a nice large book with a good introduction to reloading and various how to articles by "Mike Venturino" who should really just have a lot of the gun magazines on the rack today named after him he seems to have so many articles floating around...most of which seem to be recycled quite a bit? Anyways the book has several chapters of "how to load ammo" in basic form. We don't actually get to any reloading data until page 100 and these are not small pages either. Now when we hit the load data...here is where the new book starts to gently pull ahead of the old book as its been published more recently it has newer calibers in it. In fact its the only book I have with .500 S&W data in it. BUT it seems the lawyers got ahold of this one and really tore the max load values way down.....Elmer Keith's famous long time proven .44 mag load is not even in here and over the few years I have used this manual I have noticed a few other loads I have established long ago that are above max are not in here? What gives? Well for one safety...but more over if you have been reloading for awhile you know how to read pressure signs and when you can go above book published data...the book does not bind you..but it should guide you. The really nice surprise about this particular edition of the Lyman Cast Bullet handbook is the fact that bullet data is not JUST bullet molds from RCBS/LYMAN But also Saeco and Lee....I mean WOW. Lyman makes everything that Lee does and yet they published data using Lee bullets. That was big of them....well probably because they quite making a lot of the molds as well. A look at the back shows a lot of nice data charts...but the bullet catalog this time (only showing RCBS/Lyman molds) only shows 9 molds for the .38/357 and 11 molds for the 30 cal stuff. Variety is down because demand is down. But also because we have culled out the more useful molds over the years and gotten rid of the more novelty molds. 

The Conclusion-

If you are looking to get into reloading, bullet casting or just curious about the process I would suggest you pick up one or both of these books to staff your shelf with. Even with as much reading as I have done I learn something new with every manual I get. Check back here often as more books will be covered as time goes on. I have more reloading manuals to cover as well as more (oddly) specific niche books that you may find interesting!

As this is the first of my posts on books and I hold books very dear to me I will leave you with a quote I made up a number of years ago when I was thinking just how much I have learned from books and how they have improved my life.

"Read, re-read, watch, learn, practice and improve....it's how we do good work". ~Ben Wolf


Lyman 55 Powder measure my choice of powder measures.  For those curious the blue mark is a reference line to fill the powder when it gets below that level. Doing so insures accurate drops of powder to bench rest accuracy.


Sunday, October 26, 2014

A bit of a paradigm shift for my writings and updates

This past summer has been exceedingly busy for me and as a result I have really dropped the ball on the projects/updating them here and actually getting out to the range myself to do my own work. I have had a lot of events this summer including finally graduating from college (debt free!), moving out of the city and in with my high school sweetheart (still working out of my parents garage as my shop when the opportunity presents itself) several weddings and road trips, changing jobs and taking welding classes. A house with a proper shop is hopefully within reach in the next few years and then this blog could really be something more than a occasional thing. Anyways this blog is going to revert back to more reloading bench type projects (since I live back in a place where I can have a bench) and less shop stuff as it was kind of intended. I will have the final results of the Poly choke barrel posted once I get a clear day at the range with a patterning board. The Contender grip project will be slow going still but I hope to complete it before the end of the year. I did not think the grip through as much as I should have and hopefully I can salvage the first block I started on....if nothing else I'll make a aluminum pillar and bed that in.

If you are a practical gun guy that likes to read I have something special in store. I will be doing book reviews on a TON of classics & series books this winter. I have a large library myself but also have recently rediscovered something often forgot in today's culture, the local library...which has a lot of rare titles much to my surprise. If you have any titles you are curious about please let me know. I may have them on my shelves and can give you a unbiased opinion on them. My focus will be on reference works and collector type books not novels. But please if you have ideas let me know them!

Also....as a teaser here is something showing several possible topics which I plan to cover....as some of you who read the first posts I had up when I started this blog know I like big bore handguns more to come later.


Tuesday, July 1, 2014

Getting a (purple) grip on the Contender! or We still can't drill straight holes


Bit of the back story.....
     The Thompson Center Contender is one of those guns I knew someday I would have. Well that day came a few years back and I obtained a nice SS gun with a nice SS 10" hornet barrel and ken Light sights. A good start but soon after....as I was warned with getting one of these... barrels started coming and coming.....and coming as I continued to upgrade and experiment. I have had the gun only 2 years or so now and have had about 10 or 11 barrels come through my hands while I experiment and see what I like. Some I sent down the road after just trying them on the frame....the super light 10" octagonal 30-30 and .44 mag barrel did not appeal to my hands at all. But the topic of the versatility of the TC Contender is for another post. One barrel I know I wanted to get AND keep was a .22 match chambered barrel and then put a Williams target knob rear sight on it. This would be for practicing one handed olympic style pistol shooting. Something I don't exactly intend to compete against others in but practicing one handed shooting and building up those muscles and skill never hurt.

 A few months into my looking I got lucky and a gentleman replied to my want ad with the williams sight  and a barrel in STAINLESS for what I thought was a fair price. When I took it out to the range I could tell this barrel would have a lot to teach me in marksmenship, it was not forgiving. The custom colored grips I got off a guy online which were excellent for two handed shooting lacked the real-estate for one handed support. These grips were made of some sort of very durable composite and tended to be slippery. I knew I wouldn't find exactly what I was looking for so I decided I needed to make my own set of grips. Is this a solution  without a problem? Well in a way "yes" and "no"...I could get rubber grips and modify them to my liking but I wouldn't learn anything from doing that. Anyways I finally had some down time to research the kind of wood I wanted to use to make some nice grips for myself. And settle on a style of grip as well. The wood search went on for awhile until I found somebody else online who had made a set of grips from "purple heart". More about purple heart HERE But anyways I got online and found a supplier who had "bowl blanks" in the size I deemed I needed for my custom grips. 4x6x6".  

3 blocks of "purple heart" wood more than enough for several grip projects
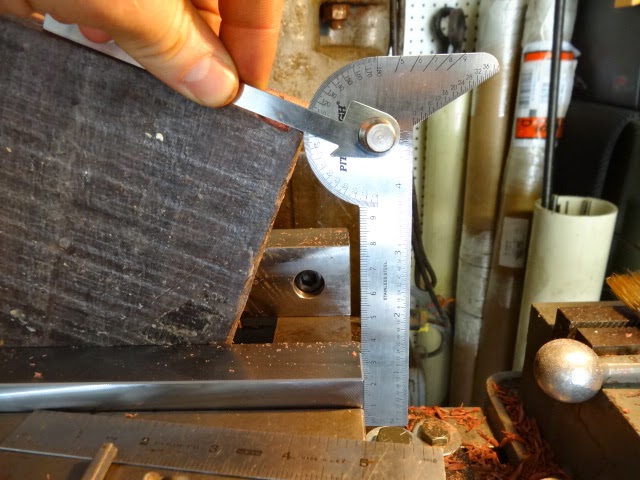
Careful use of a protractor in finding the various angles of the frame and how they relate to the bore axis will aid us in setting the block up in the mill vise correctly.

Setting the block up in the mill vise for the first frame cut


Frame cut being made


A view of the releif cut for the frame and spring

"Purple Heart" sawdust after being heated turns VERY purple

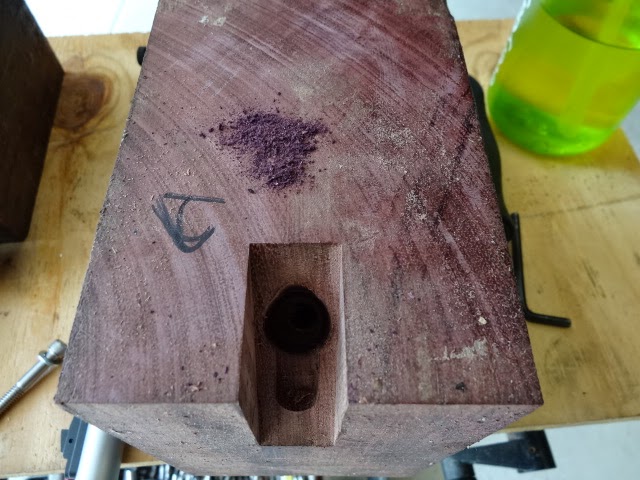
Opps, you cant see really but the set screw hole down inside the bigger hole was drilled off center
I ran into a problem in trying to drill the hole for the grip screw through the whole block. The problem is the drill bit I used walked on me. After some thought a friend offered some drill bushings to try and correct the problem. Some modifications of the bushings and I thought we were on our way.

Bushings!

more bushings!

Looooong drill....that still tended to walk...back to the drawing board.
                                   

 At this point the drill bit still wanted to walk off course. So I have stopped the project for now to try and come up with a solution, the best of which to me seems like I will be drilling out the whole block or most of it...until the very bottom of the grip to the diameter of the round frame stud or slightly under. Then drilling a set screw hole through a wood dowel or perhaps plastic or aluminum rod and setting that into place inside the purple heart block. I'll ponder solutions a bit more before I move forward....


Friday, April 25, 2014

Polychoke: A throttle for your scattergun - part 2

Before I continue on with this Polychoke project some correspondence with the company has brought some information to light that I think should be shared here. First of all the Polychoke is best installed at the factory, as of this writing it only costs $65 for them to do it and it is what they do for a living. As I have learned from this project there is a lot more that goes into the installation of these than is thought from the get go. Second, the choke element that is the part that is threaded to the barrel comes in 3 different sizes I feel like few people know this and do not understand that they are also not marked with what size choke element you have. The diameter of your barrel determines the choke size you will need, something to keep in mind when purchasing a USED polychoke. You have to know what the internal diameter of the choke element is in order to see how it matches up with your barrel. There is a number stamped on the choke element, this has nothing to do with the size of the choke or what it goes to. Those numbers were a reference system the company used with the shops that installed the chokes.

More information on the polychoke and its installation may be made available as this project progresses. On with the project!


My goal with this project is to have a short(er) field barrel than the long full choke barrel I have now. This might not be the best balanced barrel when it is all said and done but it will be compact and better for my needs all around on my favorite 870 which I have grown exceedingly fond of in the last few years. The shotgun continues to impress me as to its versatility even though its not very economical in weight of ammo vs game harvested. I looked to polychoke when I realized this barrel was not going to pattern well without the help of some external forces. This post in the project will show the barrel, and the beginnings of the fitting process.

Shortened 870 barrel shown with practice stub from another barrel project threaded and test fitted with the Polychoke.

The Polychoke will add approximately 1.5" in length to the barrel, we will be keeping this in mind as we work making sure we maintain a 18" MINIMUM barrel length when we are all said and done, ideally you want to be 18" and some change over. Installing with high temp solder or welding the choke in place will make it permanent which is required by law to be considered part of the barrel.

Ready for turning and threading

The barrel as it started in the project. 


Long vernier calipers can come in handy when laying out minimums. Making sure to keep in mind its best to be over by 1/4" with shotgun and rifle barrels.

Turning to nominal thread diameter everything looks good here!
I somehow lost pictures of threading the barrel at this point, and then I realized that upon test fitting I had messed up. The live center I used was in poor shape and I think it cause the barrel to be just a fuzz off......sooooooo we need set the barrel back 1/2" and try again. Not a big deal, we still have plenty of barrel to work with.


Hey look threads! WAIT WHAT ARE YOU DOING WITH THAT HACKSAW!!
Parents....talk to your kids about hacksaws before somebody else does.....

Saturday, April 19, 2014

Just screwing around: making hard to find replacement screws

I had a guy asking for some replacement stock screws for a Mosin Nagant 91/30 a while ago and having none left in my parts bins I decided it was time to make some.  Not wanting to make them out of the 0-1 I had on hand I secured some 3/8" cold rolled round stock from a good friend who works for one of the big metal suppliers here in town. The general rule with stock screws is that you want the material to be softer than what the receiver is, the idea being the screw is a consumable....the receiver not so much. If the screw was harder than the receiver you might run into some problems.

Anyways on with the screwing around......First determine the rough dimensions by carefully measuring and double checking before cutting, Or if you have a sample already just hold the thing up to the bar stock and mark it with a sharpie....either way works just well for these old war horses.

Classic Sharpie layout
 I used a rounded general turning HSS tool for turning the cold rolled round stock, cold rolled tends to tear easily, its hard to get good cuts on the steel if you're not used to the stuff. I managed to use a rounded general turning tool with slow speeds and feeds with lots of oil and excellent results (I think).
I did not have a square right hand facing tool ground so I was just using a "general turning tool"
 This spring/summer is going to see some changes in the shop, I am finally going to build a proper tool grinding station with a rest. I have been needing one for a long time and its way past due. If you know half of anything about proper lathe tools you'll realize I am making more work out of this than is really needed and not using the carbide tool below correctly. This should be fixed once I get my tool grinding station built.


Backwards way to square up the shoulder of the screw, not proper but it works.
 Using a parting tool we slowly cut the completed screw away from the rest of the round stock. After this we will will take the bolt to a 1/4" (the screw is slightly over 1/4" but it still works) collet and slightly dome the head, radius it and prepare for slotting.
Parting is such sweet sorrow. Here we see the newly threaded screw being parted from the rest of the round stock.

Uhhhhhh, How do they put the slot in?

These little slitting saws are great for soft steel, aluminum and other soft metals/materials. Here we begin the slotting for the flat head screwdriver. 

What we end up with after slotting.  Could be a wider slot though any wider and it becomes easier to mess it up. 

In the white new front and rear stock screws for the Mosin Nagant 91/30

Thursday, April 3, 2014

Poly-Choke: A throttle for your scattergun

 Here is a brief introduction into the next project I will attempt to document on here. My problem is I do so much so fast sometimes the camera is often not thought of until the project is done and well, lets admit it a gun blog is boring without pictures.

 The following will show the installation and maybe pattern testing of a Poly-Choke device. "Poly" means many, (like polynomials for educated folks out there....or polygamy for those who like to count past 2 and don't mind factoring a "x" or two).....bad math joke sorry.  The poly-choke is designed to give you options in the pattern your shotgun disperses depending on the situation you find yourself in. Out rabbit hunting in close brush? Turn it down to Cylinder...rabbit jumps and you don't pick it up right away? Crank it up to full and let loose.

Shown below is a "stubbed" poly-choke. "Stubbed" refers to the section of barrel that remains installed in the choke, how its installed I am not sure. It can be sweated on with solder (or jb welded on if somebody got lazy) OR it could be threaded on.  The poly-choke was given to me by a gentleman from Texas who thought I could get more use out of it than he was. He did not know however how in fact the choke was previously installed. The point is this poly-choke was on a gun previously and removed, by cutting it off with a hacksaw with enough of the barrel sticking out so the next guy can remove it and reuse the choke which is what we plan to do.

Remove outside sleeve.


Choke collet  and barrel stub shown

At this point we are needing to firmly secure the choke in a barrel vice to remove the barrel stub. The steel pipe shown opposite the  choke will keep the clamping action from focusing on the center of the vice, it will instead focus it on the thick portion of the choke protecting the collet.


 With top vice sleeve in place the top bracket of the vice is replaced and secured.

A little heat to see if solder or anything else comes out....some good old fashion torque on the stub with some shocking action and presto! The barrel stub turned out to be threaded into the choke....this revelation will require me to gain some more information on the thread pitch (which I am pretty sure is 40 TPI but want to double check) max and min barrel diameters and some other factors that may have to be taken in to consideration for the next phase of this project. The idea is to restore a 870 barrel back to having a choke, the vent ribbed full choke barrel met its demise when a few inches of its previous 26" barrel were removed for home defense use via hacksaw. Making the barrel effectively a cylinder choked gun, useless if you already have a riot barrel and need a field barrel which is what I am lacking currently.


Stubbed portion of barrel shown un-threading from Poly-Choke.

Tuesday, February 11, 2014

Junkyard bullets go on a diet: Or : The short and sweet of making your own


Its not like I've been avoiding the thought that one day I would need to start swagging lighter .224" bullets. Its just that I was avoiding the fact I would never find a vast source of .22 short brass to easily convert to short jackets. My frequent "want to buy" signs at gun shows and pleads for .22 short brass to use as jackets have remained unanswered for two years now. I finally realized that I was not going to get any help on this and with the addition of a 1:12 twist single shot .223 rifle that keyholed 61gr bullets the issue was kind of forced. I wanted to make this rifle SHOOT and after looking at reloading manuals at  just how fast I could shove a 35gr bullet out of a .223 I thought to myself "could be fun". For those of you who do not have a manual close at hand we're talking speeds of 3700-4100 fps. This is well over the speed I've been told these "junkyard" bullets would shoot at and stay together. For my "test of theory" I quickly made a trim jig to cut down my homemade jackets to around .450" using a 3/4" X 3/4" X 6" pine block with a hole drilled in it and a roll pin shoved in as a depth stop, allowing a nail to be used to eject the jackets after they were cut I was on my way to cut up some jackets. For this first batch I trimmed 10 jackets and scrounged some lead wire to swage into cores. My first mistake in making the cores was realizing the jackets were now lighter, my first 4 bullets turned out to be super light 32gr bullets these would for sure clock around 4000 fps......the next 5 bullets were 35gr and I junked one bullet when just messing around, we swagged it backwards to see what kind of nose would form and the shape it would take.


I shot these test bullets with WC-844 weighed at 26gr for use in aforementioned .223 Remington Handi Rifle. I got a few on paper even though it was in the single digits out at the range, wind was blowing and the snow drift between me and the targets came up to my knees. The few that finally printed on the edge of the paper gave me great hope in pursuing these. This is the first taste of  lighter bullets being made in the dies I have on hand. The next step is to build a improved cutting jig (another post in it of itself) and perhaps the making of a 4s Ogive (more appropriate bullet nose shape for lighter bullets) swage die. My goal is to get good accuracy with these "free bullets" out of my .223 as well as my Hornet Calibers . So here is the little teaser picture of the tiny 32 and 35 grain bullets that I'm sure flew into little bits of shrapnel as they hit the frozen backstop, the fact I used # 7 1/2 bird shot to make up the weight in the 35gr bullets didn't help I'm sure. Notice the large hollow point in these guys, a ballistic tip I'm sure would aid their BC greatly. Anybody know where I can get a bunch of Ski plugs?

Wednesday, January 29, 2014

Shotgun slug pursuit


 The start of my 12ga Slug adventures began a few years ago when I concluded the tests of my buckshot loads. After I had my buckshot load the natural progression would take me to slugs. I tried some loads out of the book with some various lyman and lee projectiles but have had little luck in getting accuracy and the speed I wanted. Since then I dropped the idea for awhile to focus on other stuff, Late this past fall and early winter I decided to pick up the slug challenge again and started by using the same load I used for my buckshot but using a Federal 12SO wad with a 1oz slug.  I roll crimped the slug using AA economy hulls and since the roll crimp on top of a previous fold crimp kind of destroys the hulls  I considered them disposable since they were dirt cheap (free).  Anyways, The first 2 shots were pretty dead on the X if you ask me (with a bead sighted riot barrel), if I remember right I started out at 50 yards then moved back. The issue is the further I moved back the slugs drifted more and more to the right and up. At 100 yards it ended up near a foot right and a foot high. So I guess I have more figuring out to do.  Might just be me, might be the gun or the ammo...or a healthy mix of the me and the ammo, the gun is pretty sound.

My goal is to get  a >1200fps 1oz slug with good accuracy at 100 yards, faster than 1200 would be good. In practical terms a slug that duplicates the factory would be great but to be honest with myself the factory slugs are a little abusive if you're shooting multiples in jack-ass positions during matches.  (If you don't know what a jack-ass position is I highly recommend you read "The art of the rifle" by Jeff Cooper Here is a amazon link to the book for reference only, I'm not advertising for Amazon.

As always follow proper loads and procedures, this is what I used and my results, I am not advising you to duplicate this load as it is not found in any load book.
Lee 1 Oz slug
Green Dot 21.5Gr
Cheddite 209
AA Economy (steel) hull
Federal 12SO wad
Roll crimped.

First 2 shots landed on the X, after that the shots migrated right and high, Note .44 mag impacts from contender testing to the left.