Saturday, May 12, 2012

Zen and the art of Browning high power maintenance :or: Talk to your kids about font size before somebody else does....


My only 9mm (non conversion) pistol I own is a Canadian Inglis Browning high power built for the Canadian military. Recently I've had some problems with it  bulging cases and the safety gets snicked on and off at random while I am shooting and while its riding in my holster...not cool or safe. I found a weak recoil spring was why it is bulging cases, the gun was unlocking too soon and the barrel was not supporting the entire rear of the case during the firing process. A stronger recoil spring is the answer for that, specifically a 18.5lb Wolff spring. I highly recommend Wolff springs for all firearms that they can be had for. I've used them as replacements in revolvers and automatics as well as some rifle. If you can field strip the gun....you can replace the spring.

Ok, so the spring is the easy fix, the harder fix being the safety going on and off when not intending to do so. Firearm controls should be positive and smooth. The low profile safety on this gun was smooth in going on and off when I didn't need it to and it was positively a pain. Knowing I would like a slightly larger safety on the gun I looked at getting an extended safety I could fit to the gun and would have better control over. I ordered through midway a Cylinder & Slide extended BHP safety that would be required to be installed by a competent gunsmith......yeah not a drop in part. But I got lucky, installation was easy on my particular gun sear and safety engagement was good, the only problem was the ejector insert when pinned back into place caused the ejector to lift significantly to the point it was binding the new extended safety. Some fitting will be required to allow the safety to move freely. Upon closer inspection after test fitting the new safety I found the place on the shaft where the ejector was rubbing. It turned out there was a high spot on the part that would need to be removed.


Here we see the ergonomic differences offered by the C&S extended safety.

To sum everything up, certain gunsmithing projects can be fairly straight forward if you take your time and don't rush. I am not a gunsmith by profession and I am not a expert....I'm still learning and will continue to do so till the day I die...which will probably be the day I learn about how  to piss off a Cape Buffalo. With care and skill and taking the time to learn and research before starting most gunsmith tasks are fairly straight forward. Read, re-read, watch, learn, practice and improve....its how we do good work. Even though the instructions for the safety had touched on fitting it if the sear blocker did not work we ran into a issue that was not addressed in the instructions. We noted how the parts interacted and test fitted many times before removing any metal. Only taking a few strokes at a time we did the job right the first time. I could have modified the ejector plate but that was not the issue...there was nothing wrong with it and I would have been making a part fit another part that was not the correct dimensions. Go slow with a steady hand and most of the time you'll have a job you'll be proud of. Or make sure other parts cover it up....


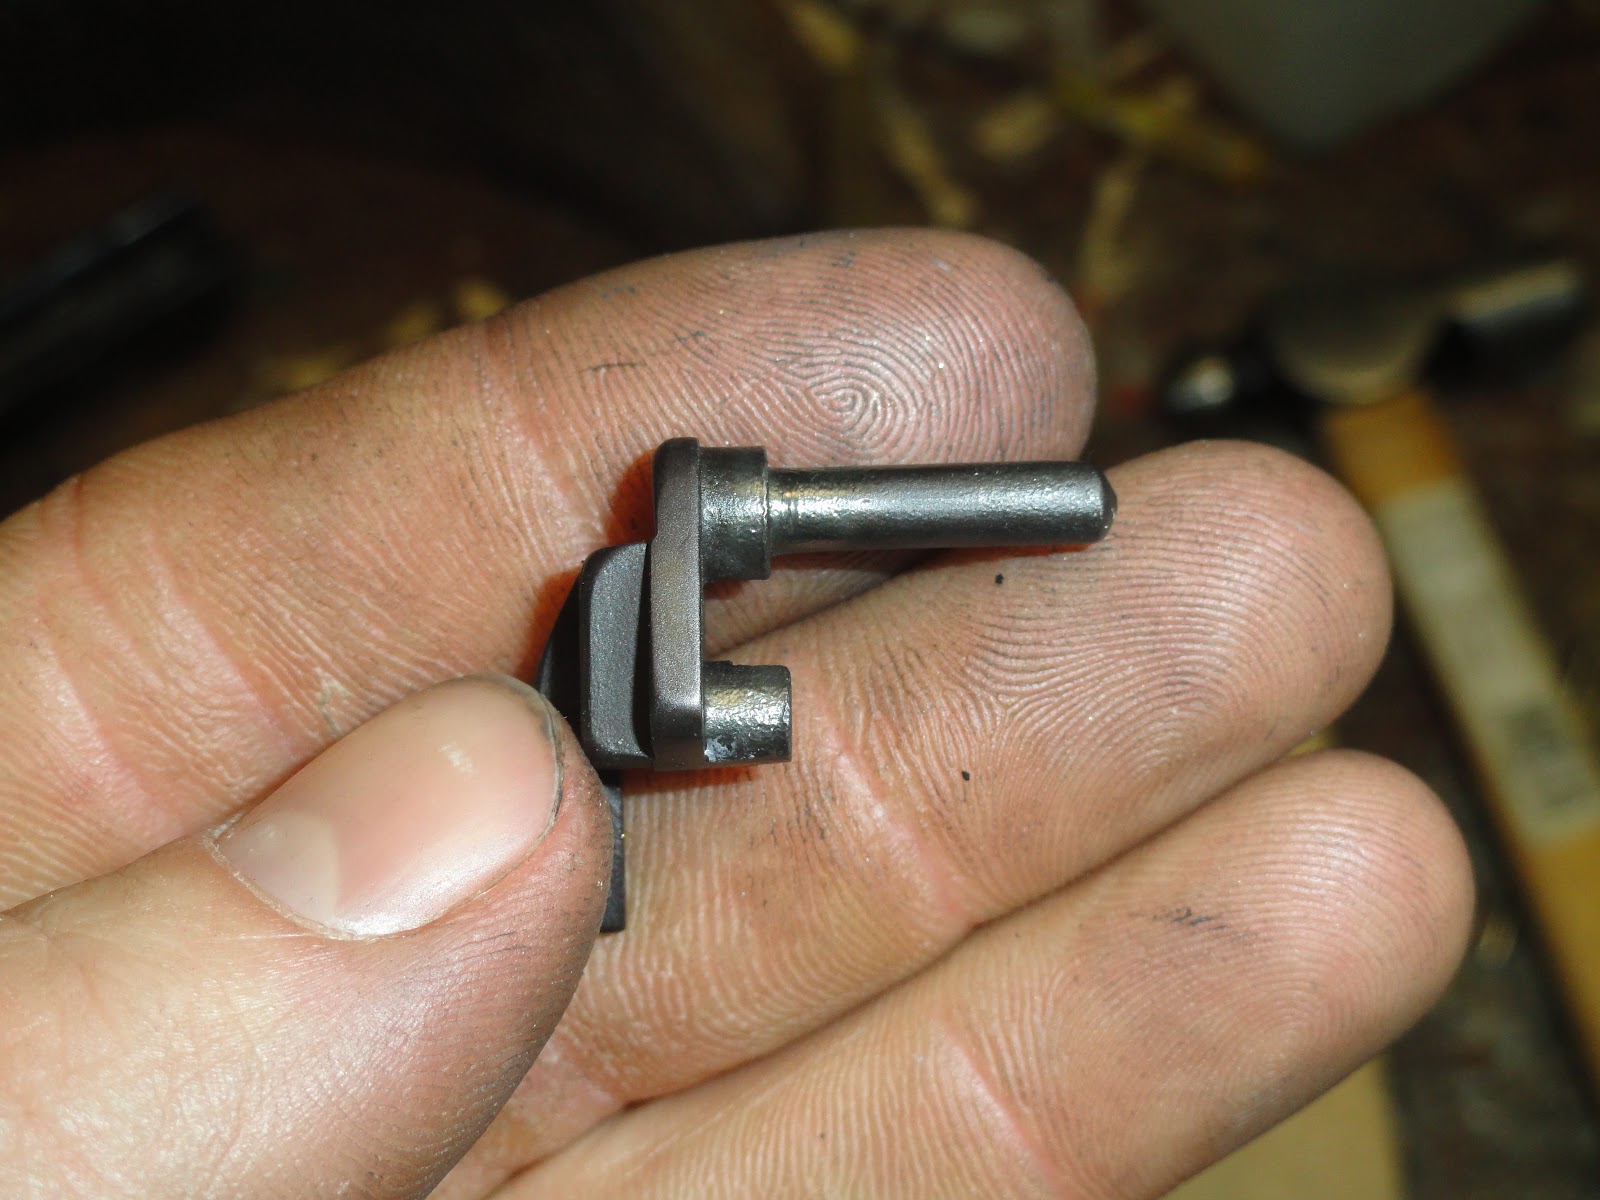
The wear spot being marked by a yellow dot needs to be uniformed with slow even rounding strokes
with a file. The result should take off the high spot and allow proper function of the safety.

 
Leave the power tools to the idiots on TV....assorted small hand files will do a lot of jobs well.


The author finds this self made gunsmiths block very helpful when disassembling and assembling
handguns and parts groups for various firearms. Note space for small parts and punches.  

Finished part buffed with Dremel wire wheel to blend and clean up the  tool marks left by the file.
(SOME power tools are "ok")
Here we can kinda sorta see the issue, imagine the plate part being forced up counter clockwise causing
the shaft of the safety to bind.
Installed and properly fitted the new recoil spring and safety should bring  this firearm back into service without any further problems....and I pray I don't break an extractor...cause those are hard to find for these Mk 1* guns.

Tuesday, May 8, 2012

.375 H&H Swage dies update #4

Working on reamer design some more and exactly how to make the dies the best way. I think I've found that machining the dies from the inside out provides the best accuracy and lessens time spent on retooling for each step. When I say from the inside out I mean do the precision internal stuff near the center of the die first and thread last.  Hopefully I'll have a complete die set done by mid May!

Thursday, March 22, 2012

.375 H&H swage die update #3

The D reamers I made work, new 4 jaw chuck is in and works just fine. Got a bit less done than I wanted to but theres always next weekend to get the die set finished. New project landed in my lap for somebody else so my .375 H&H project will get shelved for a few weeks. May put a few late nights in on it if I can sneak them in

Tuesday, March 20, 2012

Improving the simple single shot

Just a quick post on a easy upgrade for Shotguns of limited capacity. My focus on this is single shot shotguns and being able to carry some spare ammunition on the gun instead of in your pockets. First off I'll just say that you should avoid the cheap Wal Mart all black elastic butt cuff loops altogether, they may work for awhile but after some time you will start to see the elastic wear out and you'll be fighting it all the time. If you have any experiance with leather work this is a simple project. I had a custom holster maker friend of mine give me the parts to assemble my first few butt cuffs for 12ga. They do take time and effort but at the end you can be proud of what you've created. And you can carry 5 or more rounds on the gun.


Top and bottom are the two 12ga leather butt cuffs I made 
from previously cut patterns
The middle 2 are 20ga and were purchased at a show for $5 each!

The bottom "green" shotgun is a project gun that is under repair, Picked it up for $40 only needed to replace the forearm and find a buttplate for it, may make one out of stippled steel

Saturday, February 25, 2012

.375 H&H Swage die project update #2

Last weekend I spent the better part of 2 days working on die bodies and punches for this die set. I had just threaded a few die bodies and was getting ready to finish up base punches when I broke the adjustment screw on my only 4 jaw chuck for my lathe. My other chuck is a 3 jaw scroll chuck and isn't nearly as accurate as using the 4 jaw...as soon as I get a new part or a better chuck (chuck I have came with the lathe as is indian made) I'll be back in the shop.

I did work on a few D reamers for dies and worked on bullet shapes some more for the point form dies. I'm very pleased with how easy the 0-1 steel is to heat treat. I'm just not sure if the die bodies need heat treated or not. If I do more of these I'll want to get cheaper steel for non important parts as doing a entire set out of 0-1 is not the cheapest way to do it. However I wanted the option of heat treating.

Wednesday, February 15, 2012

.375 H&H swage die project


What you see above is a die set turned and threaded on my South Bend lathe for making .375 jackets out of 9mm and .38 spl cases (with rims turned off on lathe). I had to make 2 punches for each of the cases as the .38 spl can go through base first but the 9mm is better off going through case mouth first. The short stub is the knock out punch. All done from 0-1 tool steel. The power zone on the Walnut hills press is from 4.25" to 3.75" of the ram closure. So you have to make the base die fairly tall. Keep tuned in for the other dies I'm making and process to make a complete die set including making reamers and such. Only thing I really learned from this die set (besides which way to throw my threading gear to get right hand threads) is to make the die .003" undersized as the annealed cases have about .001" spring back. I'll have to make another die which won't be hard this one gives me .376" jackets and they need to be undersized from the get go unless you have a lot of pressure to work with which I do on the walnut hills press but I wanna go easy with them at first. I only want to undersize them a few thou on these first sets.

Wednesday, January 18, 2012

Champion shooting gear 10/22 Magazine loader

I usually don't like mechanical gadgets for loading magazines esp .22 magazines but after I got the 30 round 10/22 mags and loading them became somewhat of a chore I looked around and found that Champion shooting gear brand makes a magazine loader that is fairly easy to use and costs around $32 ( I got mine at Cabelas and did pay full retail) I purchased it with a Christmas gift card...about the only reason I got it really, would not have gotten it otherwise but I really was intrigued by the design.

The hopper holds up to 75 rounds or so max. Good if you want to watch your ammo consumption....keep from going through a brick of ammo in a half day. The winder is like that of a wind up alarm clock. I'll post pics later. You pop the magazine to be loaded in and with each full rotation of the winder you load 1 round. It has worked on the factory and after market mags I have. Have not taken it to the range yet so we'll see how it holds up to a full day of use and semi abuse. Product number #40430

Saturday, December 10, 2011

Shooters ridge #40629 10/22 30 round magazine review

I purchased two Shooters ridge #40629 30 round 10/22 metal header magazine from a local gunshop that was having a pretty good sale on them. They usually list for $20+ each but the shop has them for $13 this month and I was still using 10 round factory mags. First thing I noticed was its packaged and marketed by Champion targets, but the product is a shooters ridge product. Not sure how that all works but its a moot point. The magazines are a double stack design and clear body with a full metal head, the follower is plastic.

Decided to give them a good workout last night while I was teaching new shooters at the range, My 10/22 is set up as a Appleseed type trainer with irons. We ran about 400 rounds through both mags with a few hiccups. The one big flaw I saw was with 7 or 8 rounds to go the mag would fail to feed, Not sure if it was just transitioning from the double stack to the single that was causing a bind or if the spring was binding. All that was required was a manual cycle of the bolt and that was enough to bump up the next round. I had not numbered these mags yet but I do think it was just one of them that this was happening on. Other than that hiccup happening 3 times or so they ran really good, the mags were easy to pop in and pop out, I liked having an extension to grab onto coming from only using the 10 round factory blocks. I probably wouldn't spend $20+ on these unless it was something like a little teflon spray in the body to help keep things moving would fix the occasional FTF. I would give these 3 stars out of 5

Monday, December 5, 2011

The AR-7 adventure :or: Look it floats!

I had a AR-7 survival rifle a few years ago, it was one of the Henry variants and it worked. I liked it because it was one of my first semi auto rifles and it was unique in several ways. It broke down and completely stored in the stock, which was said to float (either assembled or dissembled, I never tried). I shot the rifle a few times and liked having it around but at some point I got bored with it and sold it off for something else. Fast forward a few years and I'm into S&P (Survival & preparedness) stuff pretty heavy, the AR-7 was pretty far down on my list of guns to get as I have a pretty good list of priorities made up in the order that I should get things based on money I save up. But when I found a AR-7 action complete with a magazine for $60 at a gun show I couldn't pass it up, The guns always seem to go for way more than they should, I know this past weekend I saw more than one priced above $220 at the gunshow this past weekend.

The guns have always had a jam feature that a lot of non mechanically inclined people just can't seem to get around. Their rifles jam at least once a magazine and they do a poor job finding the cause and effect. Of the 3 examples of this rifle I have now fired 2 of which have been Charter arms and 1 Henry I have had 2 types of jams. One I can easily fix (magazine) and the other may be more of a problem with the aftermarket barrel I obtained for the rifle. The jam with the barrel was caused when the cases bulge so much at the rear that they will not extract. Replacing the extractor spring and recoil springs may help in this but then again it may not. The magazine jam occurs when the magazine is fully loaded, the magazine allows the rim to catch behind the feed lips, not allowing the round to strip from the magazine. Bending the feed lips back further helps this problem however if it occurs all the time in your gun there is no reason why you can't just load 5 or 6 rounds. You should be hunting small game......not zombies.....just my thoughts on the whole jam issues. Not all guns will decide to work all the time, I know there are lemons made by everybody and my replacement barrel has a extraction groove cut deeper than should be allowing part of the case to expand where it should not. The gun works fine 98% of the time but the fired cases look pretty pregnant at the base.

My replacement barrel I obtained from HERE . The barrel is a little heavier than the factory barrel...by nearly 3/4 of a pound as compared with a factory aluminum barrel with liner on a postal scale. The barrel ejection slot was as I said before milled a little deep but when the rifle functioned fine I could not complain. I was also able to secure a original style stock for my rifle from a friend who had a stock in his parts bin. So I have $110 or so in the rifle total at this point. I forgot to mention the actions black paint had long been wearing away so I took a stiff steel brush as advised by my friend and cleaned off as much as I could prior to repainting the gun. Since the replacement stock I had gotten for nothing already had a sort of tiger stripe pattern painted on it and I had some dark OD green and dark tan dura coat left over I thought I would use it up to paint the action and the barrel. Camera woman is currently away so I'll try to have some pics posted later.

The Ar-7 is one option for a utilitarian take down survival rifle, they can come with problems and a word of warning, don't let the marketing hype the producing companies give the gun give you too much of a hard on for one. They shoot well out to 75', and if you are good you can take game out to 50 yards. but in the end it is a .22LR that is a crude but efficient rifle, there is nothing elegant about this gun. If you are left handed you may not like the rifle as the stock is offset at the grip to allow the barrel to store in the butt. If you see one for cheap and want one to have in your BOB/camping bag, to keep in the boat or bush plane its a fair choice. Esp since the more traditional M6 Springfield scout rifle fetches far more money for what is basically stamped sheet metal and 2 barrels. The Marlin papoose take down rifle is another one I've seen people keep in their bags, boats and planes and it looks a little more user friendly for sure. Weighs a little less than the AR-7, but it does not float which really wasn't a concern for me at all in the first place.

P.S.
The older rifles have room in the stocks for 1 magazine, the newer rifles allow the storage of 2 magazines in the stock. I want to say my Henry held one in the action and one in the stock but I can't recall. I plan to modify my stock to hold spare parts and a extra magazine. Being in Ohio and not on water I don't plan to test the buoyancy of the rifle any time soon.

Wednesday, November 30, 2011

Reloading for the 7.62x38R-update

I found a collet that barely works for holding the case in the lathe..can't remember what size I ended up using but I had to draw it up pretty tight and run the case more than 3/4 of the way in for it to hold. Even then the case would still migrate, a wrap around shim would have worked to make the case hold fast. I was turning the thickness of the rim down a bit from the top side of the rim. I have not yet turned out the old head stamps using the lathe but that will be done sooner than later. The needle file was working but the finish it left was poor which is why I just chucked the cases up in the lathe and thinned the rims a bit. Where function was test and retry with the needle files the amount I took off with the lathe does not leave any question that these cases will work in all the chambers of the revolver with no question marks left. May try to make a set of K frame sized grips for this gun since I've enjoyed shooting it so much but the grip it comes with is too small.

Sunday, November 20, 2011

Reloading for the 7.62x38R Nagant Revolver

I happened upon something at a flea market I had been searching out for 4 years now since reading a article in a magazine about a odd little Russian revolver that made for a great woodsman pistol. Its compact, novel design and caliber appealed (read near impossible to acquire and reload for, higher skill level to reload for and not for the faint of heart to attempt) to me in such a way I could not help but want one. The 1895 Nagant revolver usually runs for $110 or so from various online sources and around $125 from military surplus firearm dealers at gunshows. Shipping at the cost of the FFL transfer quickly brings a online or auction acquired gun into the $150+ range and the $125 cost for the show pieces never were satisfactory at the same time I had the $125 in my pocket.

So I exercised some patience and waited, not in too much of a rush as I had numerous other projects to tackle in the mean time. And then whilst looking at the numerous firearms at the flea market I came across a table with one of these revolvers laying there and its owner willing to part with it. The revolver was pristine, looked as if it had never even seen a single round of ammo and was best of all for sale. Having the ability to look it over the seller didn't say much until I asked the price. $200 he replied I sighed, set down the piece, said thanks and walked away. "hey now wait, come back, we can talk" were the words that quickly chased me as I strode away. I turned around to hear what the seller had to say, He asked me what I thought the gun was worth. That seemingly harmless statement is a trap to the majority of the people who take the bait, you have entered the realm of dickering and haggling and you can either awkwardly walk away claiming you are not that interested in which case you probably weren't too much in the first place, failure to make that a point and they might just goad you into naming a price and paying it or grab the challenge by the horns and give it your all & cut them down to YOUR PRICE. I looked the little Russian over more carefully this time, checking its bore, muzzle and other workings. The gun did not have a holster or cleaning rod, not a big deal but definitely a con. I quickly told him it was worth $100 thinking that was fair for both of us and he would never sell it otherwise, long story short I got him down to $100 after a few back and forth offers and "AW NAW I can't take THAT". So here I am with a $100 revolver to reload for and a few options of how to go about it.


This picture was added 8/28/2012 showing the gun about a year after I got it,
As you can see I found some original ammo, but too costly to justify shooting it, looks good on camera though!


Preparing for this gun actually started many years ago, around the time I read the magazine article on the gun and saw various ammo options. I acquired 32-20 brass which I read worked well in the revolver, having various kinds of brass on hand I easily traded for 60 or so pieces of once fired 32-20 brass that would be used along with a 93gr RN mold a friend had me purchase so I could supply him with a few cast bullets now and then. Bullets were sized and lubed to .311 to fit the bore of the revolver, and I set off to load a handful of rounds to test. The week after I had purchased the revolver I went to the range with dad (mostly to help him find a lost ball from his Coehorn mortar he was using to put on a demonstration for the local historical society) and headed over to one of the unoccupied pistol bays and loaded up to try it out. The 32-20 brass fire-formed beautifully, mostly just expanding around the neck. I had loaded the first batch using 32-20 dies however I quickly discovered that .30 carbine dies (as pointed out by somebody online!) would work to readily load this round and they were right. Take a .30 carbine set of dies and swap out the .308" expander ball for a .310", seat the bullet and taper crimp. After the first range trip I did realize some of the rims on the cases were a little too thick to allow the gun to funtion properly. So a set of needle files has come in handy to file the top or forward facing portion of the rim away so as to allow it to function in the gun. As you can imagine after converting 32-20 brass into its Russian Empire/commie cousin it would be a good idea to store it in a well labeled box so positive ID can be made, headstamps can and do lie and making brass out of one caliber for another can pose some problems if somebody came across it and didn't know any better. If you have lathe skills it would not be a bad idea to put the case in a collet in your headstock and turn a circle into the center line of the headstamp to negate the markings. It is important you do not try to make the brass fit the gun by shortening up the base of the brass as this will cause the primer to become exposed, causing a dangerous situation.

My first loads were 3.2gr of red dot behind the 93gr RN bullet, more than enough for plinking. They clocked 790FPS over the chrono and printed very well on paper. My next step is to see if I can make more brass from some .218 bee brass or use it to trade for more .32-20 brass, I have some .25-20 brass and loaded ammo I can fire form as well but I'm not hurting for brass that much. I would like to work up a load that is a little faster than what I have now, try to get something that is close to 950 FPS out of the 4.5" barrel I also have a small assortment of jacketed bullets and surprisingly some XTP as well I would like to load up and do some tests with in phone books.

It is a interesting project if I was a trapper or something and wanted something more than a .22LR revolver I would not hesitate to pack this little revolver at all. Reloads hardly use any lead or powder so its not too hard on the wallet.

Wednesday, September 7, 2011

Loading buckshot for $0.16 a round

I'm not sure how the idea got into my head, I'm not sure at what point in time I thought to myself I needed to start loading my own buckshot. It wasn't like I was shooting up 50 rounds of it every month at a match though I set out to load quality buckshot and I think I've come up with a decent answer to a problem that never really existed...except for not wanting to pay $1.00 a round for the stuff.

A buddy and I decided to go halves on a "00" (.33") buckshot mold, which stacks perfectly in a 12ga hull so long as petals on a trap wad don't get in the way. I choose to stay with regular trap hulls since the strength between a trap hull and a buckshot hull of the same manufacture and same internal structure (external brass height has nothing to do with hull strength) was the same.

The first load I started with was out of pure curiosity, 18gr of red dot, Win AA hull, Federal 209 primer and a WAA12 trap wad with the petals cut off and 9 balls of "00" stacked in layers of 3 capped with a fold crimp. The load patterned surprisingly well at 30 yards but out of the muzzle it only clocked 1000 FPS 6' in front of the muzzle, a little on the slow side for what I was trying to do (which I wasn't really sure what that was at the time) I messed with the red dot powder and different wads on and off for about a year and decided that I probably wasn't going to get anywhere with wads that were designed for shot and such a fast burning powder.

Around the time I decided to switch up powders I also made a move to obtain new hulls, up until this point I had been using old hulls I scrounged for out at the club. I purchased 1000 Winchester AA-HS 12ga hulls for about $0.04 each shipped and was back in business. Next was powder selection, I was using red dot and wasn't happy with any of the results I was getting speed wise I simply couldn't break out of that 1000fps without something else going to pot, I looked through the Lyman shotshell loading manual as well as the Ballistic Products Buckshot loading manual and gave careful consideration to Blue dot and Green Dot powder. Looking at the charge tables for both I came to the conclusion Green dot would be best for the money. After the hull and the powder I carefully considered the wad, after each test lot of buckshot I would look around for wads to see how they were performing. The WAA12 wads and the claybuster replacements had burns all up the sides of them and were so badly deformed I thought the performance of the wad inside the barrel was not doing me any favors. I read, reread and carefully considered all the factors going into the needs of a buckshot load. And came to the conclusion I needed a tighter fitting wad and something much stiffer to hold up to the rigors of pushing a 486gr payload that only had 3 points of contact to the wad, down the barrel and sealing up the barrel, keeping from loosing velocity.

I settled on A Ballistic product "Flex-seal" gas seal to replace the trap wad and added a 1/4" fiber wad on top to achieve the appropriate payload height for proper crimp. Working my way up from 19gr of Green dot I soon discovered the 1/4" fiber wad was causing the gas seal to tip into the new style Winchester base wad and causing at times a 50FPS variation in velocity so I quickly got rid of that, and reluctantly so because I believe the fiber wad acted as a cushion and helped patterns out. So after some very, VERY early morning range sessions and waiting for turkeys to clear the backstop I continued testing my way up the charge table and watching for any major changes in performance. I had taken my LEE Load-All II and a powder scale to the range for the on range loading and was glad I did because I ended up going back and trying some lower charged loads to confirm the thought that the tipped wad was giving me bad velocities.

The load I settled on gave me 1150 FPS which is about 86% of the velocity of factory loads and 75% of the kinetic energy. It is a low recoil load that feels about 1/2 that of factory in several guns I have tested it in so far. Final cost for each round came out to $0.16 each which is cheaper than shot loads as I making the buckshot for cost of my time, and FAR cheaper than factory buckshot. Translated I can load 6 rounds of my "00" buckshot for what a single round of factory buckshot would cost me. Which means more practice with my shotguns

My final recipe was as follows
AA hull
Cheddite 209 primer
21.5gr Green dot
12ga BP flex seal
9 pellets "00" buck

Source for buckshot mold
 http://buckshotmold.com/

As usual it works for me your results may vary, do not attempt if you do not understand how to work up loads or are not willing to be safe when doing so etc etc.


NEW PICTURES ADDED!

Standard trap hull and a 12ga Flex seal that works as an effective gas seal for buckshot loads.

Seated like a normal wad so it sits on top of internal base wad, the charge of green dot is just about level with the top of the base wad. 
Here we see where the gas seal comes in handy, no petals to cut off the trap wads!

Here we see the top stack of "00" buckshot peeking out, 9 pellets total this payload is a good combination of components that all work together to achieve the desired goal.  A utilitarian buckshot load.

Before you know it you'll have 500 rounds of buckshot loaded up!

Sunday, April 18, 2010

Squirrel some spares away today : or : It's better to have it and need it than.....


Often times when you look at purchasing a new rifle or handgun you may factor the availability of spare parts, magazines and other accessories into your considerations of which type or brand to purchase. Purchasing spares and extra parts as well as magazines will keep the firearm running for many many years even perhaps decades after the factory has closed up or importation of more parts has been banned etc. Just about the only guns you may not have to worry about buying extra parts for I think would be the Mosin Nagant and the AK-47....but in reality you would do well to have a spare complete bolt and misc small parts etc.

If you buy a new factory firearm you most likely will get a magazine or two and maybe a multi tool to adjust sights and break down and possibly service the firearm. That is usually all you get when they box up your gun and head to the check out. You could opt to buy some of the magazines stocked at the shop but I've rarely seen affordable full capacity magazines at a gun shop.
Once you get your firearm and get to the range for zero's and familiarization I would suggest you start researching what parts are common to failure in the design. Though you should have done this step of researching design flaws and part failures ahead of time there are few designs that are flawless....if any. Once you identify prone to failure parts stock up on these parts in triplicate at least (remember one is none, and two is one). As well as a full spring kit i.e. mainsprings and the smaller springs that are easily damaged or lost if the weapon is broken down far enough. For pistol parts I would mostly just say extra extractor, complete spring set and firing pin as well as a spare barrel if able. Rifle parts like the AR-15 family, M1 Garand/M1A, M1 carbine etc I would suggest a complete bolt or two if you find them at a reasonable price. Extra gas rings (on top of the complete bolts) for the AR-15 as well as firing pins and the small parts you tend to loose when you take the thing apart too many times/too often (which happens if you are teaching a lot of people how to use it). Also parts that can be easily damaged like gas tube, op rod etc accidents do happen.


Spare parts should be obtained to insure your firearms will run at least until you run out of ammo.
The author recommends triplicates of some spare parts Some may be hard to find down the road like original M1 Garand and carbine bolts.


Revolvers? Don't worry about spare parts for these, maybe a extra spring kit but if you don't know your way around the inside of a revolver....stay out. If you know how to work on these then you know what rarely fails and what you need to fix it.


Springs, barrels, firing pins and ejectors should be set aside to keep your handguns running as well. I recommend the barrels only if you can find them cheap. I've put some spares away for my CZ-52 which I only have corrosive ammo for but at $10 a pop for stripped barrels its a investment that may prove wise if I forget to clean the barrel just once.
What about magazines? how many should you get? what kind/brand? If you have rifles/carbines like the mini-14, M1 Carbine, M1A, AR-15/M4, AK-47, CETME/G3/HK91, FAL or any other rifle commonly used by the military or police you are in luck. There is a good chance that magazines and parts will be more common for these as they are in wide use (duh) kinda like parts for the F150 and common Chevy trucks. There are so many brands of mags (most notably for the AR-15) out there these days and you can get some really cheap...but you really do get what you pay for unless your buying surplus in bulk. Stay away from anything that isn't military surplus or manufactured by a reputable company. Don't think I'm joking on this...I have a few steel magazines that have no markings on them whatsever (manufacture wasn't even proud enough to mark them) they were too wide to fit in my AR. For non military i.e. aftermarket mags for the AR-15's I go with C-Product for my 30 rounders*. They (C-products) are great mags at a reasonable price (About $8.00 each). Once in a while a "lot" of a dozen or so military issue mags will hit the forums for really cheap. These are usually military contracts that have had a lot of use. Not all have anti tilt followers but that's a $0.75 upgrade easily done. Last bunch I purchased was a "lot" of 13 @ $3.84 each shipped. Only 1 had a updated follower so I'll end up replacing the other 12 with new manufactured followers. Still 13 very usable mags for a good price ($50 total) after I proof them in the rifles that is. So how many mags should you have on hand for a rifle? You may not think that there will be another AWB or revolution or any such thing that requires you to have massive amounts of mags on hand but you should still have some common sense about you. If you have a military type semi auto rifle you will want at least 6 full capacity magazines and a few short capacity magazines (so long as they are physically different...if not don't bother). I like to have some 20 round mags for my AR on hand for shooting off the benches or shooting prone or offhand. But I've also needed to have full capacity magazines for matches like the NTIT or "rattle battle". If you are going to spend $700-$900 on a rifle don't short change yourself and get one extra 30 round mag to go with it.

During the last presidential election I got a group of people together and we went in on purchasing a large quantity of high quality AR-15 magazines. With new AR-15 in our collections and new AR owners we wanted them to get the good stuff for a good price just in case any new bans were put in place. These are C-product 30 round magazines had from copes dist who has them for a great price. Same price if you order 1 or 100, with flat rate shipping. I have no connection to the company other than being a satisfied customer.
Determine how many magazines you want to have on hand for your firearm. The authors general rule is to have minimum of 50 rounds of magazine capacity for pistol and 100 for rifle/carbines.


*P.S.   C-Products has been out of business for more than a year now as of this update (5/2012) 
If you are in the market  for 30 round magazines I would just stick with the military used magazines at this point but don't pay more than $10 for any 30 rounders, unless you require preban magazines.

Monday, February 8, 2010

M261 Military rimfire conversion for the M16

I purchased a Mosin Nagant while I was in high school and (engage old man voice) I can remember when ammo cost $105 for a case of Bulgarian light ball, 1200ish rounds to a case...if I wasn't making $50 a week I guarantee you I would have purchased more, though I think I was into my Mausers and 8mm a lot more than the 7.62x54R and the 91/30's at the time.

Today, we have seen prices fold a few times over and for a while there in 2009 .223 Rem, 9mm Luger, .380ACP and 45ACP could not be found without really REALLY paying for the privilege. Walmart was the center of the great ammo rush after the presidential election...everybody was either complaining they couldn't find ammo or that they had just scored 6 precious boxes of ammo (in most areas walmart limited 6 boxes per customer). Federal bulk pack rimfire 550 rounds went up only slightly in price (from $14 to $15ish). My hats off to Walmart for not taking advantage of the situation and charging $30+ for the bulk packs like most online stores were. So lets say during all these record braking months of gun sales you manage to secure one or two precious AR-15 type rifles for fear weapons ban might be coming and you could be grandfathered in. But now you can't find ammo for the rascally thing! what now? Perhaps you have a small stash of rimfire ammo on hand that you use for your 10/22 or S&W 17 or k22. If you still have some money left over after buying your AR-15, a few quality magazines (which shouldn't cost you more than $9 a pop for 30 rounders these days) and are waiting for your back-ordered .223 Rem/5.56 ammo to show up you may want to look into a conversion unit for your rifle for training purposes. I happened along a M261 military conversion unit online one day that someone from the castboolits forum was selling. I think I gave somewhere around $100 for it with two magazines.

Its just a simple bolt swap to change your center fire AR-15 or M4 into a rimfire plinker. Now there are some drawbacks to this conversion...accuracy for one can really lack as the twist rate on some rifles and carbines 1:7-1:9 can be more than twice as fast as what you usually find on a .22 rifle or pistol which is around 1:16. If you have a older A1 upper with the slower 1:12 twist rate this may work better for these rimfire conversions. Also the bullet to barrel fit is a little off, Rimfire bullets are around .221"-.223" and the bores are about .218". I have not confirmed this number in any of my guns however. Other than slightly sloppy accuracy you will have to worry a bit about what bullets you shoot, I've heard that just plain lead bullets can foul up the gas works, I use copper washed federal bulk pack in my AR (actually nearly all my guns)and have not experienced this problem with them. The rifle is touted as self cleaning but I run a bore snake down the tube about every 200 rounds of rim fire to keep things from building up.
Above -M261 conversion- Just swap out with your center fire bolt. I put a thin film of small arms weapons lube on the chamber insert so that clean up is a simple wipe down with a shop rag. And my AR chamber gets hit with a chamber mop.


Below- The M261 conversion uses special 10 round magazine inserts that can go into standard 20 or 30 round magazines. You simply push the follower down in the magazine and slide the magazine in place. The spring tension keeps the mag seated in place.


I've used two lesser quality 30 round magazines for dedicated M261 magazines and keep them marked as such so I know what I'm grabbing when I put stuff together for the range. These mag conversions have worked very well for me. I wouldn't eject them (the magazines) from the gun while standing though, That could be detrimental to their service life if done frequently I imagine. Keep this in mind if you're into tactical training.The only draw back is there is no bolt hold open so if I practice rapid fire strings I can't drop the bolt on the 8 round magazine, I have to charge it. Black dog machine makes aftermarket 10 round and high cap magazines which from the reports work very well. The black dog mags are also on sale on their website at the time of this writing (I have no affiliation with the company). Since I'm only using my M261 to teach AR-15 familiarization to my students (not sure what else to call them) and to work on my high power position and get some practice indoors I'll stick with the two steel mags I have. I feel one important role I have in the firearms culture is to familiarize people who are new and willing to learn with firearms they are most likely to come across or own. Above- Installed with magazine in place. The bolt hold open/release does work but the bolt will not lock back on the last shot. As you may be able to tell the bolt locked back is not far enough back to pick up a round upon its release, so the weapon must be charged prior to use.

Though there are other conversions units for the AR/M-16 family I'll stick with my M261 for several reasons. It's in use by the military so surplus parts will be available on the surplus market if I need them. And it is not a proprietary design with only one source of parts and service like you may get with some other units. Olympic arms commercially makes this unit and supplies parts at a very reasonable price (I've ordered a chamber insert from them as the first one I had was cracked which happens after so much ammo is sent down range). Sarco inc also has parts but they are priced more than Olympic arms which are new and from a known source. This unit has been out for a while and the military service manual is online in PDF for free which I downloaded and printed off. If you find any conversion unit for a song I would suggest getting it if you want cheap practice with your AR-15 type rifle. Its a great way to practice indoors with your AR-15, though if the lack of accuracy is going to bother you then I would recommend getting a dedicated upper which has an appropriate .22 RF chambered barrel and still uses the same basic bolt design you see in the M261 conversion. This option would be a good way to go if you planned on shooting it more often than not. If you are already happy with your 10/22 rifle or other rimfire rifle and are thinking about a conversion unit I would suggest spending the money on more ammo instead. The unit works well to get familiarization across to beginners in how to handle a magazine fed semi automatic rifle. It would work well for small game hunting but not to any great distances, it would behoove you to have a proper .22RF rifle for that. I do not have pictures of any targets shot for accuracy but I will post some at the end of the week when I get to the range again.


Friday, December 4, 2009

Dura coat paint

This one will be a short post. I've applied Dura Coat to a 1911 slide of mine as well as a M4 I'm working on assembling (proper word in lieu of "building"...AR's are model kits for adults)...yeah I'll post about the M4 later still working on the write up. Anyways for any of you who have thought about trying out Dura coat I highly recommend trying it out...its rather easy to apply and mix. I used a cheap air brush to put it on and it dried fairly quickly. I really like it because I didn't have to blast the AR rec prior to applying it. We'll see how durable it is in the years to come but it seems ok for now.